


Hooray! Guess who got their hands on the latest and greatest from Nerf? Yep that's right kids, I managed to grab a Rampage and a Retaliator. We'll only be looking at the Rampage today, but rest assured that it's brother won't be too far behind.
Not yet officially released, and by that I mean you can buy it from an assortment of stores in the US but Nerf is still saying that they'll be here in October, the Rampage is the Elite variant of the old N-Strike Raider. The shell looks like it's just another repaint, but it's the internals and the new darts that we're all really interested in. This is because Nerf has apparently listened to it's fan base and managed to cram a direct plunger system into the old Raider shell, all while retaining that brilliant clip loading, slam-firing action we all love. But enough on the blaster, lets get to it!
_______________________________________________________________________
Tools/Materials required...
Phillips head screwdriver
Drill and assortment of drill bits
Long round hand file
_______________________________________________________________________
See how new it is, it's still in box!

Opened box.

The blaster itself.

Just like the Raider before it, you have to attach the mag well.

Like so.

Ok, time to kick off proper.

Start by removing the end cap. It's held on by two screws.

Then the priming handle.

It's held on by five screws. It's probably worth noting at this point that all the screws in this blaster are the same, so no need to remember which one goes where.

With that in mind, we can remove the rest of the screws from the shell.

These internals are not like those you've seen before. Really do take the time to have a good look around at this stage and figure out how it all works.


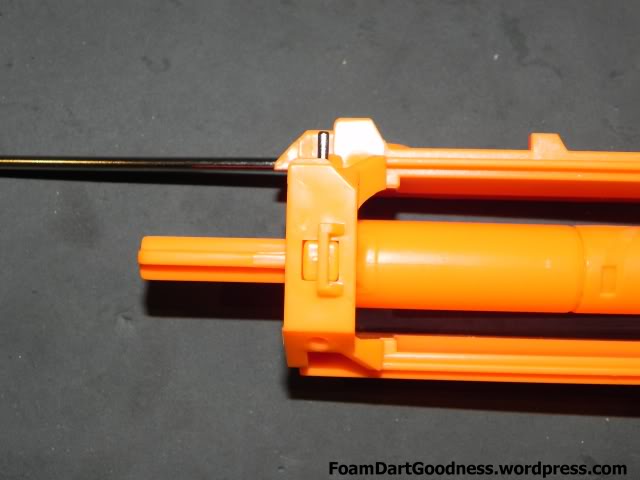
Interestingly if you look here, you'll notice that the breech isn't all the way closed. This is because the dart door is sprung much harder than in other blasters and actively forces the breech back a little.

However, when you prime the blaster or simply pull the priming handle all the way forward, it will fully close.

Ok, lets continue with the dis-assembly.

Remove the trigger and the dart holder.

Then the front barrel.

Like so.

Take the spring out.

Then the whole breech and plunger assembly should come out in one piece.

Like so.

Pop the catch off the back.

Then pull the breech out the front of the plunger.

The only Air Restrictor (AR) is in this front part of the breech.

These four little nubs hold the spring in place, which in turn forces the AR forward. When air rushes forward it pushes the AR back against the spring, allowing air to pass through to the dart.
We instead want a clear path.

Grab something small (nail, screwdriver, what ever fits) and push the bolt sled pin all the way though.
Allowing you to separate the breech from the bolt sled.

Start from the back of the breech with a small drill bit to get yourself a pilot hole, then move in with a larger bit to destroy the AR. I used a 3mm and then a 9mm bit, but whatever works for you should be fine. Once you're done, it should look like this.

The spring and dart peg should fall out intact.

Then move in with you hand file and clean up the remaining dags.

Same view from the front.

The plunger itself already has a perfect seal form factory, so no need to mess around there. We'll instead cut straight to reassembly.

Insert the breech back in the plunger tube.

Place the whole assembly back in the blaster.

Replace the catch. It has a cutout on one side; that side should be facing forward.

Slide the spring back in place.

Move up to the front of the blaster.

Replace the barrel, then the front piece. It needs to go with the two pegs facing down.

Like so.

Put the trigger and dart holder back in place.

Almost done!

Put the other half of the shell back on and screw it in place.

Replace the priming grip.

Finally, replace the end cap and we're done. One AR'd Rampage.

Range testing for this one was done between rounds at an inside game, so zero external influences. Unfortunately, I forgot to take any elite darts with me to that game so we're stuck with streamline ranges.
Stock - 11m average with an 8-12m spread
AR'd - 14m average with a 12-16m spread
Not yet officially released, and by that I mean you can buy it from an assortment of stores in the US but Nerf is still saying that they'll be here in October, the Rampage is the Elite variant of the old N-Strike Raider. The shell looks like it's just another repaint, but it's the internals and the new darts that we're all really interested in. This is because Nerf has apparently listened to it's fan base and managed to cram a direct plunger system into the old Raider shell, all while retaining that brilliant clip loading, slam-firing action we all love. But enough on the blaster, lets get to it!
_______________________________________________________________________
Tools/Materials required...
Phillips head screwdriver
Drill and assortment of drill bits
Long round hand file
_______________________________________________________________________
See how new it is, it's still in box!
Opened box.
The blaster itself.
Just like the Raider before it, you have to attach the mag well.
Like so.
Ok, time to kick off proper.
Start by removing the end cap. It's held on by two screws.
Then the priming handle.
It's held on by five screws. It's probably worth noting at this point that all the screws in this blaster are the same, so no need to remember which one goes where.
With that in mind, we can remove the rest of the screws from the shell.
These internals are not like those you've seen before. Really do take the time to have a good look around at this stage and figure out how it all works.
Interestingly if you look here, you'll notice that the breech isn't all the way closed. This is because the dart door is sprung much harder than in other blasters and actively forces the breech back a little.
However, when you prime the blaster or simply pull the priming handle all the way forward, it will fully close.
Ok, lets continue with the dis-assembly.
Remove the trigger and the dart holder.
Then the front barrel.
Like so.
Take the spring out.
Then the whole breech and plunger assembly should come out in one piece.
Like so.
Pop the catch off the back.
Then pull the breech out the front of the plunger.
The only Air Restrictor (AR) is in this front part of the breech.
These four little nubs hold the spring in place, which in turn forces the AR forward. When air rushes forward it pushes the AR back against the spring, allowing air to pass through to the dart.
We instead want a clear path.
Grab something small (nail, screwdriver, what ever fits) and push the bolt sled pin all the way though.
Allowing you to separate the breech from the bolt sled.
Start from the back of the breech with a small drill bit to get yourself a pilot hole, then move in with a larger bit to destroy the AR. I used a 3mm and then a 9mm bit, but whatever works for you should be fine. Once you're done, it should look like this.
The spring and dart peg should fall out intact.
Then move in with you hand file and clean up the remaining dags.
Same view from the front.
The plunger itself already has a perfect seal form factory, so no need to mess around there. We'll instead cut straight to reassembly.
Insert the breech back in the plunger tube.
Place the whole assembly back in the blaster.
Replace the catch. It has a cutout on one side; that side should be facing forward.
Slide the spring back in place.
Move up to the front of the blaster.
Replace the barrel, then the front piece. It needs to go with the two pegs facing down.
Like so.
Put the trigger and dart holder back in place.
Almost done!
Put the other half of the shell back on and screw it in place.
Replace the priming grip.
Finally, replace the end cap and we're done. One AR'd Rampage.
Range testing for this one was done between rounds at an inside game, so zero external influences. Unfortunately, I forgot to take any elite darts with me to that game so we're stuck with streamline ranges.
Stock - 11m average with an 8-12m spread
AR'd - 14m average with a 12-16m spread


