Oz Nerf - Australian Nerf Community

Would you like to react to this message? Create an account in a few clicks or log in to continue.
Oz Nerf - Australian Nerf Community

Nerfing down under!. Oz Nerf - Australian Nerf Community

If you're new to the forums please do the following.
1. Read the Forum Rules before posting!
2. Update your location, age and avatar TRUTHFULLY
3. Introduce yourself in the Welcome to Oznerf forum section =)

Navigation

Statistics

Our users have posted a total of 52416 messages in 3425 subjects

We have 1922 registered users

The newest registered user is seabulb

Latest topics

» gold coast nerf war?
by ShaGGz LMS Fri Oct 07, 2016 3:49 pm

» nerf clearout
by Runeblade Wed Sep 07, 2016 7:03 am

» How to replace the Longshot trigger plate?
by neon64bit Mon Jan 04, 2016 9:42 am

» Mid North Coast/Hunter War Organisation
by Vampros Thu Dec 31, 2015 6:18 pm

» WTB felt for slugs
by Richo123 Sat Oct 24, 2015 6:21 am

May 2024

MonTueWedThuFriSatSun
  12345
6789101112
13141516171819
20212223242526
2728293031  

Calendar Calendar


+9
Swatsonia
makeitgo
bulletproofvest
TheBradl3s
Akimbo Assassin
RL
mister_elliott
Xoenz
clunk07
13 posters

    CWC Bum-trooper Tutorial

    clunk07
    clunk07
    Administrator
    Administrator


    Posts : 2953
    Join date : 2011-02-02
    Age : 44
    Location : Blackwater, Queensland

    CWC Bum-trooper Tutorial Empty CWC Bum-trooper Tutorial

    Post  clunk07 Wed Aug 03, 2011 1:37 pm

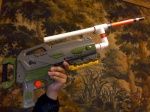
    Hey, somehow managed to finish this in between commissions. Has been a fair bit of work involved, and still a bit left in the cosmetic's dept. So, without further delay, I present the:

    BUM-TROOPER


    Tooling:

    Rotary tool with sanding, grinding and cutting wheel attachments
    Drill and drill bits
    Hot glue gun
    Basic modding tool kit

    Materials:

    BBUMB tank, valve/trigger attachment with connecting rod, and pump tube
    Alpha Trooper shell and trigger w/spring
    Vinyl tubing
    Aluminium sheeting
    3 x 10mm bolts, 50mm long, with nuts
    Barrel material/coupler of choice
    Sports/ball pump
    25mm PVC pipe
    25mm PVC endcap
    JB Weld or similar
    Barbed air fitting (brass or nylon)

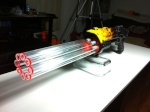
    First off, we'll start by doing a tank expansion to the BBUMB air tank. Remove the tank from the blaster, keeping the orange piston attachment, and connecting rod.

    Remove the stock pump, and cut a piece of 25mm PVC long enough to protrude about 20mm past the pump tube. Place this pipe over the pump tube, and secure it with JB Weld, and glue the PVC endcap on as well. Now set it aside to cure. Once the new tank expansion has fully cured, pick a place to insert the barbed air fitting. Drill the corresponding sized hole, insert the fitting, and glue in place with your adhesive of choice. I would recommend either 72-hr Araldite or JB Weld.

    Cut the original barrel off the front, fairly close to the tank, and add your coupler. And that's the tank expansion completed.

    CWC Bum-trooper Tutorial Dsc_0813

    Next, open up the AT, and remove everything except the trigger and spring. You'll need to gut the shell for the BBUMB tank to fit. I just used a Dremel with grinding stone, and most of the plastic came out fairly quickly. This will take a bit of time, with test-fitting, but it's a fairly simple task. You'll also need to cut the shell, to allow the bulb tank to fit, and also for the tank expansion to sit outside of the shell, where the stock would normally attach. Once you're happy with the placement of the tank, glue it in place with hot glue or similar. (I had run out of hot glue, and was unable to source any locally, so I've used sikaflex, which was all that I had lying around.)

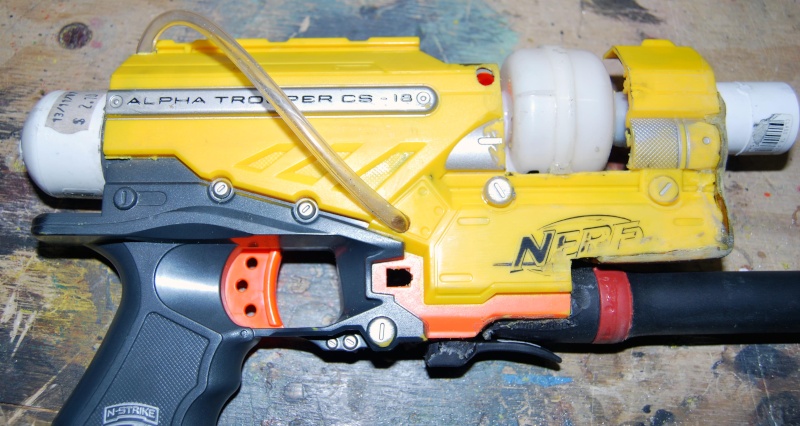
    Once that is completed, mark out where you want your pump to fit, and cut the AT shell to suit. Secure the pump in place with some strong adhesive, as it will need to be fairly solid, so it doesn't dislodge during priming. I had wanted the vinyl tubing to be external, so I cut some of the tac rail out to allow the air fitting clearance, and drilled a hole through the side of the shell for the vinyl tubing to connect from pump to tank. You would have no issues doing this internally though. Glue the vinyl tubing in to the pump, and connect it to the tank.

    I had originally planned on using the AT shotgun grip to prime the pump, but it just didn't feel comfortable, with the pump handle underneath. If you wanted to do this though, you could use some polycarb or similar, to cover the entire SG grip and pump handle, which would make it much more ergonomic.

    So, I cut the shell down, allowing the conduit coupler to protrude a little bit. I then cut some plastic to fill in the big gaps from the shell butchery, and plastic-welded them in place. This is entirely for aesthetic's, but does add another attachment point for the coupler, making the barrel more stable.

    CWC Bum-trooper Tutorial Dsc_1110

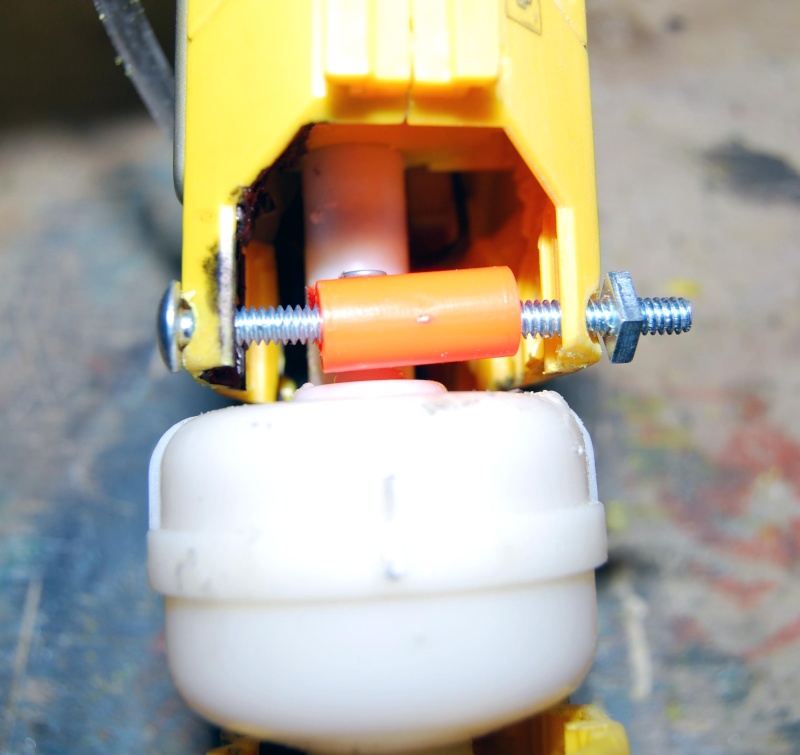
    I connected the orange BBUMB piston attachment to the trigger of the AT, using the original connecting rod, shortened, and bent to shape. Drill a small hole in the top of the trigger for the rod. Make sure though, that the trigger is completely released, and the piston is closed, when measuring for the length of the rod. If the trigger won't allow the piston to fully close, the air tank won't seal, and obviously won't fill with air.

    CWC Bum-trooper Tutorial Dsc_1111

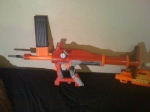
    This shows the external vinyl tubing, and the cuts required for the bulb air tank to fit.

    CWC Bum-trooper Tutorial Dsc_1112

    Drill a hole on either side of the shell, in-line with the orange trigger attachment. Use one of the bolts to secure it in place.

    CWC Bum-trooper Tutorial Dsc_1113

    CWC Bum-trooper Tutorial Dsc_1114

    To finish-off, I bent a piece of aluminium sheeting, and secure it in place with the final 2 bolts. Purely for aesthetic's.

    CWC Bum-trooper Tutorial Dsc_1115

    I've used 30cm of 20mm conduit, with petg nested inside for my barrel, and a short piece of 25mm conduit for the coupler. A couple wraps of e-tape around the 20mm conduit makes the barrel a very snug fit in the 25mm coupler/conduit.

    The dual-action ball pump I've used, takes around 15 pumps to completely fill the tank. Using heavy sili-tips on inf0rm3r's blue foam, ranges are:

    385 feet on average, at approximately 30 degree angle.

    I ran out of daylight to perform a flat range test, but I'll try to get that done in the next couple of days.

    Cheers,


    Last edited by clunk07 on Thu Jan 31, 2013 2:33 am; edited 2 times in total
    Xoenz
    Xoenz
    Donator
    Donator


    Posts : 538
    Join date : 2010-12-30
    Age : 26
    Location : Liverpool, NSW

    CWC Bum-trooper Tutorial Empty Re: CWC Bum-trooper Tutorial

    Post  Xoenz Wed Aug 03, 2011 1:39 pm

    Oh dear god.


    lol.

    Goodjob?
    clunk07
    clunk07
    Administrator
    Administrator


    Posts : 2953
    Join date : 2011-02-02
    Age : 44
    Location : Blackwater, Queensland

    CWC Bum-trooper Tutorial Empty Re: CWC Bum-trooper Tutorial

    Post  clunk07 Wed Aug 03, 2011 1:47 pm

    haha...

    While it mightn't have the ranges and flair of a TitMav, it is alot more ergonomic to prime, and alot cheaper...


    And, yes, I probably do need professional help...

    Cheers,
    mister_elliott
    mister_elliott


    Posts : 327
    Join date : 2011-05-10
    Age : 35
    Location : Ipswich, QLD

    CWC Bum-trooper Tutorial Empty Re: CWC Bum-trooper Tutorial

    Post  mister_elliott Wed Aug 03, 2011 1:50 pm

    Holy mother of cthulu...
    RL
    RL


    Posts : 697
    Join date : 2010-09-27
    Age : 33
    Location : Sydney

    CWC Bum-trooper Tutorial Empty Re: CWC Bum-trooper Tutorial

    Post  RL Wed Aug 03, 2011 1:53 pm

    Are you gonna include this in the CWC commission list?
    Akimbo Assassin
    Akimbo Assassin


    Posts : 394
    Join date : 2010-09-16
    Age : 50
    Location : Sydney, NSW

    CWC Bum-trooper Tutorial Empty Re: CWC Bum-trooper Tutorial

    Post  Akimbo Assassin Wed Aug 03, 2011 1:55 pm

    Hehe, not sure I'll attempt this mod on my stock AT, a bit too hideous to my personal liking. Definitely need your superior painting skill to make it decent looking again, Clunk.

    What would be good is similar integration into a Longstrike, with smaller tank which only requires 3-5 pumps to achieve 150ft range, PLUS maintaining the clip-feed ability.
    clunk07
    clunk07
    Administrator
    Administrator


    Posts : 2953
    Join date : 2011-02-02
    Age : 44
    Location : Blackwater, Queensland

    CWC Bum-trooper Tutorial Empty Re: CWC Bum-trooper Tutorial

    Post  clunk07 Wed Aug 03, 2011 1:59 pm

    Yeh, I've got a few ideas planned for other integrations.

    This really started out as a research project to find a cheaper alternative to Titan/BBBB tanks, and it's been a fairly good success.

    It was an after-thought to put it in the AT shell, and I didn't really want all the hassles of making it breeched, even though it wouldn't be that hard to do, if you don't cut the shell down like I did.

    I've still got a lot of cleaning-up to do on the cosmetic's side, and a nice paintjob planned. Sure make it look something half-decent.

    This is really a tribute to gooni!!

    Cheers,
    Akimbo Assassin
    Akimbo Assassin


    Posts : 394
    Join date : 2010-09-16
    Age : 50
    Location : Sydney, NSW

    CWC Bum-trooper Tutorial Empty Re: CWC Bum-trooper Tutorial

    Post  Akimbo Assassin Wed Aug 03, 2011 2:07 pm

    clunk07 wrote:This is really a tribute to gooni!!

    Ah I see, Gooni, the guy with his Dreadnought and only speak 2-word sentences.

    Sorry Gooni, just teasing you.
    clunk07
    clunk07
    Administrator
    Administrator


    Posts : 2953
    Join date : 2011-02-02
    Age : 44
    Location : Blackwater, Queensland

    CWC Bum-trooper Tutorial Empty Re: CWC Bum-trooper Tutorial

    Post  clunk07 Wed Aug 03, 2011 2:10 pm

    haha - he's the master of air tank integrations!!

    Cheers,
    TheBradl3s
    TheBradl3s
    Moderator
    Moderator


    Posts : 512
    Join date : 2010-06-28
    Age : 28
    Location : The Awesome Adelaide!!!!!!! Rank: Goblin Welder

    CWC Bum-trooper Tutorial Empty Re: CWC Bum-trooper Tutorial

    Post  TheBradl3s Wed Aug 03, 2011 2:22 pm

    That thing is gnarly. I like it!

    - Brad
    clunk07
    clunk07
    Administrator
    Administrator


    Posts : 2953
    Join date : 2011-02-02
    Age : 44
    Location : Blackwater, Queensland

    CWC Bum-trooper Tutorial Empty Re: CWC Bum-trooper Tutorial

    Post  clunk07 Wed Aug 03, 2011 3:55 pm

    TheBradl3s wrote:That thing is gnarly. I like it!

    - Brad

    haha, thanks mate. Still a WIP, but I'm fairly satisfied with it!!

    Cheers,
    bulletproofvest
    bulletproofvest


    Posts : 508
    Join date : 2010-05-29
    Age : 28
    Location : Adelaide Hills

    CWC Bum-trooper Tutorial Empty Re: CWC Bum-trooper Tutorial

    Post  bulletproofvest Wed Aug 03, 2011 4:03 pm

    This is so badass! WIP or not, it's awesome. Good job.
    makeitgo
    makeitgo


    Posts : 161
    Join date : 2011-04-04
    Location : Ottawa, Ontario, Canada

    CWC Bum-trooper Tutorial Empty Re: CWC Bum-trooper Tutorial

    Post  makeitgo Wed Aug 03, 2011 6:56 pm

    Nice job. I have plans to do something similar with my Recon.

    385 feet does seem kind of suspect though. Even at a 30 degree angle. According to some quick calculations, that's over 250 feet flat.

    Although I don't doubt that it fires very hard and far, hitting almost 400 feet (even angled) is quite unbelievable.

    It would be nice to see/hear some flat ranges to confirm.

    I myself have had "lucky shots" but I take the averages as opposed to the 'one' that got huge range.

    Otherwise, great job.

    RL
    RL


    Posts : 697
    Join date : 2010-09-27
    Age : 33
    Location : Sydney

    CWC Bum-trooper Tutorial Empty Re: CWC Bum-trooper Tutorial

    Post  RL Thu Aug 04, 2011 8:45 am

    Hey clunk, do you reckon if I sent you an AT shell and a BBUMB tank, would you be willing to do a commission for me?
    Swatsonia
    Swatsonia


    Posts : 457
    Join date : 2010-07-20
    Age : 30
    Location : Willeton, Perth, WA

    CWC Bum-trooper Tutorial Empty Re: CWC Bum-trooper Tutorial

    Post  Swatsonia Thu Aug 04, 2011 8:52 am

    This thing made my eyes feel dirty.

    Besides that, it's an excellent concept.

    And with that tank size, I can imagine it hitting those ranges.

    And stop being so slack, make your next one to use a clip breech.

    False
    False


    Posts : 253
    Join date : 2010-04-25
    Age : 25
    Location : Gold Coast, Queensland.

    CWC Bum-trooper Tutorial Empty Re: CWC Bum-trooper Tutorial

    Post  False Thu Aug 04, 2011 9:08 am

    Hey clunk, another question:

    CWC Bum-trooper Tutorial Untitl10

    Just a bit unsure...

    (Also, I'm not familiar with paint so don't mind the large white bit next to the picture. Aaaand, the picture is not mine, I found it on Foam Universe)
    chiiia
    chiiia


    Posts : 158
    Join date : 2011-07-17
    Age : 25
    Location : Wheelers Hill, Victoria

    CWC Bum-trooper Tutorial Empty Re: CWC Bum-trooper Tutorial

    Post  chiiia Thu Aug 04, 2011 9:30 am

    Clunk, would it be logical if the original AT front bit with the cocking mech was there, so like you would pump up the blaster with the cocking mech?
    clunk07
    clunk07
    Administrator
    Administrator


    Posts : 2953
    Join date : 2011-02-02
    Age : 44
    Location : Blackwater, Queensland

    CWC Bum-trooper Tutorial Empty Re: CWC Bum-trooper Tutorial

    Post  clunk07 Thu Aug 04, 2011 2:50 pm

    Where to start...

    @MIG - The tank size is fairly close to a Titan, and mine hits over 450 ft angled with heavy stinger's. I've been in this game long enough to know to use averages, and pretty sure I stated that it was an avg range. If the tank expansion was attached to the main tank with a larger tube, I'm sure it would get Titan ranges. And, still, I'm unsure of any calculation you could perform to convert angled to flat without knowing the weight of the dart. But, anyway, like I said, I did some flat tests today, and it hits approx 210 ft average, give or take a few feet. For the money spent on it, the result's are quite good with a 12" barrel. Anything longer, and the range dies off a fair bit.

    Regardless of range, it's still not as funky as you're crutches version!! haha

    @2120 - yeh mate, I'd take it on as a commission. Fairly busy at present, but it's definitely something I'd look at in a month or so, if you were still interested then. Flick me an email to: clunkweaponsco@hotmail.com, and we'll see what we can organise.

    @Swat - haha mate, it's not that bad on the eyes, really?!? It will look better with a paint job and some detailing, but that won't be happening for a while yet. As for being clip-fed, this was mainly just research for a replacement Titan tank, and I whacked it in the AT shell because the BBUMB shell is crap imo. Wouldn't be hard to do though, and something that I may re-visit in the future. But, for now, there's a few other project's I'm waiting to get started on, so a clip-fed bum-trooper will have to go on the back-burner. I'm sure someone else will do it before I even get a chance.

    @False - just cut-down the small tubing that connects the pump tube to the air tank. Probably somewhere near where the green box is in your drawing. Do not cut it anywhere near those red lines, it's not required. If you're still a little unclear, I can probably do a paint drawing for you. Virtually, all you're doing is shortening the small tube from the pump to the tank.

    @Chiiia - if you read the tutorial properly mate, you'd see that was my original reason for mounting this in an AT. But, the grip felt terribly uncomfortable with the pump handle attached to it. If I had some poly-carb spare, I would have moulded a cover around the stock priming grip and pump handle, and it would have been fine. Admittedly, I do like this being a short pistol.

    Cheers,
    chiiia
    chiiia


    Posts : 158
    Join date : 2011-07-17
    Age : 25
    Location : Wheelers Hill, Victoria

    CWC Bum-trooper Tutorial Empty Re: CWC Bum-trooper Tutorial

    Post  chiiia Thu Aug 04, 2011 3:09 pm

    Ah I see Clunk, that's fair enough, I guess I was just reading this in the morning on my phone and I must have missed that part.
    False
    False


    Posts : 253
    Join date : 2010-04-25
    Age : 25
    Location : Gold Coast, Queensland.

    CWC Bum-trooper Tutorial Empty Re: CWC Bum-trooper Tutorial

    Post  False Thu Aug 04, 2011 11:24 pm

    Okay, I think I know what you mean, but if it's not too much of a hassle can you do that quick little paint drawing?

    Also, I currently don't actually have a BBUMB (I was hoping to get one on the weekend to do a simple plug, RSCB and put it all in another shell as I think the BBUMB shell is a bit ugly, but this tank expansion looks pretty interesting), so I can't really study the internals up close in person, only look at pictures.
    Swatsonia
    Swatsonia


    Posts : 457
    Join date : 2010-07-20
    Age : 30
    Location : Willeton, Perth, WA

    CWC Bum-trooper Tutorial Empty Re: CWC Bum-trooper Tutorial

    Post  Swatsonia Fri Aug 05, 2011 3:49 am

    Clunk:

    I meant the inside of the shell. Externally, it's fine.

    Also, you make me ghetto happy.
    clunk07
    clunk07
    Administrator
    Administrator


    Posts : 2953
    Join date : 2011-02-02
    Age : 44
    Location : Blackwater, Queensland

    CWC Bum-trooper Tutorial Empty Re: CWC Bum-trooper Tutorial

    Post  clunk07 Fri Aug 05, 2011 3:53 am

    Hey False,

    Cut the tube somewhere around the green line, and discard the rest of the tube (coloured red):

    CWC Bum-trooper Tutorial Img_0310


    @Swat - yeh, the joys of living in a rural area, and having to order most of my modding supplies online... Just for the record, it wasn't much fun using the sikaflex either.. haha

    Cheers,
    makeitgo
    makeitgo


    Posts : 161
    Join date : 2011-04-04
    Location : Ottawa, Ontario, Canada

    CWC Bum-trooper Tutorial Empty Re: CWC Bum-trooper Tutorial

    Post  makeitgo Fri Aug 05, 2011 5:12 am

    The calculations I did are very rough approximations and are by no means accurate. I know math gives you a headache so I'll try to keep it simple.

    Mass is irrelevant since it's the same no matter what angle it's fired from.

    Theoretically, 45 degrees would give the maximum range of any projectile (optimal conditions). Since you fired at ~30 degrees. That's only 67% of the maximum range (30/45 = 66.667%). If 385' is only 67% of the Maximum range, that would put the maximum range at 575 feet.

    Any projectile fired at 45 degrees, theoretically doubles the range of the same projectile fired flat.

    Therefore, 575' divided by 2 would be the theoretical flat range: 287.5 feet!!!

    This of course is theoretical mathematics calculated in a vacuum.

    Initially I did all of this in my head which is why this number is off from the one I posted earlier.

    But you can see why, I was skeptical.

    However, if your estimated angle of 30 degrees was off and for arguments sake it was actually closer to 40 degrees,using the same calculations above that would put the flat range at 216'. Which is pretty close to what you actually got.

    If it was actually 45 degrees you fired at, 385' would have been the max. Divided by 2 gives 192.5'

    So between 40 and 45 degrees a mathematical flat range can be calculated to be between 192.5 and 216 feet. Which is an average of 204.25 feet.

    Pretty close to what you found.

    Which leads me to believe that your estimated angle of 30 degrees was probably actually much closer to 40 degrees. Maybe even 42 degrees.

    Hopefully your brain didn't explode.

    Anyway, my 'Hop-A-Long' is no more. The crutches were a loaner and I gave them back some time ago. I kept the BBUMB internals which is what I'm planning to put it in my Recon shell (from a failed earlier project). It will probably look a lot like what you did with the AT but I'm planning on making it breeched to accept clips.


    clunk07
    clunk07
    Administrator
    Administrator


    Posts : 2953
    Join date : 2011-02-02
    Age : 44
    Location : Blackwater, Queensland

    CWC Bum-trooper Tutorial Empty Re: CWC Bum-trooper Tutorial

    Post  clunk07 Fri Aug 05, 2011 7:31 am

    haha MIG, maths doesn't give me a headache mate, I use it every day as a boiler-maker. Physic's though, that's a whole different story...

    I've had a mate check the firing angle, and it's pretty close to 30 degrees, but anyway, angled is angled, and I have a flat range now, so all is good.

    Cheers,
    mister_elliott
    mister_elliott


    Posts : 327
    Join date : 2011-05-10
    Age : 35
    Location : Ipswich, QLD

    CWC Bum-trooper Tutorial Empty Re: CWC Bum-trooper Tutorial

    Post  mister_elliott Fri Aug 05, 2011 2:32 pm

    makeitgo wrote:This of course is theoretical mathematics calculated in a vacuum.

    I still think air resistance is too big a thing to disregard. Boltsniper did some pretty intense maths regarding ranges, angles and air resistance. Highly recommended reading for the nerf physics head.

    Having handled an AT today for the first time makes this mod alot more impressive. With a comfy ball pump handle and super light weight, this thing would be ergonomic deliciousness.
    clunk07
    clunk07
    Administrator
    Administrator


    Posts : 2953
    Join date : 2011-02-02
    Age : 44
    Location : Blackwater, Queensland

    CWC Bum-trooper Tutorial Empty Re: CWC Bum-trooper Tutorial

    Post  clunk07 Fri Aug 05, 2011 4:02 pm

    Having had not much experience with physic's, I'm still surprised that the weight of the dart doesn't come in to play. Surely, a heavier dart must create more drag, causing the projectile to drop faster..

    But, anyway, I'm fairly certain this thread won't become a physic's debate (due to my evil admin powers... ).

    It is very ergonomic, another reason why I wasn't too concerned about cutting off the front section. It's ultra-compact, and even fits in my new holster. With a proper OPV, it could even be war-legal, as a Tertiary.

    Hell, with a bit of work to install a stock, it could even work quite well as a Primary...

    Cheers,
    False
    False


    Posts : 253
    Join date : 2010-04-25
    Age : 25
    Location : Gold Coast, Queensland.

    CWC Bum-trooper Tutorial Empty Re: CWC Bum-trooper Tutorial

    Post  False Mon Aug 15, 2011 2:21 pm

    Another question (I'm just interested in this, haha).

    What is the purpose of the barbed air fitting, does it have a one way valve inside it?

    And also where can you find one? Because I went looking for one in Bunnings but to no avail.

    clunk07
    clunk07
    Administrator
    Administrator


    Posts : 2953
    Join date : 2011-02-02
    Age : 44
    Location : Blackwater, Queensland

    CWC Bum-trooper Tutorial Empty Re: CWC Bum-trooper Tutorial

    Post  clunk07 Mon Aug 15, 2011 2:24 pm

    False wrote:Another question (I'm just interested in this, haha).

    What is the purpose of the barbed air fitting, does it have a one way valve inside it?

    And also where can you find one? Because I went looking for one in Bunnings but to no avail.


    It's just a cleaner way of attaching the air hose to the tank expansion, rather than just epoxying in the vinyl tubing.

    You can use brass/nylon fittings. You'll find the brass ones at stores that sell hydraulic fittings (eg: Enzed, HosePro, Pirtek etc etc), and the nylon ones at SuperCheap/AutoBarn etc etc (they're used for vacuum hoses, fuel lines and are generally "Champion" brand).

    Cheers,
    redcricket077
    redcricket077


    Posts : 629
    Join date : 2010-12-31
    Age : 27
    Location : SE Suburbs Melbourne

    CWC Bum-trooper Tutorial Empty Re: CWC Bum-trooper Tutorial

    Post  redcricket077 Wed Aug 17, 2011 10:19 am

    Awesome job Clunk, you get crazier every time lol
    boosted6
    boosted6


    Posts : 479
    Join date : 2011-03-06
    Age : 43
    Location : Melbourne

    CWC Bum-trooper Tutorial Empty Re: CWC Bum-trooper Tutorial

    Post  boosted6 Wed Aug 17, 2011 12:41 pm

    Nice work clunk.

    Would have been fun putting that tank in that little trooper.

    clunk07
    clunk07
    Administrator
    Administrator


    Posts : 2953
    Join date : 2011-02-02
    Age : 44
    Location : Blackwater, Queensland

    CWC Bum-trooper Tutorial Empty Re: CWC Bum-trooper Tutorial

    Post  clunk07 Wed Aug 17, 2011 1:39 pm

    Crazy, that's definitely on the money.. ha ha.

    Wasn't too hard fitting it in to the shell. A lot to cut out, but fairly easy with the right tools.

    Cheers,
    mister_elliott
    mister_elliott


    Posts : 327
    Join date : 2011-05-10
    Age : 35
    Location : Ipswich, QLD

    CWC Bum-trooper Tutorial Empty Re: CWC Bum-trooper Tutorial

    Post  mister_elliott Wed Aug 17, 2011 2:09 pm

    Right tools Schmight tools :p

    I'm doing an airtank integration and so far have completed:breech, old PVC coupler removal, shell butchering and pump removal using just pocket knife and pliers.

    *Poor*
    clunk07
    clunk07
    Administrator
    Administrator


    Posts : 2953
    Join date : 2011-02-02
    Age : 44
    Location : Blackwater, Queensland

    CWC Bum-trooper Tutorial Empty Re: CWC Bum-trooper Tutorial

    Post  clunk07 Wed Aug 17, 2011 2:45 pm

    I used pliers for most of the shell internals removal. Just cleaned it up with a dremel afterwards.

    Cheers,

    Sponsored content


    CWC Bum-trooper Tutorial Empty Re: CWC Bum-trooper Tutorial

    Post  Sponsored content


      Current date/time is Thu May 02, 2024 3:02 am