

In this tutorial you will learn how to remove the AR (Air Restrictor) from your Dart Tag Blaster.
Materials/Tools
1. Screw Driver (Phillips Head)(Preferably a thinner one)
2. Common Sense
3. Container to place your screws in
Most of you probably know how to remove the AR's of your dart tag blaster, but I've posted this up anyway as I bought 3 new sets and this will help fill up the directory as well as provide a detailed picture tutorial for those of us who are visual learners.
First of all, open up your gun by unscrewing all the screws and placing them aside in a safe place. Take the turret (Big orange/black thing) out, pull back the white piece of plastic with a spring behind it.

Next Step is to unscrew the screws in the turret as shown.

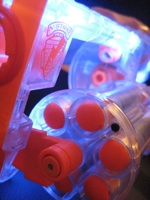
Below is what the turret should look like when you open it up.

The picture below shows you how your Air restrictors should be cut and which parts should be thrown away.

Place it all back together and screw all screws back into the turret.

Next place your turret back into the gun. Use the plastic to guide your way.

Before you put your gun back together it's a good idea to put the metal bar (Attached to the one of the two pieces of plastic which cock your gun) (Priming Bar) through the loop in the spring.

Now screw it all back together, and you have just added some range and the ability to use pretty much all types of foam projectiles in your Dart Tag Blaster
Materials/Tools
1. Screw Driver (Phillips Head)(Preferably a thinner one)
2. Common Sense
3. Container to place your screws in
Most of you probably know how to remove the AR's of your dart tag blaster, but I've posted this up anyway as I bought 3 new sets and this will help fill up the directory as well as provide a detailed picture tutorial for those of us who are visual learners.
First of all, open up your gun by unscrewing all the screws and placing them aside in a safe place. Take the turret (Big orange/black thing) out, pull back the white piece of plastic with a spring behind it.
Next Step is to unscrew the screws in the turret as shown.
Below is what the turret should look like when you open it up.
The picture below shows you how your Air restrictors should be cut and which parts should be thrown away.
Place it all back together and screw all screws back into the turret.
Next place your turret back into the gun. Use the plastic to guide your way.
Before you put your gun back together it's a good idea to put the metal bar (Attached to the one of the two pieces of plastic which cock your gun) (Priming Bar) through the loop in the spring.
Now screw it all back together, and you have just added some range and the ability to use pretty much all types of foam projectiles in your Dart Tag Blaster