

I can’t claim this write-up to be entirely my doing, as I have basically just taken it from the Nerfhaven forum threads: DecietfulSteve’s ‘Easy Recon Trigger Mod’ and ‘Adding Another Spring to the Recon’, Analogkid’s ‘Nerf Recon Spring Fix’; and a Youtube video by Thesullos called “How to Mod Your Recon CS 6” which dealt with removing the air restrictor via powerdrill. So I consider this more of a compendium of (mostly) useful mods for the Recon plus guide and pictures. It's also my first post here, quite chuffed to find an Aussie Nerf forum.
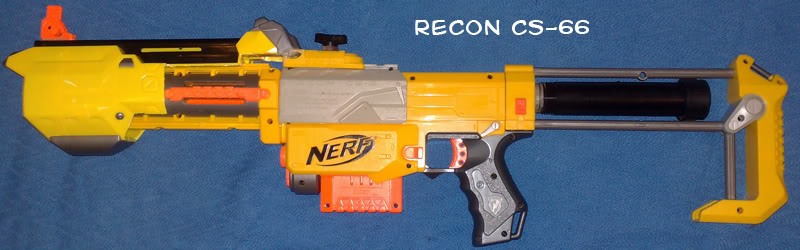
The only issue I have with the various shotgun mods I’ve seen for the recon in various forums is that it makes the recon either REALLY hard to get apart, they prevent you from ever using the front barrel on it’s own, or it’s not able to be removed quickly. I then set out to find the best way to have a shotgun mod that can be removed in about 10 seconds with no tools, yet still perfectly functional and strong. I call it the Recon CS-66.
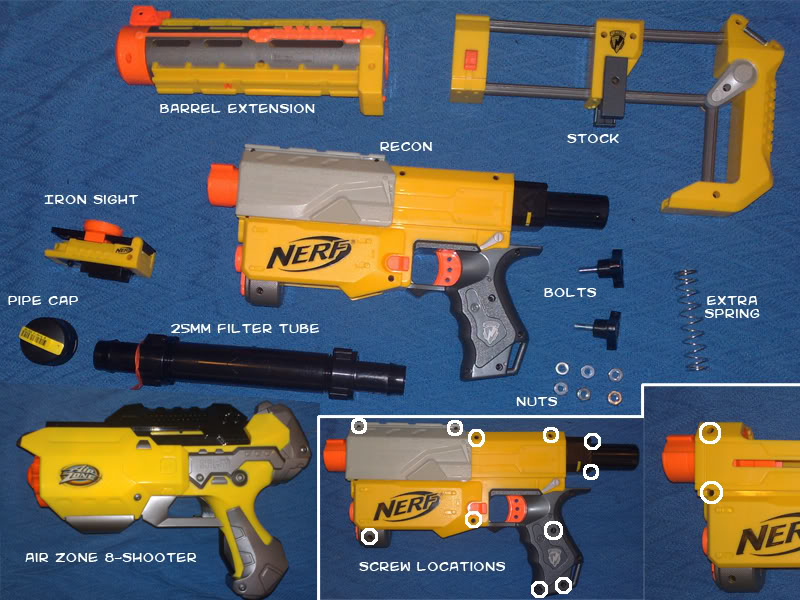
Items you’ll need:-
Recon
Recon barrel extension
Recon Stock
Recon ‘Ironsight’
Air Zone ‘8-shooter’ or other appropriate gun (AZ8)
25mm In-Line Filter
Pipe Cap (for filter tube)
Extra Spring (must fit in filter tube)
2 x 1/4” Hex Nuts
Bolt to fit 1/4” Hex Nuts
Short length of wire
Tools you’ll need:-
Power Drill / Dremel (Or patience and a file / sandpaper)
Phillips head screwdriver
Epoxy putty / good bonding agent (I used No More Nails or NMN)
Electrical Tape
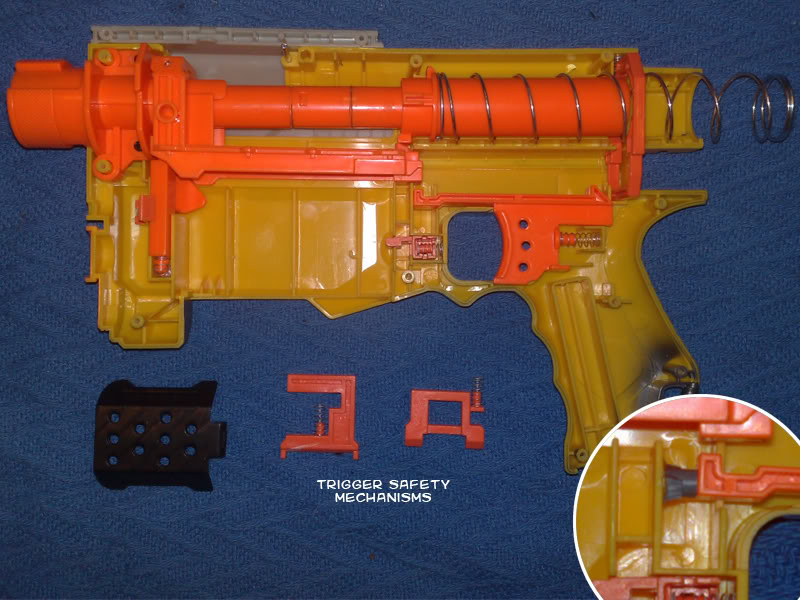
Righty, first up you’ll need to disassemble the Recon. Take out all the screws and don’t forget the two screws under the slide as well as the two screws that hold on the black casing at the rear of the gun. When you pull the gun apart make sure to keep an eye on the orange piece that sits in the slide as there’s a spring in there that might be useful to keep (might…. You never know…).
Once the gun is in two halves feel free to remove the two parts that sit in front of the trigger. One prevents you from being able to fire the gun while the slide is still cocked and the other prevents you from loading a magazine unless the slide is cocked, they’re useful for safety reasons, but otherwise annoying. Also remove the black cover on the top of the gun as you don’t really need it and if you do get a jam, I find it gets in the way. Next up we’ll want to find a small piece of plastic / wood / metal / etc. to place in front of the trigger to shorten the draw distance. This is more personal taste than anything else, but I think it feels better. I used a 5mm piece of plastic off of a Warhammer sprue and glued it on with NMN.
Next remove the inner barrel / pump mechanism. Watch out for the spring that holds the locking panel in place. Once removed, separate the barrel section from the pump section. Take the wire and wrap it around the pump casing between 1/2” and 1”. Might need to experiment with spring compression for best results. When done wrap a few layers of E Tape around it to keep it in place.

Take the barrel and using a nail / pin / really small allen key remove the metal pin connecting it to the frame. Take barrel and put in vice (I held it, but gave myself blisters when the Drill bit stuck, so I recommend a vice) and fit a medium sized drill bit to the powerdrill/dremel. Try to snap off the AR’s prong first, then use the drill to hollow out the barrel. There is a spring in there, and a nice big thick bit of plastic, but if you don’t rush it, it should only take a couple of minutes and the barrel will be nice and clear.
Next I took a small amount of cellophane tape and positioned it inside the barrel over the small hole. I put a small bit of NMN in the hole and after it had dried (24 hours) put a piece of tape over the outside of the hole.
Cut off the end of the black back casing about 1/4” from the end with the C shaped hole. Turns out that the 25mm filter tube fit perfectly over the casing. It fit so well that had the casing not had any grooves on it, it would have held incredibly well with just tape. But Just to make sure, I NMN’d it. I took the plunger tube out of the AZ8 to use as a filler as the spring from the wii was just too damn short for the entire length of tube, but I’ll keep looking for a decent spring, so wanted the space able to hold something larger. I’ll update if I find any better springs. The rear assembly should now look a little like so (exploded view).

Where that little orange piece sat on top of the slide is where we’re going to put the Hex Nut. Dremel / cut out the shape of the nut and NMN it to one side only. Preferably the right side as it has a little tab for it to sit on. This will enable you to open up the recon for maintenance in the future so don’t glue it to both sides unless you’re sure you’ll never open it up again.

For the Shotgun grip I was originally going to just use some PVC pipe, but I went out looking for another spring, couldn’t find an NF anywhere (damn HvZ) so ended up buying an Air Zone 8-Shooter, which boasted a 25ft range. HA! 25ft angled… maybe. Anyway, the spring was crap but the body was perfect for the grip. As it was a maverick-style 8-shot pistol it had a really wide circular front end which when all the internals were removed / Dremeled out fit around the barrel extension like a dream.
Take the ironsight, unscrew it and remove everything that isn’t the yellow casing. Then dremel the ‘bottom’ of it to be able to move up and down the rails on the gun’s slide. It takes a bit of experimentation but shouldn’t take too long.

Next you’ll want to Dremel out the little bars that sit between the outer part of the rails and the base of both the slide and top part of the barrel extension. All they do is stop the tactical light, ironsight, or whatever addition that uses the rails from sliding back too far, and little notches help lock the extensions in place. We want to get rid of the slide’s one as it gets in the way of the shotgun attachment point and get rid of the barrel one as it gets in the way of the sliding motion of the grip.
Put the Recon back together but without any of the main springs. You want the trigger assembly, internal barrel and plunger setup all inside. Now cock the gun and leave it in the cocked position (don’t move the slide forward) Attatch the ironsight base to the slide and place the AZ8 shell over the barrel extension, pulling it back so it touches the ironsight. You have to make sure the AZ8 shell has no less than a 1/2” gap between it and the main body of the recon when the gun is fully cocked. Any less and it can prevent the gun from cocking properly.
Now you can either cut the AZ8 shell or the ironsight to fit the other, I chose the ironsight to cut, and when you have the two pieces fitting together nicely, NMN them. Wait a half hour or so and the NMN should be quite tacky but a ways off being set. If it isn’t already attached to the gun, reattach the ironsight to the slide making sure you don’t disturb the connection point to the AZ8 too much. Then take the black rail-connector you pulled out of the ironsight and place it up inside the AZ8 shell to connect to the top rail of the barrel extension. You could place it in the bottom, but I thought it might be more structurally sound at the top. NMN it in place when you have it in a good position, making sure the entire connector is on the rail so it slides well.
Before I left it for all the NMN to dry there was one thing still to do. After figuring the proper placement of the grip assembly so it would cock properly I measured where the hole should be for the bolt that will go through the ironsight and into the slide. Rulers, markers and many powerdrill revs later I had the hole. Flipping the entire assembly over I NMNd the second nut to the inside of the ironsight, and after a minute or two I then screwed in the bolt very carefully so it was now connected to the bolt on the slide.
Leave to dry. No More Nails has a curing time of 24 hours, I’ve found the best bonding agents to have curing times similar (+/- 12 hours). While it’s drying, remove the central yellow section of the stock. It will get in the way of the housing for the second spring.
All that is left is to re-assemble the gun. You should be left with an extra three screws (from the stock section) so dropping one between the sofa cushions shouldn’t be too much of a drama. If you have forgotten where the long one goes, it goes in at the front of the gun, at the bottom (the gunmetal-grey bit in front of the trigger).
Okay, ranges. Without the shotgun attachment or front barrel I fired off a magazine with gun level (I may be new to the forums, but I’ve read enough posts to know people will reach through the computer and slap you if you only give angled ranges). These were the results:- 49’, 52’, 66’, 52’, 55’, 59’ = 55.5’ average. Hoping to get at least another 10’ with a better spring. Longest distance I could get angled was 105-115’, Don’t know the exact distance as I didn’t catch the exact landing point, but it was beyond the 105’ marker I set up.
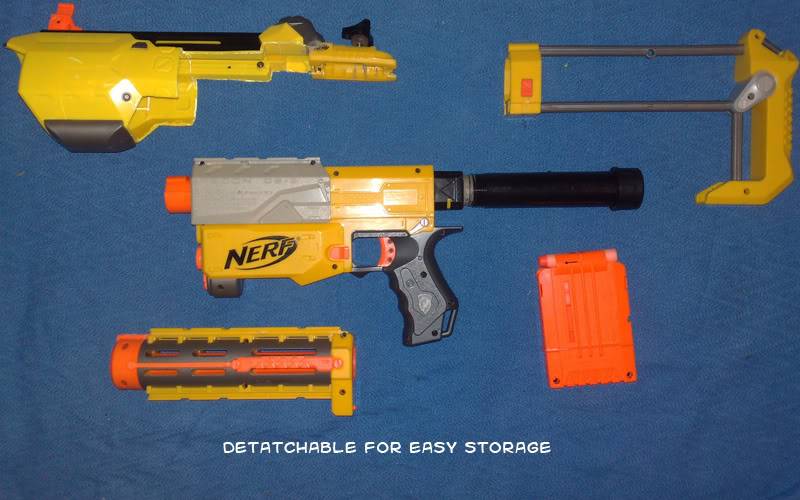
As I mentioned at the start of the write-up the grip is removable within 10 seconds. Making it possible to strip the entire thing down from full shotgun setup with stock to just the base recon with no extensions in 15 seconds. Not useful but I’m proud of it. Will possibly add another bolt or some extra support for the slide connection, but I’ll see how it goes for now. It cocks fine without shearing or breaking, but I’ll have to put it through a battle to test it. The yellow of the AZ8 is a little different from the Recon, but not too much that it looks incredibly out of place. I think it turned out all right. Had an idea for a maverick “magazine” the other day, might start working on that now that this one’s over.
:{>
The only issue I have with the various shotgun mods I’ve seen for the recon in various forums is that it makes the recon either REALLY hard to get apart, they prevent you from ever using the front barrel on it’s own, or it’s not able to be removed quickly. I then set out to find the best way to have a shotgun mod that can be removed in about 10 seconds with no tools, yet still perfectly functional and strong. I call it the Recon CS-66.
Items you’ll need:-
Recon
Recon barrel extension
Recon Stock
Recon ‘Ironsight’
Air Zone ‘8-shooter’ or other appropriate gun (AZ8)
25mm In-Line Filter
Pipe Cap (for filter tube)
Extra Spring (must fit in filter tube)
2 x 1/4” Hex Nuts
Bolt to fit 1/4” Hex Nuts
Short length of wire
Tools you’ll need:-
Power Drill / Dremel (Or patience and a file / sandpaper)
Phillips head screwdriver
Epoxy putty / good bonding agent (I used No More Nails or NMN)
Electrical Tape
Righty, first up you’ll need to disassemble the Recon. Take out all the screws and don’t forget the two screws under the slide as well as the two screws that hold on the black casing at the rear of the gun. When you pull the gun apart make sure to keep an eye on the orange piece that sits in the slide as there’s a spring in there that might be useful to keep (might…. You never know…).
Once the gun is in two halves feel free to remove the two parts that sit in front of the trigger. One prevents you from being able to fire the gun while the slide is still cocked and the other prevents you from loading a magazine unless the slide is cocked, they’re useful for safety reasons, but otherwise annoying. Also remove the black cover on the top of the gun as you don’t really need it and if you do get a jam, I find it gets in the way. Next up we’ll want to find a small piece of plastic / wood / metal / etc. to place in front of the trigger to shorten the draw distance. This is more personal taste than anything else, but I think it feels better. I used a 5mm piece of plastic off of a Warhammer sprue and glued it on with NMN.
Next remove the inner barrel / pump mechanism. Watch out for the spring that holds the locking panel in place. Once removed, separate the barrel section from the pump section. Take the wire and wrap it around the pump casing between 1/2” and 1”. Might need to experiment with spring compression for best results. When done wrap a few layers of E Tape around it to keep it in place.
Take the barrel and using a nail / pin / really small allen key remove the metal pin connecting it to the frame. Take barrel and put in vice (I held it, but gave myself blisters when the Drill bit stuck, so I recommend a vice) and fit a medium sized drill bit to the powerdrill/dremel. Try to snap off the AR’s prong first, then use the drill to hollow out the barrel. There is a spring in there, and a nice big thick bit of plastic, but if you don’t rush it, it should only take a couple of minutes and the barrel will be nice and clear.
Next I took a small amount of cellophane tape and positioned it inside the barrel over the small hole. I put a small bit of NMN in the hole and after it had dried (24 hours) put a piece of tape over the outside of the hole.
Cut off the end of the black back casing about 1/4” from the end with the C shaped hole. Turns out that the 25mm filter tube fit perfectly over the casing. It fit so well that had the casing not had any grooves on it, it would have held incredibly well with just tape. But Just to make sure, I NMN’d it. I took the plunger tube out of the AZ8 to use as a filler as the spring from the wii was just too damn short for the entire length of tube, but I’ll keep looking for a decent spring, so wanted the space able to hold something larger. I’ll update if I find any better springs. The rear assembly should now look a little like so (exploded view).
Where that little orange piece sat on top of the slide is where we’re going to put the Hex Nut. Dremel / cut out the shape of the nut and NMN it to one side only. Preferably the right side as it has a little tab for it to sit on. This will enable you to open up the recon for maintenance in the future so don’t glue it to both sides unless you’re sure you’ll never open it up again.
For the Shotgun grip I was originally going to just use some PVC pipe, but I went out looking for another spring, couldn’t find an NF anywhere (damn HvZ) so ended up buying an Air Zone 8-Shooter, which boasted a 25ft range. HA! 25ft angled… maybe. Anyway, the spring was crap but the body was perfect for the grip. As it was a maverick-style 8-shot pistol it had a really wide circular front end which when all the internals were removed / Dremeled out fit around the barrel extension like a dream.
Take the ironsight, unscrew it and remove everything that isn’t the yellow casing. Then dremel the ‘bottom’ of it to be able to move up and down the rails on the gun’s slide. It takes a bit of experimentation but shouldn’t take too long.
Next you’ll want to Dremel out the little bars that sit between the outer part of the rails and the base of both the slide and top part of the barrel extension. All they do is stop the tactical light, ironsight, or whatever addition that uses the rails from sliding back too far, and little notches help lock the extensions in place. We want to get rid of the slide’s one as it gets in the way of the shotgun attachment point and get rid of the barrel one as it gets in the way of the sliding motion of the grip.
Put the Recon back together but without any of the main springs. You want the trigger assembly, internal barrel and plunger setup all inside. Now cock the gun and leave it in the cocked position (don’t move the slide forward) Attatch the ironsight base to the slide and place the AZ8 shell over the barrel extension, pulling it back so it touches the ironsight. You have to make sure the AZ8 shell has no less than a 1/2” gap between it and the main body of the recon when the gun is fully cocked. Any less and it can prevent the gun from cocking properly.
Now you can either cut the AZ8 shell or the ironsight to fit the other, I chose the ironsight to cut, and when you have the two pieces fitting together nicely, NMN them. Wait a half hour or so and the NMN should be quite tacky but a ways off being set. If it isn’t already attached to the gun, reattach the ironsight to the slide making sure you don’t disturb the connection point to the AZ8 too much. Then take the black rail-connector you pulled out of the ironsight and place it up inside the AZ8 shell to connect to the top rail of the barrel extension. You could place it in the bottom, but I thought it might be more structurally sound at the top. NMN it in place when you have it in a good position, making sure the entire connector is on the rail so it slides well.
Before I left it for all the NMN to dry there was one thing still to do. After figuring the proper placement of the grip assembly so it would cock properly I measured where the hole should be for the bolt that will go through the ironsight and into the slide. Rulers, markers and many powerdrill revs later I had the hole. Flipping the entire assembly over I NMNd the second nut to the inside of the ironsight, and after a minute or two I then screwed in the bolt very carefully so it was now connected to the bolt on the slide.
Leave to dry. No More Nails has a curing time of 24 hours, I’ve found the best bonding agents to have curing times similar (+/- 12 hours). While it’s drying, remove the central yellow section of the stock. It will get in the way of the housing for the second spring.
All that is left is to re-assemble the gun. You should be left with an extra three screws (from the stock section) so dropping one between the sofa cushions shouldn’t be too much of a drama. If you have forgotten where the long one goes, it goes in at the front of the gun, at the bottom (the gunmetal-grey bit in front of the trigger).
Okay, ranges. Without the shotgun attachment or front barrel I fired off a magazine with gun level (I may be new to the forums, but I’ve read enough posts to know people will reach through the computer and slap you if you only give angled ranges). These were the results:- 49’, 52’, 66’, 52’, 55’, 59’ = 55.5’ average. Hoping to get at least another 10’ with a better spring. Longest distance I could get angled was 105-115’, Don’t know the exact distance as I didn’t catch the exact landing point, but it was beyond the 105’ marker I set up.
As I mentioned at the start of the write-up the grip is removable within 10 seconds. Making it possible to strip the entire thing down from full shotgun setup with stock to just the base recon with no extensions in 15 seconds. Not useful but I’m proud of it. Will possibly add another bolt or some extra support for the slide connection, but I’ll see how it goes for now. It cocks fine without shearing or breaking, but I’ll have to put it through a battle to test it. The yellow of the AZ8 is a little different from the Recon, but not too much that it looks incredibly out of place. I think it turned out all right. Had an idea for a maverick “magazine” the other day, might start working on that now that this one’s over.
:{>