Not at all my mod, but I thought it was worth sharing, all the credit goes to Mod Works (http://www.modworks.blogspot.com/) for this.
Nerf Magstrike Mod - Air Compressor System!
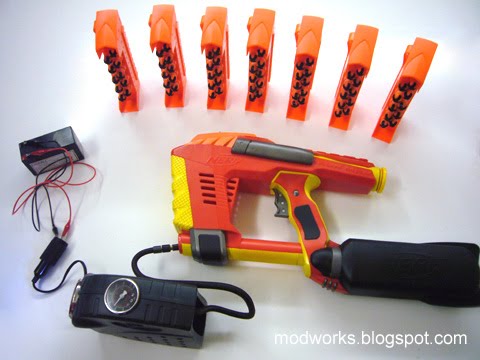
The Nerf Magstrike has proven to be a popular high RoF blaster amongst Nerf players. It has a comfortable form factor, uses a clip-based ammo system, is powered by compressed air and can fire in both full-auto and burst-fire.
But even though its air bladder can be modded to hold more air volume to fire more clips at a time, there is still a limit to that function, not to mention all the physical effort required to manually pump it up!
The solution = Air Compressor Mod!
Disclaimer: Modify at your own risk. Modifications may wear out or damage your blaster. Please be careful when using hobby tools!
Lets begin...
Air Compressor Mod
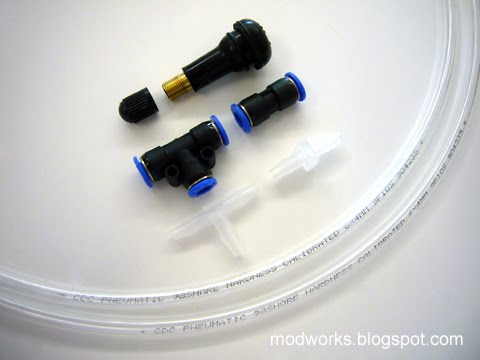
Step 1: Obtain Pressure-rated Air Hoses, Air Hose Couplers and Tire Valves. In the photo below, I've displayed the various components that can be used.
Tire valves can be sourced from car workshops or garages.
The transparent pressure-rated air hoses are 6mm OD / 4mm ID in dimension, exact match for the original Magstrike air hoses.
I usually use 2 types of air hose couplers for my mods, the transparent ones are nylon barbed tee or splicer air hose couplers, these will require additional clamping or epoxy glue to secure them to the air hoses.
The black-coloured air hose couplers are special tee or splicer air hose couplers that feature a quick-release system. Just insert the air hose in to engage the automatic internal clamp and air seal. To detach, just press the blue plastic collar to release it.
Pressure-rated air hoses and couplers can be sourced from pneumatic equipment manufacturers and suppliers.
In this mod, I'll be using the quick-release air hose couplers so that the system can be modular.
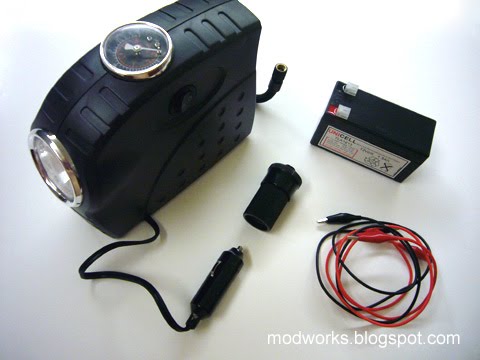
Step 2: Obtain a Portable Car Tire Air Compressor, a 12V Sealed Rechargable Battery, a 12V Plug Adaptor and a set of Electrical Cables.
Portable car tire air compressors can be sourced from car workshops or garages.
The 12V sealed rechargable battery, 12V plug adaptor and electrical cables can be sourced from electronics or hardware stores.
Step 3: Open up the Magstrike. Make sure it is a fully working unit without any air leaks.
DO NOT remove or plug the over-pressure valve (OPV).
If the OPV has been disabled, DO NOT perform this mod until its enabled or properly repaired.
When the Magstrike is connected to an air compressor, the OPV will act as a constant safe-guard to prevent over inflation (and resulting rupturing) of the air bladder system by releasing excess air pressure, it has to be functioning properly to avoid damage to the blaster (or user).
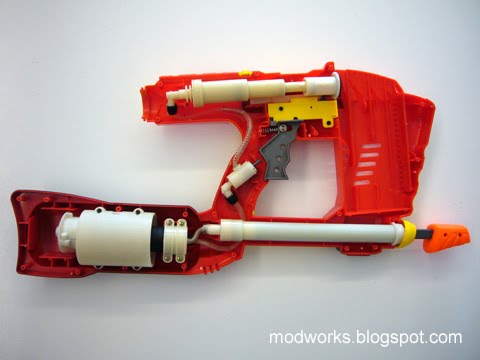
Step 4: Cut the air hose between the air pump and air bladder system. Remove the original air pump.
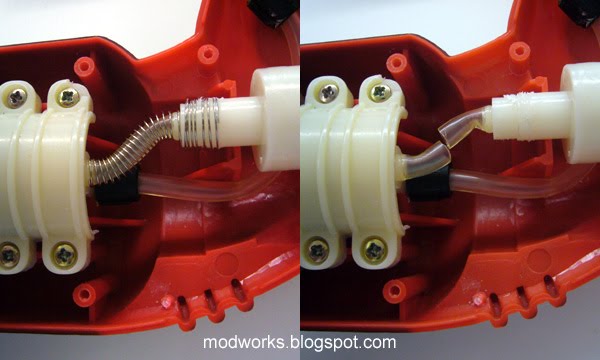
Step 5: Connect the air hose and quick-release splicer air hose coupler.
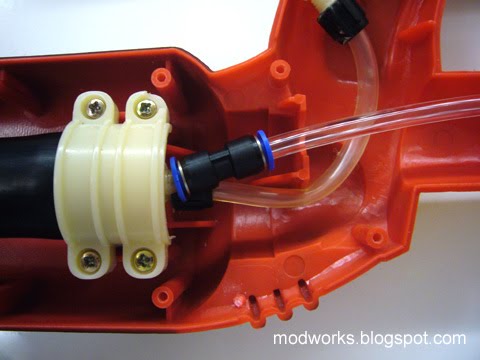
Step 6: Attach the air hose to the tire valve using 2-part epoxy glue, make sure the glue fills all the gaps but yet does not seep into the connection to ensure an unrestricted air-flow.
In my example, I used a smaller section of air hose connected to the tire valve, for modular design, and connected it to another quick-release splicer air hose coupler.
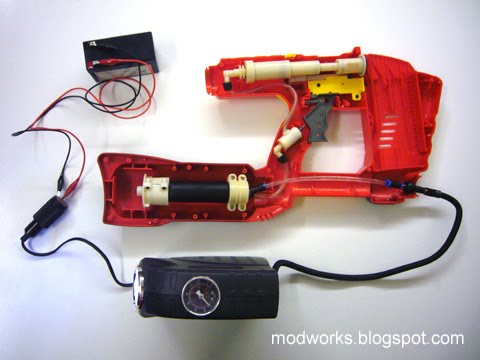
Connect the tire valve to the air compressor, which is in turn linked up to the 12V battery.
Test it out to check that everything is working properly, the air bladder should fill up and stay filled for an extended period of time, any decrease in pressure will indicate a leak somewhere in the system.
For those interested to know, the air compressor I use has an in-built pressure gauge, so I can track that the air bladder at full air volume (without the white retaining shell and after the OPV activates) is operating at around 50-60 PSI.

Alternative Step: The air compressor system can also retain the original air pump. Just use a tee air pressure hose coupler instead to connect the air bladder, air pump and tire valve.
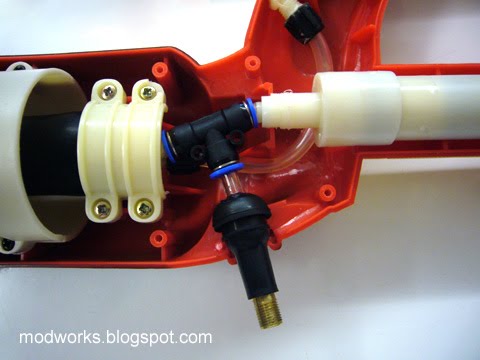
Note that with this alternative method, due to the limited space between the air bladder and air pump, the air pump may require some additional adjustments in positioning within the casing, including some trimming of the casing to create an exit opening for the tire valve.
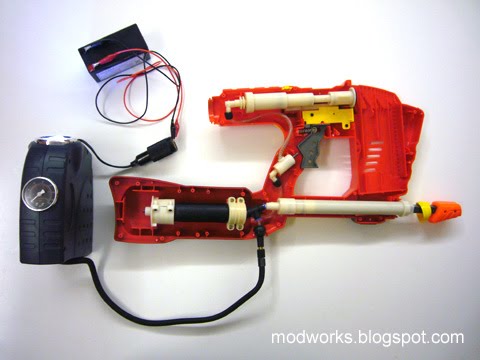
Step 7: Assemble the Magstrike casing... and its done!
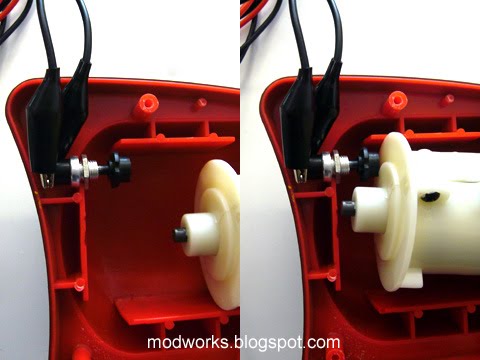
Add-on Step: To fully automate the air compressor system, install an automatic "cut-off" switch to the air compressor's electrical circuit.
I used a "push-to-off" switch which can be sourced from electrical parts supply stores. When the air bladder fills up and expands to a certain size, its OPV plastic assembly will press onto the switch, thereby switching off the air compressor. When the Magstrike is fired and the air bladder decreases in size, the switch will then be released and the air compressor will resume pumping air. This system regulates the air compressor to automatically pump air only when required.
Ammo Clip Management
With all that continuous supply of air pressure, the Magstrike will now need ALOT of clips.
Magstrike clips are much larger than N-Strike clips though... so how to carry them efficiently?
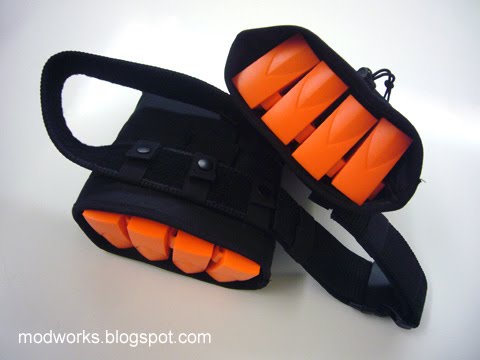
To solve that issue, i customised an Ammo Clip Belt System which consists of a thick nylon tactical belt with adjustable "dump" pouches that fit the Magstrike clips.
Harness System
I'm not keen on the idea of tethering cables or hoses from waist pouches or backpacks to blasters, I've found that method ungainly and too restrictive. Loose cables tend to get tangled up easily, especially when quick response and fast movement is required during games.
So I customised an Air Compressor System Harness to mount the entire system onto the Magstrike itself. Therefore, a Magstrike with the air compressor system can now become a completely stand-alone unit, which offers the best combination of flexibility and mobility.
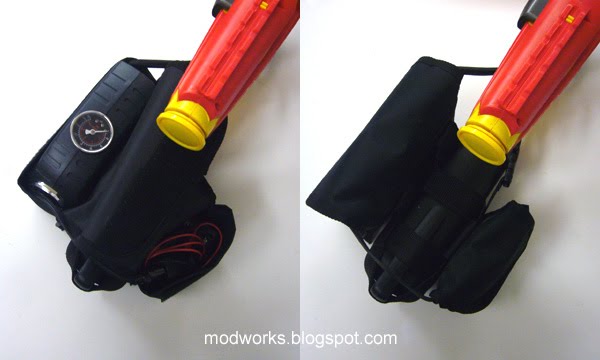
Overall, the entire air compressor system (incl. battery) adds around 1.3kg to the Magstrike. It is abit heavier to carry, but I managed to adjust the weight distribution for equal weight balance between both harness pouches, so the blaster can still be held and fired comfortably.
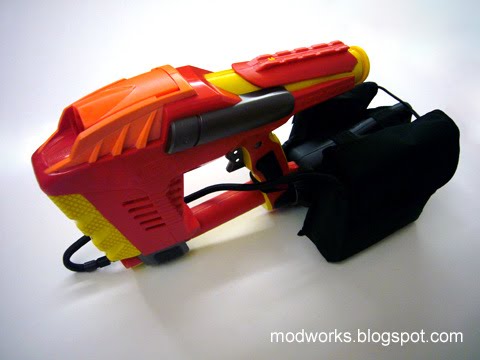
Ready to go!
Test Fire & Demo Video
Yeah, I know... the air compressor is quite a noisy piece of equipment!
Nerf Magstrike Mod - Air Compressor System!
The Nerf Magstrike has proven to be a popular high RoF blaster amongst Nerf players. It has a comfortable form factor, uses a clip-based ammo system, is powered by compressed air and can fire in both full-auto and burst-fire.
But even though its air bladder can be modded to hold more air volume to fire more clips at a time, there is still a limit to that function, not to mention all the physical effort required to manually pump it up!
The solution = Air Compressor Mod!
Disclaimer: Modify at your own risk. Modifications may wear out or damage your blaster. Please be careful when using hobby tools!
Lets begin...
Air Compressor Mod
Step 1: Obtain Pressure-rated Air Hoses, Air Hose Couplers and Tire Valves. In the photo below, I've displayed the various components that can be used.
Tire valves can be sourced from car workshops or garages.
The transparent pressure-rated air hoses are 6mm OD / 4mm ID in dimension, exact match for the original Magstrike air hoses.
I usually use 2 types of air hose couplers for my mods, the transparent ones are nylon barbed tee or splicer air hose couplers, these will require additional clamping or epoxy glue to secure them to the air hoses.
The black-coloured air hose couplers are special tee or splicer air hose couplers that feature a quick-release system. Just insert the air hose in to engage the automatic internal clamp and air seal. To detach, just press the blue plastic collar to release it.
Pressure-rated air hoses and couplers can be sourced from pneumatic equipment manufacturers and suppliers.
In this mod, I'll be using the quick-release air hose couplers so that the system can be modular.
Step 2: Obtain a Portable Car Tire Air Compressor, a 12V Sealed Rechargable Battery, a 12V Plug Adaptor and a set of Electrical Cables.
Portable car tire air compressors can be sourced from car workshops or garages.
The 12V sealed rechargable battery, 12V plug adaptor and electrical cables can be sourced from electronics or hardware stores.
Step 3: Open up the Magstrike. Make sure it is a fully working unit without any air leaks.
DO NOT remove or plug the over-pressure valve (OPV).
If the OPV has been disabled, DO NOT perform this mod until its enabled or properly repaired.
When the Magstrike is connected to an air compressor, the OPV will act as a constant safe-guard to prevent over inflation (and resulting rupturing) of the air bladder system by releasing excess air pressure, it has to be functioning properly to avoid damage to the blaster (or user).
Step 4: Cut the air hose between the air pump and air bladder system. Remove the original air pump.
Step 5: Connect the air hose and quick-release splicer air hose coupler.
Step 6: Attach the air hose to the tire valve using 2-part epoxy glue, make sure the glue fills all the gaps but yet does not seep into the connection to ensure an unrestricted air-flow.
In my example, I used a smaller section of air hose connected to the tire valve, for modular design, and connected it to another quick-release splicer air hose coupler.
Connect the tire valve to the air compressor, which is in turn linked up to the 12V battery.
Test it out to check that everything is working properly, the air bladder should fill up and stay filled for an extended period of time, any decrease in pressure will indicate a leak somewhere in the system.
For those interested to know, the air compressor I use has an in-built pressure gauge, so I can track that the air bladder at full air volume (without the white retaining shell and after the OPV activates) is operating at around 50-60 PSI.
Alternative Step: The air compressor system can also retain the original air pump. Just use a tee air pressure hose coupler instead to connect the air bladder, air pump and tire valve.
Note that with this alternative method, due to the limited space between the air bladder and air pump, the air pump may require some additional adjustments in positioning within the casing, including some trimming of the casing to create an exit opening for the tire valve.
Step 7: Assemble the Magstrike casing... and its done!
Add-on Step: To fully automate the air compressor system, install an automatic "cut-off" switch to the air compressor's electrical circuit.
I used a "push-to-off" switch which can be sourced from electrical parts supply stores. When the air bladder fills up and expands to a certain size, its OPV plastic assembly will press onto the switch, thereby switching off the air compressor. When the Magstrike is fired and the air bladder decreases in size, the switch will then be released and the air compressor will resume pumping air. This system regulates the air compressor to automatically pump air only when required.
Ammo Clip Management
With all that continuous supply of air pressure, the Magstrike will now need ALOT of clips.
Magstrike clips are much larger than N-Strike clips though... so how to carry them efficiently?
To solve that issue, i customised an Ammo Clip Belt System which consists of a thick nylon tactical belt with adjustable "dump" pouches that fit the Magstrike clips.
Harness System
I'm not keen on the idea of tethering cables or hoses from waist pouches or backpacks to blasters, I've found that method ungainly and too restrictive. Loose cables tend to get tangled up easily, especially when quick response and fast movement is required during games.
So I customised an Air Compressor System Harness to mount the entire system onto the Magstrike itself. Therefore, a Magstrike with the air compressor system can now become a completely stand-alone unit, which offers the best combination of flexibility and mobility.
Overall, the entire air compressor system (incl. battery) adds around 1.3kg to the Magstrike. It is abit heavier to carry, but I managed to adjust the weight distribution for equal weight balance between both harness pouches, so the blaster can still be held and fired comfortably.
Ready to go!
Test Fire & Demo Video
Yeah, I know... the air compressor is quite a noisy piece of equipment!


