Phuonguyen and me were walking in Brisbane CBD and decided to checkout toyworld to see if there was any new Nerf stock available. We walked inside we came across the Buzz Bee Tetra Strike. I was like holy crap! I’ve always wanted this gun since I saw SG use it. The cost was only $15 and I jumped at the chance. Here’s a picture to compare the sizes of the actual gun. I believe it would work as a great ‘shotgun pistol’.

On a side note, looks like toyworld should have restock a lot of Nerf guns Australia wide which include Longshots, Raiders, Recons, Clear NiteFinders, Mavericks, Buzz Bee Ultimate Blast (BBUB) (the new big blast), BBSB (Buzz Bee Sniper Blast), BBURF (Buzz Bee Ultimate Rapid Fire). Unfortunately, there weren’t any BBBRs (Buzz Bee Berserkers). Anyhow, I got home and had some fun with it.
Stock Ranges:
PTG 6metres
ATG 7.5metres
The ranges dropped as each dart was shot. I think the reason for this is if you don’t pull the trigger quickly the air isn’t released quickly and therefore the ranges decrease. The ranges dropped down roughly 5metres if you don’t pull the trigger quickly enough. Anyways, I was disappointed with these ranges and decide to crack it open and give it a shot at rebarreling and removing the ‘air plugs’.
Materials:
- Dremel (or Hacksaw)
- Hot Glue and Heat Gun
- 16mm UPVC Conduit (or your barrel of choice)
- 12mm Aluminium Tube (this will help align the barrels when gluing)
- Flat Head Screw Driver
- Phillips Head Screw Driver
- Teflon tape
- Electrical Tape
- Hand eye coordination!
- Pipe Cutters
Step 1:
Crack open the Tetra Strike by unscrewing the screws. The green bit hand grip you have to remove with a flat head screwdriver by levering it out. It will flick right out.

Using pipe cutters try to cut it out enough that you can leave it off with your flat head screwdriver. Alternatively you can use a hacksaw, but watch out if you cut off the pump itself! You will need to e-tape the cut off orange bit to the green cylinder thing or else it will rattle if you don't.


Step 2:
Here are some pictures of the internals so you have an idea what the internals look like. If you are familiar with the LBS (Lanard Big Salvo) then the internals are very similar.

Step 3:
As you know, plugging guns is usually a frowned upon practice in Nerf. However, I believe without plugging the gun it won’t be able to shoot to optimal performance. The air chambers are about 1/3 the size of a mega missile, even less. However, for those who only want a temporary solution you can plug it by filling the hole with Teflon tape and squashing it in. You will only want to pump it up to 20 times. This is because if you go pass those numbers of pumps the trigger won’t be able to fire off the darts properly and you will be putting too much stress on the firing mech. Getting up to the last shot it is VERY HARD to pull and you have to use two fingers to actually push the trigger all the way down.


Range Updates: I decided to chuck it back together again to see what I would get for about 20pumps.
PTG – 9metres
ATG – 11metres
I see a range improvement but it’s not too great and were inconsistent as the ‘stock barrels’ are similar to what you would find in a BBBB or BBMM; two holes to the side where it pushes the dart out. Let’s continue...
Step 4:
You’ll definitely need to replace the barrels because as you all know; Buzz Bee relies on their ‘pegs’ to fire of each dart. Therefore, the stock barrels are pretty much useless to begin with. We’ll start by cutting ourselves about four lengths of 16mm UPVC Conduit Pipe with our pipe cutters. I cut them to ‘stock streamline’ lengths, but you can make them longer if you want. Alternatively you can use a hacksaw but the finish product isn’t as ‘clean’ as it should be.


Step 5:
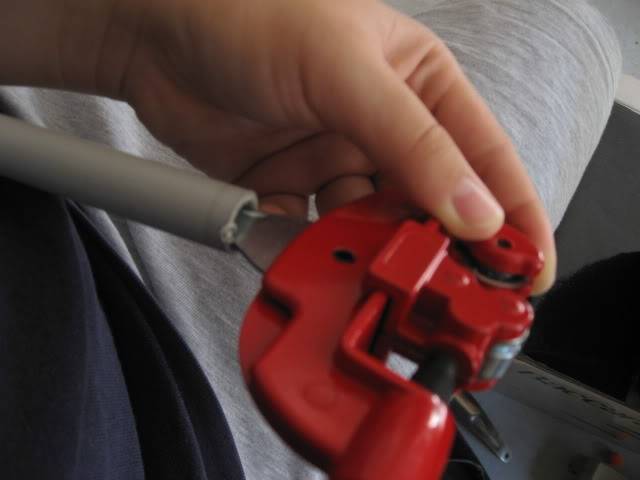
If you ever use pipe cutters before you will know that it cuts by clamping on to the pipe, rotate, tightening the clamp and repeating the process. This leaves with those ‘folded over’ pipes. You can clean this up shaving those ‘folded over’ bits with the ‘knife’ bit of your pipe cutter to clean it out. If you don’t do this step, darts will not fit in the pipe.
Step 6:
Using a dremel, you will need to cut the stock barrels off. The pictures below show where you have to cut it. You will need to leave at least 5mm of the stock barrels to do the next step.


Step 7:
Using pipe cutters, cut approximately 8mm-10mm of 12mm aluminium tubing. Again, you can use a hacksaw but pipe cutters are what make the barrels more centred.

Step 8:
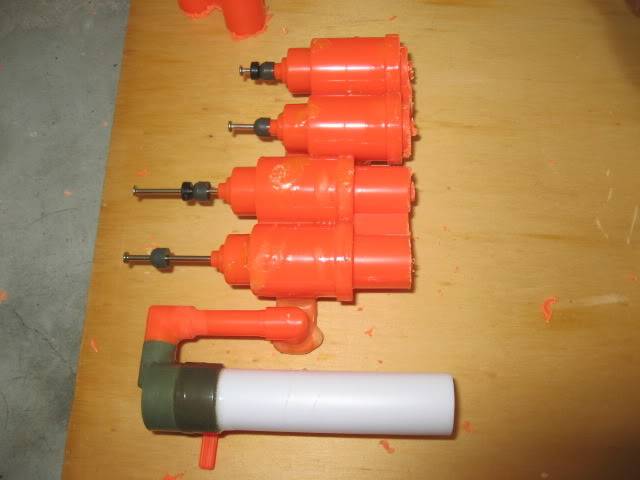
Using hot glue (or any other glue), fill the ‘barrel gaps’ and centre the 12mm aluminium tubes into the barrel gaps where the glue are.


Step 9:
Using the hot glue again, you must put hot glue around the 12mm aluminium pipes that have been placed on the air tanks of the gun. When the hot glue is around the aluminium pipes, slide down the 16mm UPVC Conduit Pipe as shown in the pictures below. The reason we need the 12mm aluminium pipe lengths is to help align the UPVC barrels. This will also strengthen the overall bond from conduit to air tank. The more primitive way also takes much more effort and the results are not very neat.


Step 9 v2:
Here’s an alternative way you can place the barrels, but as you can see it is extremely unstable looking the barrels are all over the joint. (Image retrieved from Nerf Haven)

Step 10:
Place the internals back inside the gun.

Step 11:
Finish!


Yes, I love my First Person Shooter photographs. I was thoroughly impressed of the ranges I got out this gun for all I’ve done to it. All measurements were done using Screw Cap Blue inf0rm3r stefans. These ranges were tested on 20 pumps, outdoor, and somewhat windy day. Results may differ depending on external factors.
PTG: 17metres average
ATG: 20metres average
MAXIMUM RANGE: 23metres average (heavily angled)
I spent approximate $20-$25 on building this gun and took me about 4hours to complete because of procrastination in between. I can see myself using this weapon as a last resort ‘shotgun pistol’ in the hopes of the spray and pray. If someone dares charge at me they will be meeting the end of four darts flying their way. I hope this give you guys insight of different ways you can mod guns and enjoy!
On a side note, looks like toyworld should have restock a lot of Nerf guns Australia wide which include Longshots, Raiders, Recons, Clear NiteFinders, Mavericks, Buzz Bee Ultimate Blast (BBUB) (the new big blast), BBSB (Buzz Bee Sniper Blast), BBURF (Buzz Bee Ultimate Rapid Fire). Unfortunately, there weren’t any BBBRs (Buzz Bee Berserkers). Anyhow, I got home and had some fun with it.
Stock Ranges:
PTG 6metres
ATG 7.5metres
The ranges dropped as each dart was shot. I think the reason for this is if you don’t pull the trigger quickly the air isn’t released quickly and therefore the ranges decrease. The ranges dropped down roughly 5metres if you don’t pull the trigger quickly enough. Anyways, I was disappointed with these ranges and decide to crack it open and give it a shot at rebarreling and removing the ‘air plugs’.
Materials:
- Dremel (or Hacksaw)
- Hot Glue and Heat Gun
- 16mm UPVC Conduit (or your barrel of choice)
- 12mm Aluminium Tube (this will help align the barrels when gluing)
- Flat Head Screw Driver
- Phillips Head Screw Driver
- Teflon tape
- Electrical Tape
- Hand eye coordination!
- Pipe Cutters
Step 1:
Crack open the Tetra Strike by unscrewing the screws. The green bit hand grip you have to remove with a flat head screwdriver by levering it out. It will flick right out.
Using pipe cutters try to cut it out enough that you can leave it off with your flat head screwdriver. Alternatively you can use a hacksaw, but watch out if you cut off the pump itself! You will need to e-tape the cut off orange bit to the green cylinder thing or else it will rattle if you don't.
Step 2:
Here are some pictures of the internals so you have an idea what the internals look like. If you are familiar with the LBS (Lanard Big Salvo) then the internals are very similar.
Step 3:
As you know, plugging guns is usually a frowned upon practice in Nerf. However, I believe without plugging the gun it won’t be able to shoot to optimal performance. The air chambers are about 1/3 the size of a mega missile, even less. However, for those who only want a temporary solution you can plug it by filling the hole with Teflon tape and squashing it in. You will only want to pump it up to 20 times. This is because if you go pass those numbers of pumps the trigger won’t be able to fire off the darts properly and you will be putting too much stress on the firing mech. Getting up to the last shot it is VERY HARD to pull and you have to use two fingers to actually push the trigger all the way down.
Range Updates: I decided to chuck it back together again to see what I would get for about 20pumps.
PTG – 9metres
ATG – 11metres
I see a range improvement but it’s not too great and were inconsistent as the ‘stock barrels’ are similar to what you would find in a BBBB or BBMM; two holes to the side where it pushes the dart out. Let’s continue...
Step 4:
You’ll definitely need to replace the barrels because as you all know; Buzz Bee relies on their ‘pegs’ to fire of each dart. Therefore, the stock barrels are pretty much useless to begin with. We’ll start by cutting ourselves about four lengths of 16mm UPVC Conduit Pipe with our pipe cutters. I cut them to ‘stock streamline’ lengths, but you can make them longer if you want. Alternatively you can use a hacksaw but the finish product isn’t as ‘clean’ as it should be.
Step 5:
If you ever use pipe cutters before you will know that it cuts by clamping on to the pipe, rotate, tightening the clamp and repeating the process. This leaves with those ‘folded over’ pipes. You can clean this up shaving those ‘folded over’ bits with the ‘knife’ bit of your pipe cutter to clean it out. If you don’t do this step, darts will not fit in the pipe.
Step 6:
Using a dremel, you will need to cut the stock barrels off. The pictures below show where you have to cut it. You will need to leave at least 5mm of the stock barrels to do the next step.
Step 7:
Using pipe cutters, cut approximately 8mm-10mm of 12mm aluminium tubing. Again, you can use a hacksaw but pipe cutters are what make the barrels more centred.
Step 8:
Using hot glue (or any other glue), fill the ‘barrel gaps’ and centre the 12mm aluminium tubes into the barrel gaps where the glue are.
Step 9:
Using the hot glue again, you must put hot glue around the 12mm aluminium pipes that have been placed on the air tanks of the gun. When the hot glue is around the aluminium pipes, slide down the 16mm UPVC Conduit Pipe as shown in the pictures below. The reason we need the 12mm aluminium pipe lengths is to help align the UPVC barrels. This will also strengthen the overall bond from conduit to air tank. The more primitive way also takes much more effort and the results are not very neat.
Step 9 v2:
Here’s an alternative way you can place the barrels, but as you can see it is extremely unstable looking the barrels are all over the joint. (Image retrieved from Nerf Haven)
Step 10:
Place the internals back inside the gun.
Step 11:
Finish!
Yes, I love my First Person Shooter photographs. I was thoroughly impressed of the ranges I got out this gun for all I’ve done to it. All measurements were done using Screw Cap Blue inf0rm3r stefans. These ranges were tested on 20 pumps, outdoor, and somewhat windy day. Results may differ depending on external factors.
PTG: 17metres average
ATG: 20metres average
MAXIMUM RANGE: 23metres average (heavily angled)
I spent approximate $20-$25 on building this gun and took me about 4hours to complete because of procrastination in between. I can see myself using this weapon as a last resort ‘shotgun pistol’ in the hopes of the spray and pray. If someone dares charge at me they will be meeting the end of four darts flying their way. I hope this give you guys insight of different ways you can mod guns and enjoy!
Last edited by littlebro05 on Wed Sep 15, 2010 6:14 am; edited 4 times in total