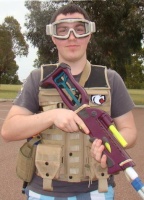

Acerised's L'BOW Tutorial - All Aussie Materials

Firstly Big shout out to Unknown for contributing with his great help to this project. Thank you.
This Project is very easy to build and very easy to source materials (All Aussie).
This is a general but with detail, Write-Up. Everyone has different materials so you will need to experiment and source appropiate materials yourself.
Materials: (You may subsitute materials for others)
• 16mm Electrical Conduit
• 20mm Electrical Condiuit
• 20mm Electrical Conduit Coupler
• 25mm PVC
• 25mm PVC End Cap
• 2x 25mm PVC Elbow
• 25mm PVC T
• 25mm to 20mm PVC Reducer
• 20mm PVC
• 15mm End Cap
• 15mm PVC
• Various Nails and Screws
• E-Tape
• Hot Glue and Gun
• Epoxy Putty
• Padding
• KHA Spring
• Arcylic Rod
• Additional or Replacment Catch Spring
• O-Ring
Ive always wanted a pull back longhot and a powerful springer. I have made a NF Rifle, although it was very unreliable with the catch and k26. So I thought to myself why not combine the two? Playing around with pipe and ideas I discovered that 16mm conduit acts as a identical plunger rod and 20mm nested acts as a identical catch. Through futher investigation I discovered that 32mm PVC is very close to stock LS plunger tube and 32mm path plug will complete this system. So this means you could make a replacment LS plunger system by doing this. However i used parts I already had.
I wanted to keep this project as clean as possible and keep the look of the stock shell of the Longshot
Method:
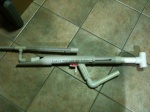
Make a plunger head that has a good seal in 25mm PVC. You may have other ideas. However I used a 15mm PVC End Cap, as it quite a near fit in 25mm PVC. Firstly I cut the end cap flush and then cut a grove for the O-Ring to sit, this will prevent it from slipping out. Grab a small piece of 15mm PVC and jam it inside the End Cap as furthest as possible. Now Insert your 16mm conduit plunger rod into the 15mm PVC and drill a hole through the end cap, 15mm pvc and 16mm conduit. Insert a Nail into the hole and cut it flush with the hole. Adhere a padding to the top of the head and secure the padding, O-Ring and nail bar with e-tape. Wrap enough e-tape so it creates a good seal. It will be hard to create a 100% seal with a fast plunger as, the grove you cut for the o-ring will not be consistant. Experiment until you are satisfied with the seal and plunger speed. You could use a skirt seal by, ramming acrylic rod inside the 16mm conduit by sanding the edges. Then secure it with a nail at the bottom. Now you can attach the skirt seal with a screw and nut. There are endless possibilities. Cut a small piece of 20mm conduit for the catch and sand one it's edges so it is round and smooth.
The picture below is not clean, I created another seal.

Remember to reinforce everything to withstand the powerful spring. I used a KHA Spring. The Kha spring features a 6cm compression (11" to 6cm) which is very impressive. This means you will get around 24cm air volume from a 30cm plunger tube. Very powerful and very very easy to prime. You may use a full k26, however I personally hate k26s as they are too powerful. It took my whole body weight to get full compression of a 20cm k26. (As no one in Australia knows what a real k26 is, i am refering to Informer's K26). Imagine the stress on the plastic with a fully compressed k26. Back to topic I reinforced the Catch frame, trigger and plastic around the catch frame with Epoxy Putty. I also added aluminium sheeting above the trigger as this will decrease the bending of the trigger. Add replacement/additional catch spring if necessary.
Here is a link for Kha Springs: http://www.oznerf.com/t4596-homemade-blaster-part-sales-kha-spring-check-valves

Now for the barrel coupler. You may use different methods, such as a 25mm to 15mm reducer and e-tape on a 20mm conduit barrel. However I nested a 20mm conduit coupler inside of the 20mm end of a 25mm to 20mm PVC Reducer. Remember DEADSPACE, so cut half of the coupler and use a half. But firstly, attach the reducer to 25mm pvc tightly and use the plunger head to mark of where the plunger stops. This is where you will put the end of the 20mm conduit coupler. Place the 20mm coupler inside the 20mm pvc end and drill a hole through each and place a nail as a dart stop. Add hotglue and Eputty to seal any gaps. Remember to add hot glue over the extruding nail to seal of any air leaks.


Add the spring and cut the 25mm PVC plunger tube to account for the spring. Remember that the pipe does not go fully inside the Couplers and End caps. For the Spring rest i used a 25mm PVC end cap. Drill and sand a hole in the middle, so the the plunger rod and catch can easily pass through the hole but not the spring. BE CAREFUL. If you used a Kha Spring and this set up you will have around a 2-3mm clearance. Compress the spring and measure where to secure the catch on the 16mm conduit at the catch frame once fully compressed. Once marked drill a hole straight through and secure with a flush cut nail.


Now to place the plunger system inside the shell. Decide where to put the plunger system and dremel out all plastic in the way. I placed my plunger tube against the orange barrel connection knub, to evenly spread the force of the plunger smacking the coupler. MAKE SURE ALL COUPLERS AND END CAPS ARE ON TIGHTLY.

Now for the plunger tube rest. I used epoxy putty and moulded it around the plunger tube. Remember to not place eputty to high, as the 20mm conduit catch needs to pass through freely. To keep the plunger system from not rotating when inserting barrel and taking it off. I drilled a hole for a nail in the end cap into the epoxy putty. This will stop the system from rotating.

You now can test if the blaster is functional, hopefully yes. Now add a priming handle to the 16mm conduit. Allow for space for your finger to grip. I used arcylic rod as the priming handle. Cut the exccess 16mm conduit.
You have finished, reattach the shell through nails or tape if you wish to continue and add a stock.

Adding a PVC Stock
Decide on a PVC stock design. I decided on a "slanted" design. I dislike the look of a +bow stock design on a Longshot.
To start of, measure how much pipe you will need to comply with the full draw length. Now cut a 25mm PVC pipe in half and to that length. Screw it to a 25mm Elbow and to the top of the shell and attach it to a 25mm T. Now measure and cut a suitable length of 20mm pvc to join to the bottom of the shell. Screw it and attach it to the 25mm PVC T, wrap E-Tape on the 20mm pipe. Note: You cannot use 25mm pvc as the OD is too big. Add another 25mm Elbow to the bottom T. Measure approximately how much 25mm pipe you will need to angle to attach it to the shell. Cut accordinly and heat the pipe using a heat gun to bend the pipe, Screw it. You may use a 45 degree join, but i believe this would look bulky. Also you may heat the actual elbow itself, but you will need to be careful that the pipe can still be placed in and out.


Finished, Hopefully it turned out well.


Please Click on the link for the Clip accepting Sliding Breech Tutorial:
http://www.oznerf.com/t4721-acerised-s-clip-accepting-sliding-breech-tutorial
I have currently not finished this project. I have yet to add polycarb sheeting inside the gap of the stock, this would make the stock more strong and allows dart holders to be added.
Ranges:
I have not officially range tested the L'BOW yet.
Around the 30 metre mark (100ft).
However with stinger darts its penetrates through two pieces of carboard and through a styrofoam box cleanly.
With Streamlines it dents and rips cardboard and penetrates styrofoam boxes.
REMEMBER THIS IS A SPRINGER.
L'BOW Cardboard Test Video
Further Experimentation
- 16mm Electrical Conduit is an identical LS Plunger Rod.
- 20mm Electrical Conduit is an Identical LS Catch.
- 32mm PVC Pipe is Almost identical to LS Plunger tube.
- 32mm Path Plug is a good plunger head for 32mm PVC pipe.
Now you can create home-made replacement LS Parts.
Barrels
- a 34cm 16mm conduit is better than 27cm PETG which is better than a 36cm PETG Barrel
Thanks!
Firstly Big shout out to Unknown for contributing with his great help to this project. Thank you.
This Project is very easy to build and very easy to source materials (All Aussie).
This is a general but with detail, Write-Up. Everyone has different materials so you will need to experiment and source appropiate materials yourself.
Materials: (You may subsitute materials for others)
• 16mm Electrical Conduit
• 20mm Electrical Condiuit
• 20mm Electrical Conduit Coupler
• 25mm PVC
• 25mm PVC End Cap
• 2x 25mm PVC Elbow
• 25mm PVC T
• 25mm to 20mm PVC Reducer
• 20mm PVC
• 15mm End Cap
• 15mm PVC
• Various Nails and Screws
• E-Tape
• Hot Glue and Gun
• Epoxy Putty
• Padding
• KHA Spring
• Arcylic Rod
• Additional or Replacment Catch Spring
• O-Ring
Ive always wanted a pull back longhot and a powerful springer. I have made a NF Rifle, although it was very unreliable with the catch and k26. So I thought to myself why not combine the two? Playing around with pipe and ideas I discovered that 16mm conduit acts as a identical plunger rod and 20mm nested acts as a identical catch. Through futher investigation I discovered that 32mm PVC is very close to stock LS plunger tube and 32mm path plug will complete this system. So this means you could make a replacment LS plunger system by doing this. However i used parts I already had.
I wanted to keep this project as clean as possible and keep the look of the stock shell of the Longshot
Method:
Make a plunger head that has a good seal in 25mm PVC. You may have other ideas. However I used a 15mm PVC End Cap, as it quite a near fit in 25mm PVC. Firstly I cut the end cap flush and then cut a grove for the O-Ring to sit, this will prevent it from slipping out. Grab a small piece of 15mm PVC and jam it inside the End Cap as furthest as possible. Now Insert your 16mm conduit plunger rod into the 15mm PVC and drill a hole through the end cap, 15mm pvc and 16mm conduit. Insert a Nail into the hole and cut it flush with the hole. Adhere a padding to the top of the head and secure the padding, O-Ring and nail bar with e-tape. Wrap enough e-tape so it creates a good seal. It will be hard to create a 100% seal with a fast plunger as, the grove you cut for the o-ring will not be consistant. Experiment until you are satisfied with the seal and plunger speed. You could use a skirt seal by, ramming acrylic rod inside the 16mm conduit by sanding the edges. Then secure it with a nail at the bottom. Now you can attach the skirt seal with a screw and nut. There are endless possibilities. Cut a small piece of 20mm conduit for the catch and sand one it's edges so it is round and smooth.
The picture below is not clean, I created another seal.
Remember to reinforce everything to withstand the powerful spring. I used a KHA Spring. The Kha spring features a 6cm compression (11" to 6cm) which is very impressive. This means you will get around 24cm air volume from a 30cm plunger tube. Very powerful and very very easy to prime. You may use a full k26, however I personally hate k26s as they are too powerful. It took my whole body weight to get full compression of a 20cm k26. (As no one in Australia knows what a real k26 is, i am refering to Informer's K26). Imagine the stress on the plastic with a fully compressed k26. Back to topic I reinforced the Catch frame, trigger and plastic around the catch frame with Epoxy Putty. I also added aluminium sheeting above the trigger as this will decrease the bending of the trigger. Add replacement/additional catch spring if necessary.
Here is a link for Kha Springs: http://www.oznerf.com/t4596-homemade-blaster-part-sales-kha-spring-check-valves
Now for the barrel coupler. You may use different methods, such as a 25mm to 15mm reducer and e-tape on a 20mm conduit barrel. However I nested a 20mm conduit coupler inside of the 20mm end of a 25mm to 20mm PVC Reducer. Remember DEADSPACE, so cut half of the coupler and use a half. But firstly, attach the reducer to 25mm pvc tightly and use the plunger head to mark of where the plunger stops. This is where you will put the end of the 20mm conduit coupler. Place the 20mm coupler inside the 20mm pvc end and drill a hole through each and place a nail as a dart stop. Add hotglue and Eputty to seal any gaps. Remember to add hot glue over the extruding nail to seal of any air leaks.
Add the spring and cut the 25mm PVC plunger tube to account for the spring. Remember that the pipe does not go fully inside the Couplers and End caps. For the Spring rest i used a 25mm PVC end cap. Drill and sand a hole in the middle, so the the plunger rod and catch can easily pass through the hole but not the spring. BE CAREFUL. If you used a Kha Spring and this set up you will have around a 2-3mm clearance. Compress the spring and measure where to secure the catch on the 16mm conduit at the catch frame once fully compressed. Once marked drill a hole straight through and secure with a flush cut nail.
Now to place the plunger system inside the shell. Decide where to put the plunger system and dremel out all plastic in the way. I placed my plunger tube against the orange barrel connection knub, to evenly spread the force of the plunger smacking the coupler. MAKE SURE ALL COUPLERS AND END CAPS ARE ON TIGHTLY.
Now for the plunger tube rest. I used epoxy putty and moulded it around the plunger tube. Remember to not place eputty to high, as the 20mm conduit catch needs to pass through freely. To keep the plunger system from not rotating when inserting barrel and taking it off. I drilled a hole for a nail in the end cap into the epoxy putty. This will stop the system from rotating.
You now can test if the blaster is functional, hopefully yes. Now add a priming handle to the 16mm conduit. Allow for space for your finger to grip. I used arcylic rod as the priming handle. Cut the exccess 16mm conduit.
You have finished, reattach the shell through nails or tape if you wish to continue and add a stock.
Adding a PVC Stock
Decide on a PVC stock design. I decided on a "slanted" design. I dislike the look of a +bow stock design on a Longshot.
To start of, measure how much pipe you will need to comply with the full draw length. Now cut a 25mm PVC pipe in half and to that length. Screw it to a 25mm Elbow and to the top of the shell and attach it to a 25mm T. Now measure and cut a suitable length of 20mm pvc to join to the bottom of the shell. Screw it and attach it to the 25mm PVC T, wrap E-Tape on the 20mm pipe. Note: You cannot use 25mm pvc as the OD is too big. Add another 25mm Elbow to the bottom T. Measure approximately how much 25mm pipe you will need to angle to attach it to the shell. Cut accordinly and heat the pipe using a heat gun to bend the pipe, Screw it. You may use a 45 degree join, but i believe this would look bulky. Also you may heat the actual elbow itself, but you will need to be careful that the pipe can still be placed in and out.
Finished, Hopefully it turned out well.
Please Click on the link for the Clip accepting Sliding Breech Tutorial:
http://www.oznerf.com/t4721-acerised-s-clip-accepting-sliding-breech-tutorial
I have currently not finished this project. I have yet to add polycarb sheeting inside the gap of the stock, this would make the stock more strong and allows dart holders to be added.
Ranges:
I have not officially range tested the L'BOW yet.
Around the 30 metre mark (100ft).
However with stinger darts its penetrates through two pieces of carboard and through a styrofoam box cleanly.
With Streamlines it dents and rips cardboard and penetrates styrofoam boxes.
REMEMBER THIS IS A SPRINGER.
L'BOW Cardboard Test Video
Further Experimentation
- 16mm Electrical Conduit is an identical LS Plunger Rod.
- 20mm Electrical Conduit is an Identical LS Catch.
- 32mm PVC Pipe is Almost identical to LS Plunger tube.
- 32mm Path Plug is a good plunger head for 32mm PVC pipe.
Now you can create home-made replacement LS Parts.
Barrels
- a 34cm 16mm conduit is better than 27cm PETG which is better than a 36cm PETG Barrel
Thanks!
Last edited by Acerised on Sat May 19, 2012 4:57 pm; edited 9 times in total