Oz Nerf - Australian Nerf Community

Would you like to react to this message? Create an account in a few clicks or log in to continue.
Oz Nerf - Australian Nerf Community

Nerfing down under!. Oz Nerf - Australian Nerf Community

If you're new to the forums please do the following.
1. Read the Forum Rules before posting!
2. Update your location, age and avatar TRUTHFULLY
3. Introduce yourself in the Welcome to Oznerf forum section =)

Navigation

Statistics

Our users have posted a total of 52416 messages in 3425 subjects

We have 1922 registered users

The newest registered user is seabulb

Latest topics

» gold coast nerf war?
by ShaGGz LMS Fri Oct 07, 2016 3:49 pm

» nerf clearout
by Runeblade Wed Sep 07, 2016 7:03 am

» How to replace the Longshot trigger plate?
by neon64bit Mon Jan 04, 2016 9:42 am

» Mid North Coast/Hunter War Organisation
by Vampros Thu Dec 31, 2015 6:18 pm

» WTB felt for slugs
by Richo123 Sat Oct 24, 2015 6:21 am

November 2024

MonTueWedThuFriSatSun
    123
45678910
11121314151617
18192021222324
252627282930 

Calendar Calendar


+8
redcricket077
Benjiman
bulletproofvest
boosted6
Mozart
oxymoron
Echoes
clunk07
12 posters

    CWC - PAS Mod tutorial (Picture Heavy)

    clunk07
    clunk07
    Administrator
    Administrator


    Posts : 2953
    Join date : 2011-02-02
    Age : 44
    Location : Blackwater, Queensland

    CWC - PAS Mod tutorial (Picture Heavy) Empty CWC - PAS Mod tutorial (Picture Heavy)

    Post  clunk07 Sun May 22, 2011 3:23 pm

    Hi guys,

    Seeing as I've got another 5 of these on order, I thought it would be best to single the PAS, to show people the possibilities of this unit.

    Tools:

    • Basic tool kit


    • Hot glue gun


    • Dremel/rotary tool with cutting and sanding attachment


    Materials:

    • 19/32" brass (5cm)


    • 1/2" brass (3cm)


    • 25mm conduit


    • 20mm conduit


    • PETG


    • spring


    CWC - PAS Mod tutorial (Picture Heavy) Pas11

    As always, start by opening up your blaster. There are 2 screws located underneath the pump grip. Here's a look at the internals:

    CWC - PAS Mod tutorial (Picture Heavy) Dsc_0616

    Cut off the ball launcher, on the last rib, like this:

    CWC - PAS Mod tutorial (Picture Heavy) Dsc_0617

    I've used a piece of 25mm conduit, due to availability. You could use a coupler if you desire. Insert the brown funnel in to the orange housing, and glue in the 25mm conduit with hot glue, like so:

    CWC - PAS Mod tutorial (Picture Heavy) Dsc_0618

    Get your piece of 19/32" brass, and wrap it in e-tape until it fits snugly in the 25mm conduit. Also, wrap the piece of 1/2" brass in e-tape, so it fits snugly inside the 19/32" brass. You could also nest it in 9/16" first, and epoxy all 3 pieces of brass together, and epoxy in to the conduit. But, it's not difficult for it all to be done with e-tape, and just the 2 pieces of brass.

    CWC - PAS Mod tutorial (Picture Heavy) Dsc_0619

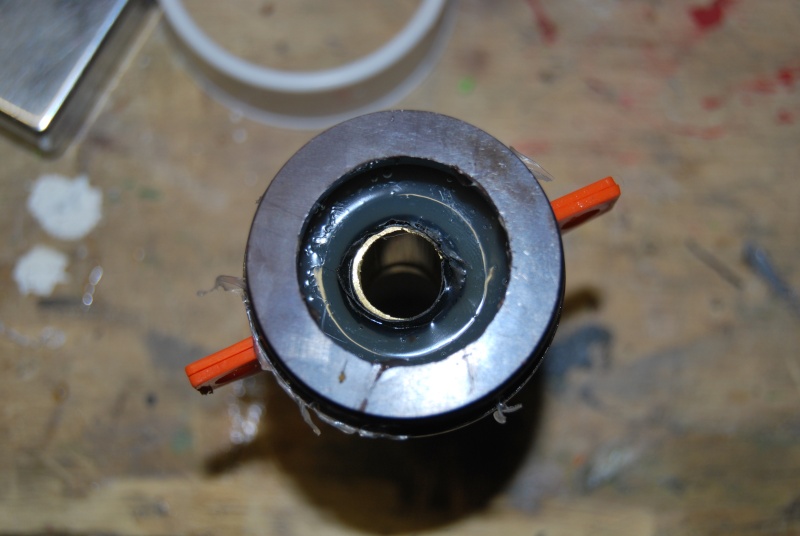
    Stick the brass in from the funnel end, and fill the deadspace up with hot glue:
    CWC - PAS Mod tutorial (Picture Heavy) Dsc_0620

    What we're building here, is a stopper for the dart. This blaster vacuum loads, and without this stopper, your darts will be sucked all the way in to the pluger tube. End result, squashed darts, and no firing. This is what it should look like from the barrel end:

    CWC - PAS Mod tutorial (Picture Heavy) Dsc_0621

    Okay, that's it for the coupler. For the barrel, I've used a 30cm length of 20mm conduit, with 30cm Petg nested inside of that with e-tape. A couple of wraps of e-tape on the 20mm conduit, and it's a very snug fit inside the 25mm conduit.

    Next is the plunger tube. Remove the plunger rod, head and spring. The stock spring is quite beefy, but I decided to add a spacer for a little more compression. Stock set-up:

    CWC - PAS Mod tutorial (Picture Heavy) Dsc_0623

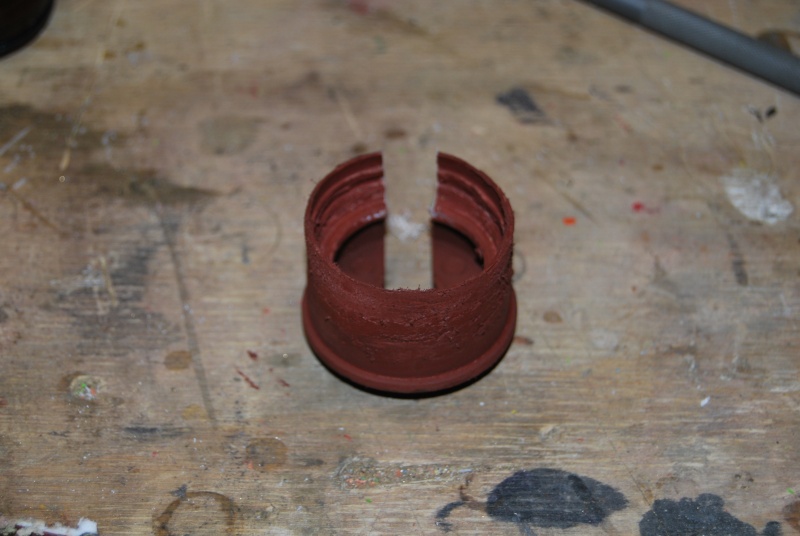
    There's different ways of doing this. I've used a small piece of 1" pvc, and the cap off of a 10L bottle of water. Cut out the groove for the plunger rod, and glue the spacer on to the stock spring locator:
    CWC - PAS Mod tutorial (Picture Heavy) Dsc_0622

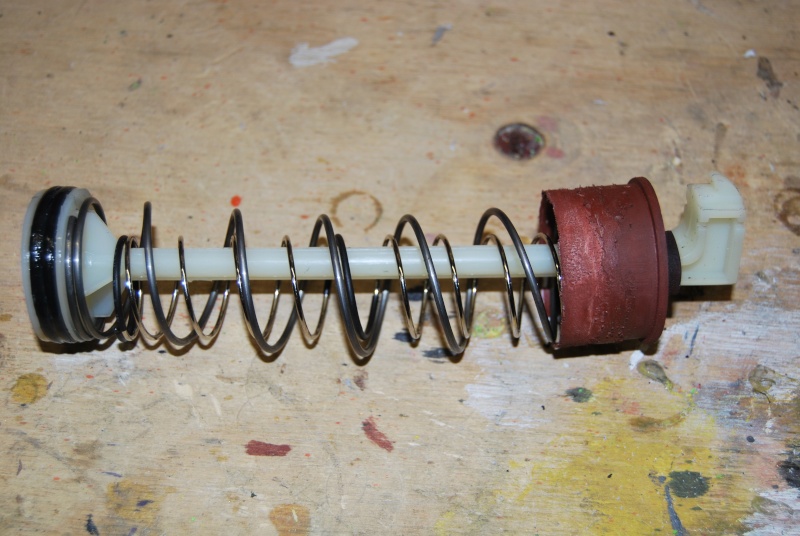
    Stock plunger seal is quite good, so I left it alone. I did add the spring from a Longstrike. It isn't long enough to add momentum through the entire travel of the plunger rod, but it will add power for at least 75% of the travel. Completed assembly:
    CWC - PAS Mod tutorial (Picture Heavy) Dsc_0624

    Now, lubricate the o-rings and re-assemble the plunger tube:

    CWC - PAS Mod tutorial (Picture Heavy) Dsc_0625

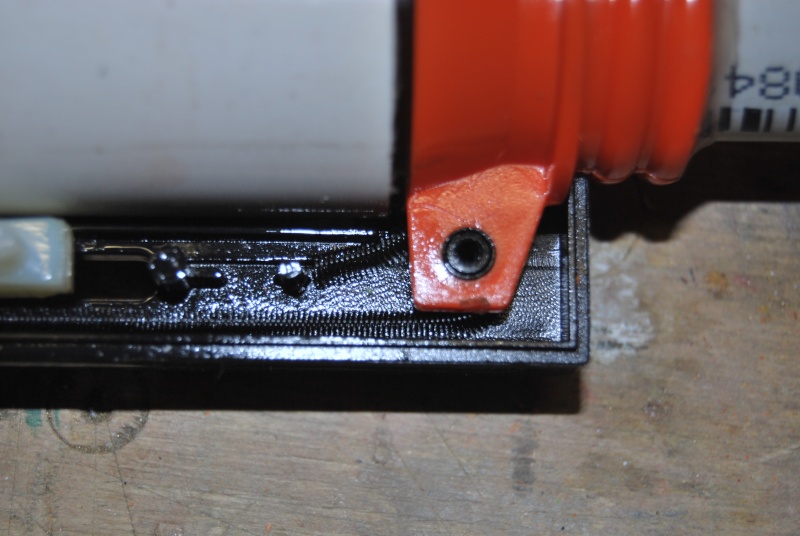
    The last part, is to re-locate the return spring of the grip, before re-assembling the blaster. This puts a fair bit more load on the spring, making the priming action feel alot better:
    CWC - PAS Mod tutorial (Picture Heavy) Dsc_0626

    Install the plunger tube, ensuring that the groove on the plunger rod lines up with the track. Re-assemble the blaster, and check that it functions correctly.

    CWC - PAS Mod tutorial (Picture Heavy) Dsc_0627

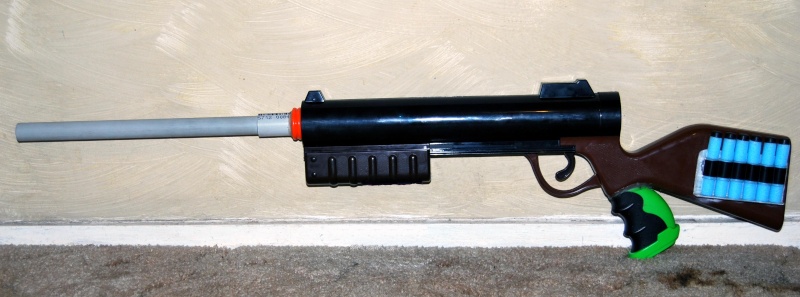
    All in all, it's a fairly simple and quick blaster to mod, requiring minimal materials. Now for some cosmetics:

    Pistol grip:
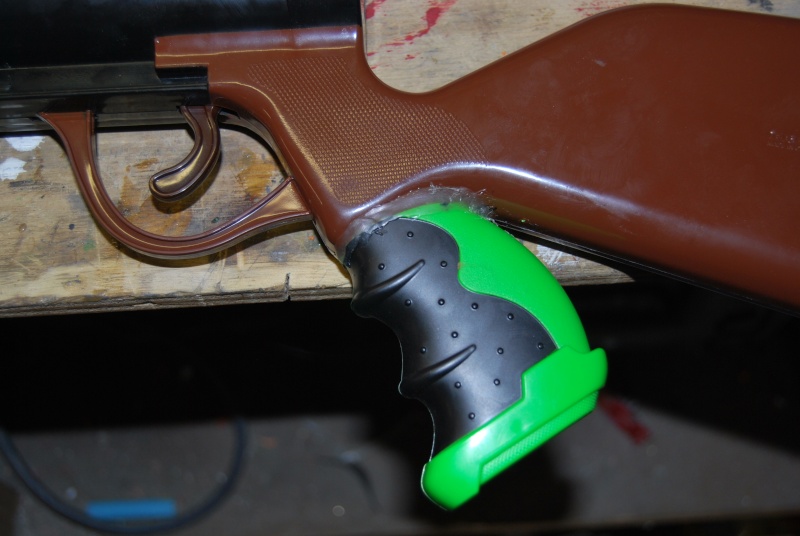
    CWC - PAS Mod tutorial (Picture Heavy) Dsc_0628

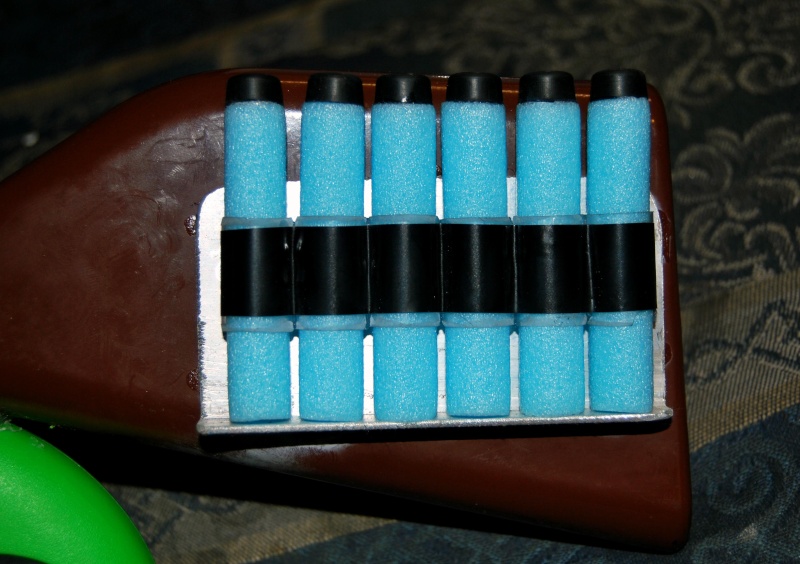
    Buttstock ammo holder:

    CWC - PAS Mod tutorial (Picture Heavy) Pas_bu10

    Finished Product:

    CWC - PAS Mod tutorial (Picture Heavy) Modded10

    I've still got some final sanding to finish, then a paint job, and mabye an iron sight on the barrel or something. I'll post pictures when I finally get around to finishing this off.

    Ranges:

    Stock, flat - 10 feet, maybe...

    Modded, flat - 114 feet

    Now, I haven't had time to experiment with more spring compression, different barrel material/length, dart weight etc. but I'm fairly impressed with the results so far. I feel it's as accurate, if not better, than my LShot.

    I've tested the range with heavy sili's, tails cut down to 5mm, and double-washered stingers. Lighter darts fish-tail like crazy.

    Before you go crazy with springs, the plunger rod does not look overly strong in my opinion, so reinforcement/replacement would be advisable.

    And, for those who don't know already, check out my sales thread to purchase one of these blaster's.
    Cheers,


    Last edited by clunk07 on Sun May 29, 2011 4:26 pm; edited 1 time in total
    Echoes
    Echoes


    Posts : 433
    Join date : 2010-11-04
    Age : 34
    Location : Bass Hill, Sydney, NSW

    CWC - PAS Mod tutorial (Picture Heavy) Empty Re: CWC - PAS Mod tutorial (Picture Heavy)

    Post  Echoes Sun May 22, 2011 3:54 pm

    This looks pretty awesome. 114 flat... and there's definitely a lot more potential in there. I think you might make a sale to me some time in the future clunk, perhaps in july/august if they don't sell by then that is.

    I'm thinking of doing an RSCB or something... but we'll see. Thanks for the write up! Eagerly awaiting your Doomsayer writeup

    clunk07
    clunk07
    Administrator
    Administrator


    Posts : 2953
    Join date : 2011-02-02
    Age : 44
    Location : Blackwater, Queensland

    CWC - PAS Mod tutorial (Picture Heavy) Empty Re: CWC - PAS Mod tutorial (Picture Heavy)

    Post  clunk07 Sun May 22, 2011 4:24 pm

    No problems mate, it was a pretty quick mod. I'm looking at keeping one of the other ones from this current order, seeing as no one has showed any interest, and doing the K9 mod with RSCB.

    Doomslayer mod is quite a while away, gotta finish a few other projects, plus some commissions.

    Funnily enough, I actually got slightly better range from 32mm blue foam, but never recorded that in my averages. There's a first for everything I suppose!!

    I'm looking in to reinforcing the plunger rod, then more spring compression will be possible. The vacuum-loading of this blaster is awesome, and the plunger tube is massive!! I'm overly impressed
    Echoes
    Echoes


    Posts : 433
    Join date : 2010-11-04
    Age : 34
    Location : Bass Hill, Sydney, NSW

    CWC - PAS Mod tutorial (Picture Heavy) Empty Re: CWC - PAS Mod tutorial (Picture Heavy)

    Post  Echoes Sun May 22, 2011 4:35 pm

    I can wait for that write up. There are a lot of things I didn't really understand from Angel's write up (over in NH) because half of his pictures are missing/deleted from his photobucket or whatever. His quality of write-up is generally nowhere near as detailed or easy to follow as yours either. Looking forward to it.

    How do you reckon you'd go about reinforcing the plunger rod? (You're right in that it looks a tad flimsy... or perhaps that's the translucent plastic talking :P). Epoxy putty it to hell? I also reckon replacing the spring altogether would do well once you get the reinforcements.
    clunk07
    clunk07
    Administrator
    Administrator


    Posts : 2953
    Join date : 2011-02-02
    Age : 44
    Location : Blackwater, Queensland

    CWC - PAS Mod tutorial (Picture Heavy) Empty Re: CWC - PAS Mod tutorial (Picture Heavy)

    Post  clunk07 Sun May 22, 2011 6:03 pm

    Seriously, the stock spring is fairly beefy. I think finding another longer spring to nest inside it would be a good addition - needs to be about 4cm longer than the longstrike, but I'll get an exact measurement at some stage.

    A few options for reinforcing the plunger rod. It's definitely not the colour of the plastic, it is rather flimsy. I had to cut an inch of length off my spacer, as it was bending the rod...

    Major reinforcement would be to cut the plunger head off, sheath the tube in conduit or steel pipe or similar, then tap a thread in to the rod, screw the plunger head on, and JB weld the hell out of everything. Similar to a LongShot plunger rod.

    At this stage, I'm going to leave it as is. Once I get some time up my sleeve, I'll investigate the possibilities.
    oxymoron
    oxymoron


    Posts : 357
    Join date : 2010-12-19
    Age : 41
    Location : SE Brisbane, QLD

    CWC - PAS Mod tutorial (Picture Heavy) Empty Re: CWC - PAS Mod tutorial (Picture Heavy)

    Post  oxymoron Mon May 23, 2011 1:51 am

    I was thinking of finding a brass size with an ID as close to the OD of the plunger rod, cutting it in half, gluing it to the rod and soldering the brass back together.

    I think the priming arm will need some strengthening as well depending how much more spring load is added.
    clunk07
    clunk07
    Administrator
    Administrator


    Posts : 2953
    Join date : 2011-02-02
    Age : 44
    Location : Blackwater, Queensland

    CWC - PAS Mod tutorial (Picture Heavy) Empty Re: CWC - PAS Mod tutorial (Picture Heavy)

    Post  clunk07 Mon May 23, 2011 3:35 am

    Priming arm shouldn't be too hard to replicate out of mild steel I reckon!!

    Brass tube was another one of the options I was considering.
    Mozart
    Mozart


    Posts : 622
    Join date : 2011-04-24
    Age : 32
    Location : Burnie, TAS

    CWC - PAS Mod tutorial (Picture Heavy) Empty Re: CWC - PAS Mod tutorial (Picture Heavy)

    Post  Mozart Mon May 23, 2011 4:59 am

    Please send my PAS to me tight now, Clunk! Lol. Can't wait man. I'd be tempted to buy two, but the RFSG and one, plus all the other crap I'm getting from you, has emptied my wallet!

    Nice write up, man. Clean and simple.

    Cody
    boosted6
    boosted6


    Posts : 479
    Join date : 2011-03-06
    Age : 44
    Location : Melbourne

    CWC - PAS Mod tutorial (Picture Heavy) Empty Re: CWC - PAS Mod tutorial (Picture Heavy)

    Post  boosted6 Tue May 24, 2011 4:09 am

    Nice Clunk, was great to see a write-up of one of these here.

    Yeah that plunger rod looks flimsy, but thats nothing.
    To think those ranges are with the stock spring.

    How big is the plunger tube? Over 35mm?

    Would you do a speed loader on the PAS? Saw a guy on that M6 picture slideshow had a 6 shot speed loader on one.

    Wonder if a 35mm bath plug head would fit that plunger tube?


    Good stuff Clunk. If my TS wasnt such a beast, i would have bought one.

    clunk07
    clunk07
    Administrator
    Administrator


    Posts : 2953
    Join date : 2011-02-02
    Age : 44
    Location : Blackwater, Queensland

    CWC - PAS Mod tutorial (Picture Heavy) Empty Re: CWC - PAS Mod tutorial (Picture Heavy)

    Post  clunk07 Tue May 24, 2011 4:11 am

    boosted6 wrote:Nice Clunk, was great to see a write-up of one of these here.

    Yeah that plunger rod looks flimsy, but thats nothing.
    To think those ranges are with the stock spring.

    How big is the plunger tube? Over 35mm?

    Would you do a speed loader on the PAS? Saw a guy on that M6 picture slideshow had a 6 shot speed loader on one.

    Wonder if a 35mm bath plug head would fit that plunger tube?


    Good stuff Clunk. If my TS wasnt such a beast, i would have bought one.


    I've put a little compression on the stock spring, and added a Longstrike spring, which is a little short.

    When I open it up to get internal pics, I'll measure the ID of the plunger tube for you.

    Cheers,
    bulletproofvest
    bulletproofvest


    Posts : 508
    Join date : 2010-05-29
    Age : 29
    Location : Adelaide Hills

    CWC - PAS Mod tutorial (Picture Heavy) Empty Re: CWC - PAS Mod tutorial (Picture Heavy)

    Post  bulletproofvest Tue May 24, 2011 4:35 am

    So what paintjob is planned?
    boosted6
    boosted6


    Posts : 479
    Join date : 2011-03-06
    Age : 44
    Location : Melbourne

    CWC - PAS Mod tutorial (Picture Heavy) Empty Re: CWC - PAS Mod tutorial (Picture Heavy)

    Post  boosted6 Tue May 24, 2011 4:50 am

    clunk07
    clunk07
    Administrator
    Administrator


    Posts : 2953
    Join date : 2011-02-02
    Age : 44
    Location : Blackwater, Queensland

    CWC - PAS Mod tutorial (Picture Heavy) Empty Re: CWC - PAS Mod tutorial (Picture Heavy)

    Post  clunk07 Tue May 24, 2011 7:28 am

    That's a pretty sweet PJ. I'm too lazy to mask up and paint (Edit - too impatient!!).

    I'm not sure what will happen with PJ for the PAS or RFSG yet. I've got a few electric camo ideas in mind.

    Gotta finish modding the PAS before I even look at the RFSG, oh, and commissions, commissions lol
    Benjiman
    Benjiman


    Posts : 26
    Join date : 2011-05-12
    Age : 34
    Location : Geelong, Vic

    CWC - PAS Mod tutorial (Picture Heavy) Empty Re: CWC - PAS Mod tutorial (Picture Heavy)

    Post  Benjiman Tue May 24, 2011 9:14 am

    oxymoron
    oxymoron


    Posts : 357
    Join date : 2010-12-19
    Age : 41
    Location : SE Brisbane, QLD

    CWC - PAS Mod tutorial (Picture Heavy) Empty Re: CWC - PAS Mod tutorial (Picture Heavy)

    Post  oxymoron Wed May 25, 2011 6:37 am

    clunk07 wrote:
    boosted6 wrote:Nice Clunk, was great to see a write-up of one of these here.

    Yeah that plunger rod looks flimsy, but thats nothing.
    To think those ranges are with the stock spring.

    How big is the plunger tube? Over 35mm?

    Would you do a speed loader on the PAS? Saw a guy on that M6 picture slideshow had a 6 shot speed loader on one.

    Wonder if a 35mm bath plug head would fit that plunger tube?


    Good stuff Clunk. If my TS wasnt such a beast, i would have bought one.


    I've put a little compression on the stock spring, and added a Longstrike spring, which is a little short.

    When I open it up to get internal pics, I'll measure the ID of the plunger tube for you.

    Cheers,


    The ID of the PAS plunger tube is 40mm and the length the plunger travels when firing is about 90mm which gives a volume of 0.113Lt.

    Compare that to a Longshot plunger tube which has a volume of just 0.077Lt (ID of 35mm and plunger travel of about 80mm) and you can start to see the potential of one of these


    Last edited by oxymoron on Wed May 25, 2011 7:14 am; edited 1 time in total
    boosted6
    boosted6


    Posts : 479
    Join date : 2011-03-06
    Age : 44
    Location : Melbourne

    CWC - PAS Mod tutorial (Picture Heavy) Empty Re: CWC - PAS Mod tutorial (Picture Heavy)

    Post  boosted6 Wed May 25, 2011 6:42 am

    Damn 40mm!

    Might be worth having afew custom springs made for this?

    But yes i can see the potential...

    If a TS can shoot 160ft, surely the PAS will get around 170-180ft?
    oxymoron
    oxymoron


    Posts : 357
    Join date : 2010-12-19
    Age : 41
    Location : SE Brisbane, QLD

    CWC - PAS Mod tutorial (Picture Heavy) Empty Re: CWC - PAS Mod tutorial (Picture Heavy)

    Post  oxymoron Wed May 25, 2011 7:00 am

    I'm working on the spring setup now. The stock spring is HUGE - OD is about 37mm and free length is 160mm but it drops to 140mm once it is sitting in place due to the pre-compression.
    My guess on it's load rating is roughly the same as a Longshot V2 spring (14Kg)

    I've found a spring with an OD of 27mm and a free length of 135mm that should sit inside the stock spring nicely. It's load is also around the 14Kg mark.

    I'm going to try both of these together

    Once everything has been reinforced of course.
    boosted6
    boosted6


    Posts : 479
    Join date : 2011-03-06
    Age : 44
    Location : Melbourne

    CWC - PAS Mod tutorial (Picture Heavy) Empty Re: CWC - PAS Mod tutorial (Picture Heavy)

    Post  boosted6 Wed May 25, 2011 7:03 am

    Both together would be insane i think, say hello to 160ft at least.
    Mmm i told myself not to buy anymore blasters.

    Wonder if its easy to have a spring made?
    Say if you currently have 14kg, what if you asked for a 25kg rating?
    oxymoron
    oxymoron


    Posts : 357
    Join date : 2010-12-19
    Age : 41
    Location : SE Brisbane, QLD

    CWC - PAS Mod tutorial (Picture Heavy) Empty Re: CWC - PAS Mod tutorial (Picture Heavy)

    Post  oxymoron Wed May 25, 2011 7:08 am

    Yeah it's possible - but I imagine it will be a lot cheaper to buy something off the shelf that suits unless you were going to get a heap made to sell.
    clunk07
    clunk07
    Administrator
    Administrator


    Posts : 2953
    Join date : 2011-02-02
    Age : 44
    Location : Blackwater, Queensland

    CWC - PAS Mod tutorial (Picture Heavy) Empty Re: CWC - PAS Mod tutorial (Picture Heavy)

    Post  clunk07 Wed May 25, 2011 7:16 am

    I'll be waiting for a spring to magically appear in my letter box (hint, nudge, wink oxy!!)

    Reinforcement would be a major priority at this point.

    I think with a bit of work, these would definitely rival a LS for distance. At current range, it's a hell of alot more accurate than any LS I've used.

    Maybe I should order some more... lol
    boosted6
    boosted6


    Posts : 479
    Join date : 2011-03-06
    Age : 44
    Location : Melbourne

    CWC - PAS Mod tutorial (Picture Heavy) Empty Re: CWC - PAS Mod tutorial (Picture Heavy)

    Post  boosted6 Wed May 25, 2011 7:19 am

    Should rival a LS?

    I thought it would smash a LS for distance?

    clunk07
    clunk07
    Administrator
    Administrator


    Posts : 2953
    Join date : 2011-02-02
    Age : 44
    Location : Blackwater, Queensland

    CWC - PAS Mod tutorial (Picture Heavy) Empty Re: CWC - PAS Mod tutorial (Picture Heavy)

    Post  clunk07 Wed May 25, 2011 7:22 am

    I meant as an overall package.

    Range and accuracy should be better, but the Lshot's aesthetics and clip modularity even it out a bit.

    The PAS feels a little awkward in my hands, but nothing too concerning. Definitely not as nice as the LS.

    The PAS is quicker to mod and paint though. haha
    boosted6
    boosted6


    Posts : 479
    Join date : 2011-03-06
    Age : 44
    Location : Melbourne

    CWC - PAS Mod tutorial (Picture Heavy) Empty Re: CWC - PAS Mod tutorial (Picture Heavy)

    Post  boosted6 Wed May 25, 2011 7:25 am

    Yeah much quicker for sure to paint.

    Looking forward to seeing what ranges you guys achieve!

    160-170ft at least...
    redcricket077
    redcricket077


    Posts : 629
    Join date : 2010-12-31
    Age : 27
    Location : SE Suburbs Melbourne

    CWC - PAS Mod tutorial (Picture Heavy) Empty Re: CWC - PAS Mod tutorial (Picture Heavy)

    Post  redcricket077 Wed May 25, 2011 7:33 am

    Looking good Clunk. Keep up the awesomness!
    clunk07
    clunk07
    Administrator
    Administrator


    Posts : 2953
    Join date : 2011-02-02
    Age : 44
    Location : Blackwater, Queensland

    CWC - PAS Mod tutorial (Picture Heavy) Empty Re: CWC - PAS Mod tutorial (Picture Heavy)

    Post  clunk07 Tue Jun 07, 2011 8:34 am

    Hey guys,

    Been doing a little bit of research, and found this reinforcement technique for the plunger rod over at NH. Full credit goes to TantumBull for discovering this:

    http://nerfhaven.com/forums/index.php?showtopic=17096

    I've not had any issues with mine yet, but I'll probably do this anyway. Preventive Maintenance is always better than closing the gate after the horse has bolted!!

    It will also give me the option to run any spring combo that I choose.

    Cheers,
    oxymoron
    oxymoron


    Posts : 357
    Join date : 2010-12-19
    Age : 41
    Location : SE Brisbane, QLD

    CWC - PAS Mod tutorial (Picture Heavy) Empty Re: CWC - PAS Mod tutorial (Picture Heavy)

    Post  oxymoron Tue Jun 07, 2011 3:09 pm

    Yeah that's the method I was planning on using. I must have read that previously at some stage.

    I've been running the spring setup I mentioned earlier (13kg plus stock spring) for a few days without any reinforcement at all. Even used it at the war on Sunday for a bit. Only problem I had was the trigger being very twitchy. Apart from that accuracy and range are excellent.

    I'm using a 50cm ish PETG barrel nested in Conduit. It hits 40m pretty easy with a couple of degrees angle. Well over 50m with a 10-15 degree angle.

    A little hard to prime for most but I don't mind. Just need to sort a faster way of loading and it would make a great primary.
    clunk07
    clunk07
    Administrator
    Administrator


    Posts : 2953
    Join date : 2011-02-02
    Age : 44
    Location : Blackwater, Queensland

    CWC - PAS Mod tutorial (Picture Heavy) Empty Re: CWC - PAS Mod tutorial (Picture Heavy)

    Post  clunk07 Tue Jun 07, 2011 3:23 pm

    oxymoron wrote:Yeah that's the method I was planning on using. I must have read that previously at some stage.

    I've been running the spring setup I mentioned earlier (13kg plus stock spring) for a few days without any reinforcement at all. Even used it at the war on Sunday for a bit. Only problem I had was the trigger being very twitchy. Apart from that accuracy and range are excellent.

    I'm using a 50cm ish PETG barrel nested in Conduit. It hits 40m pretty easy with a couple of degrees angle. Well over 50m with a 10-15 degree angle.

    A little hard to prime for most but I don't mind. Just need to sort a faster way of loading and it would make a great primary.

    I only just found that method this morning, but it's very similar to what we originally spoke about - not exactly rocket-science.

    My barrel is only 30cm, and hitting very close to 35m dead flat, maybe a couple of degrees angled. That's just with stock PAS and stock LS springs. I tried the 60cm barrel from my titan, and results were rather disappointing. Also, it primes very easily, and re-load is quite good time-wise. I just stick half the dart down the end of the barrel, and the vacuum takes care of the rest!!

    I'll have to test it with a decent angle at some stage, but I doubt it would go anywhere over 130 feet.
    matt.chopper
    matt.chopper


    Posts : 451
    Join date : 2010-08-24
    Age : 28
    Location : Melbourne

    CWC - PAS Mod tutorial (Picture Heavy) Empty Re: CWC - PAS Mod tutorial (Picture Heavy)

    Post  matt.chopper Tue Jun 07, 2011 3:30 pm

    I started installing a bathplug plunger in mine the other week. Should be finished after exams. I"ll keep you updated guys.
    clunk07
    clunk07
    Administrator
    Administrator


    Posts : 2953
    Join date : 2011-02-02
    Age : 44
    Location : Blackwater, Queensland

    CWC - PAS Mod tutorial (Picture Heavy) Empty Re: CWC - PAS Mod tutorial (Picture Heavy)

    Post  clunk07 Tue Jun 07, 2011 3:38 pm

    matt.chopper wrote:I started installing a bathplug plunger in mine the other week. Should be finished after exams. I"ll keep you updated guys.

    Sounds good, but wouldn't that be smaller than the stock tube? I'm sure I measure it at 34mm or so.

    Either way, interested in the results mate.
    Eclipse
    Eclipse


    Posts : 339
    Join date : 2010-09-27
    Age : 26
    Location : Sydney

    CWC - PAS Mod tutorial (Picture Heavy) Empty Re: CWC - PAS Mod tutorial (Picture Heavy)

    Post  Eclipse Wed Jun 08, 2011 9:34 am

    Looks awesome, keep up the good work. If the paintjob is anything like that of your commissioned LSs, it'll be great.
    clunk07
    clunk07
    Administrator
    Administrator


    Posts : 2953
    Join date : 2011-02-02
    Age : 44
    Location : Blackwater, Queensland

    CWC - PAS Mod tutorial (Picture Heavy) Empty Re: CWC - PAS Mod tutorial (Picture Heavy)

    Post  clunk07 Wed Jun 08, 2011 9:38 am

    Thanks for that, I'm still a little undecided yet for paint. Having a few weeks off, so plenty of time to work something out. Watch this space... haha

    Cheers,
    clunk07
    clunk07
    Administrator
    Administrator


    Posts : 2953
    Join date : 2011-02-02
    Age : 44
    Location : Blackwater, Queensland

    CWC - PAS Mod tutorial (Picture Heavy) Empty Re: CWC - PAS Mod tutorial (Picture Heavy)

    Post  clunk07 Mon Jun 27, 2011 7:59 pm

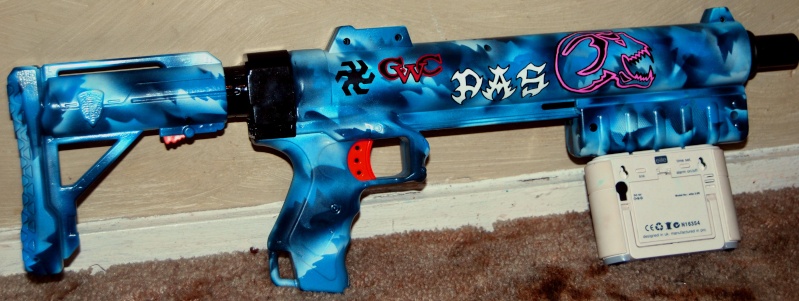
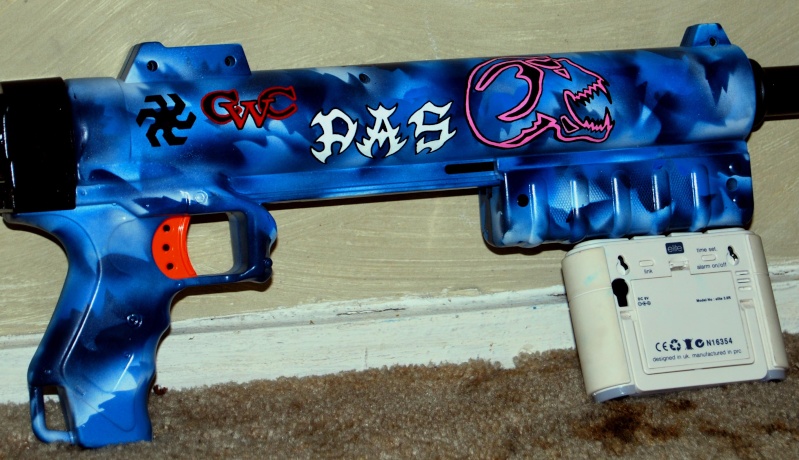
    Finished product (finally):

    CWC - PAS Mod tutorial (Picture Heavy) Dsc_0910

    CWC - PAS Mod tutorial (Picture Heavy) Dsc_0911

    CWC - PAS Mod tutorial (Picture Heavy) Dsc_0912

    Notice how well the Raider handle fits. I used a little hot-glue to hold it in place initially, then plastic welded it to the shell of the PAS, and to fill any of the gaps. A piece of the old Raider shell covers the gap in front of the trigger guard, which I plastic-welded as well. Technically, it's not plastic welding, as I just used an old soldering iron, but the principle is virtually the same.

    I connected the Raider and PAS trigger's together in a similar way that Mozart did, but utilised 30lb fuseable trace wire instead of string and hot-glue.

    This is without a doubt, my favourite blaster thus far. Sure, it's not quite as powerful as a LS, and isn't clip-fed, but it will adhere to range limitations at the majority of wars, and it's just so light and ergonomic.

    I'm pretty happy that I've got a spare one!!

    Cheers,
    matt.chopper
    matt.chopper


    Posts : 451
    Join date : 2010-08-24
    Age : 28
    Location : Melbourne

    CWC - PAS Mod tutorial (Picture Heavy) Empty Re: CWC - PAS Mod tutorial (Picture Heavy)

    Post  matt.chopper Tue Jun 28, 2011 12:48 am

    Haha I love my PAS as well. To bad my bluefoam is a little tighter than everyone elses.
    clunk07
    clunk07
    Administrator
    Administrator


    Posts : 2953
    Join date : 2011-02-02
    Age : 44
    Location : Blackwater, Queensland

    CWC - PAS Mod tutorial (Picture Heavy) Empty Re: CWC - PAS Mod tutorial (Picture Heavy)

    Post  clunk07 Tue Jun 28, 2011 5:41 am

    matt.chopper wrote:Haha I love my PAS as well. To bad my bluefoam is a little tighter than everyone elses.

    That sucks mate, my blue foam is a perfect fit in the petg barrel, even the larger pink foam still seems to fit quite well!!

    Cheers,
    clunk07
    clunk07
    Administrator
    Administrator


    Posts : 2953
    Join date : 2011-02-02
    Age : 44
    Location : Blackwater, Queensland

    CWC - PAS Mod tutorial (Picture Heavy) Empty Re: CWC - PAS Mod tutorial (Picture Heavy)

    Post  clunk07 Thu Aug 11, 2011 2:16 pm

    Update:

    Completed alot of reinforcing on a second PAS today, and have been successful in using a cut down K26 spring and stock PAS spring.

    Using Triple-washer blue foam stinger's, average range was 157 feet at flat angle (less than 5 degree's - even had a mate check it while I was firing!! )

    Admittedly, it's not overly functional, as most people will struggle to prime it, even with a shotgun grip. After 10 shots, I had actually done some muscular damage to my left arm )

    I then removed the stock PAS spring, and just tested with the K26 spring. Priming was alot easier, and flat range was just over 135 feet. Not much increase in velocity though. Shooting cardboard boxes with the K26 PAS as opposed to the stock spring PAS, there was minimal, if any, difference.

    A little disappointing with the work involved, but the consolation is that the internals are pretty much bullet-proof now, which is always a bonus.

    I'll post up some pic's at a later stage to detail the reinforcements completed.

    Cheers,

    Sponsored content


    CWC - PAS Mod tutorial (Picture Heavy) Empty Re: CWC - PAS Mod tutorial (Picture Heavy)

    Post  Sponsored content


      Current date/time is Fri Nov 15, 2024 4:11 am