

Hi guys,
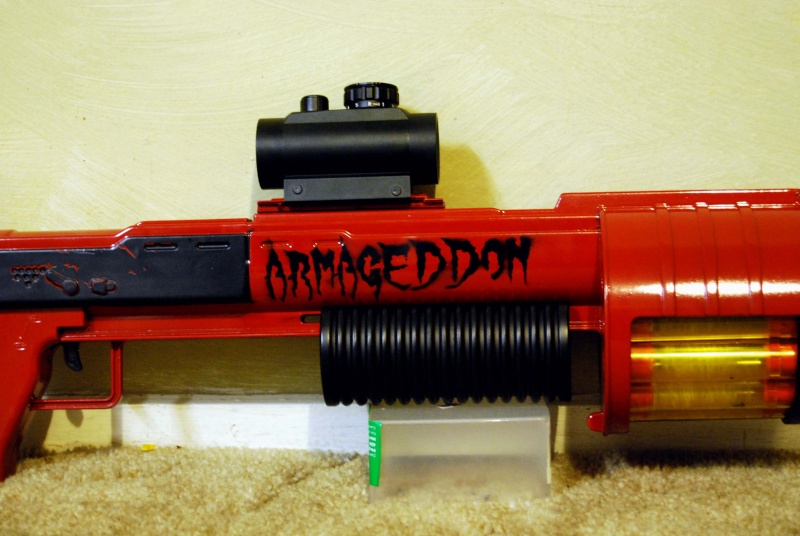
Following FA24's lead, here's the Aussie DoomSayer - the "Armageddon" haha

Tools:
Basic Tool Kit
Dremel/Rotary tool with cutting, sanding attachments
Hot glue gun
Hobby hacksaw
Power drill/drill press and associated drill bits
Materials
PETG x 12 feet
PVC cement/plumber's goop
E-tape
O-rings and insertion foam
Foam
Epoxy putty
Super glue
1/8" pushnut fasteners.
Start by opening up the blaster, as normal. There are two screws obscured by the pump slide. You'll also need to cut off the orange barrel marker/sight. Apart from that, it's a fairly straight-forward procedure.
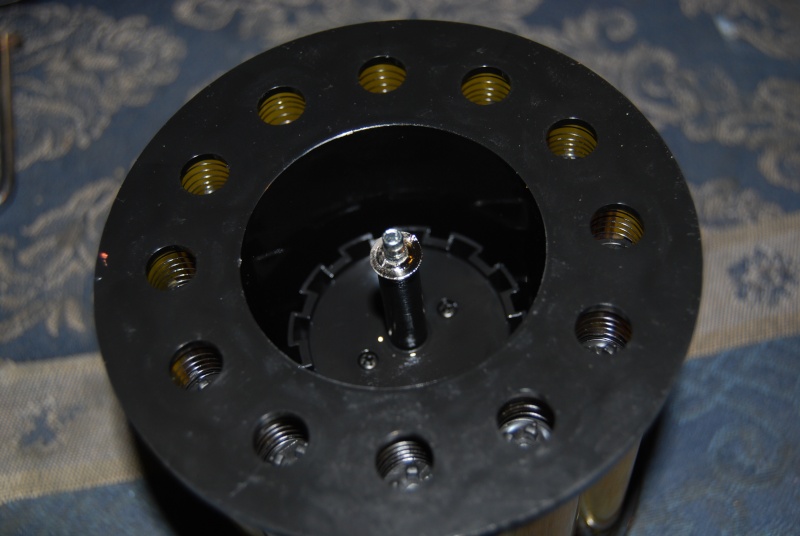
Once opened, remove the plunger tube, priming bar and spring, rotation mech rod and spring, and lastly the turret. There's a fair bit of work to be done on the turret, so I started on it first.
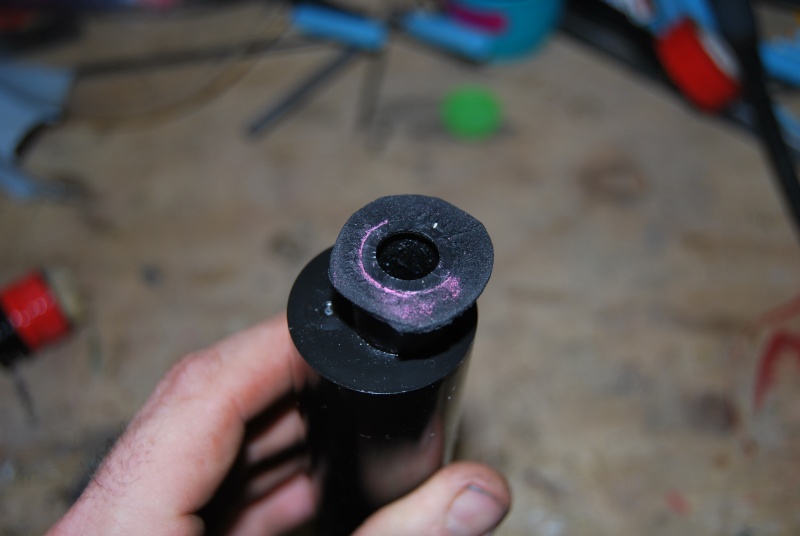
cut the pushnut fastener pictured below, so the rotation mech can be accessed. I just used a pair of diagonal cutters:
These are the components of the rotation mech. Beefy gear wheel,slip clutch, connecting rod, mech spring.
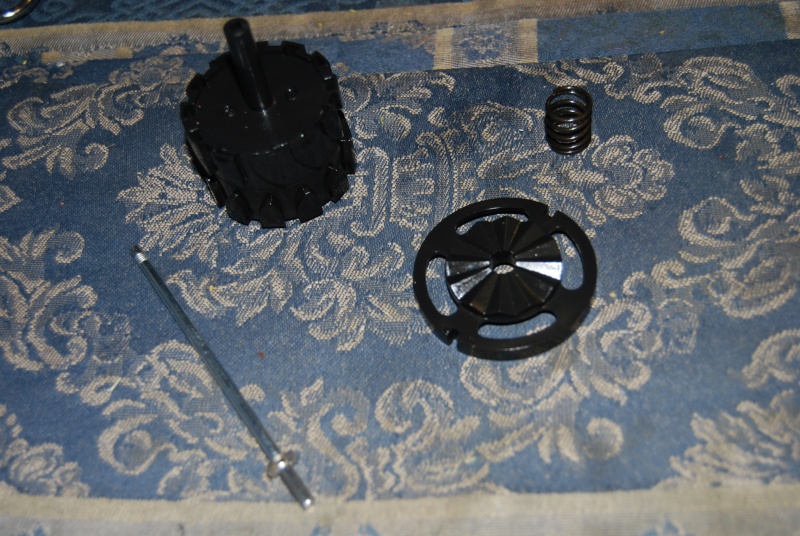
Grease up the black rod of the gear wheel, and slip the mech spring over the top of it. Fill the mech spring with hot glue to beef it up, then cut each end flat with a hobby knife.
This should hopefully be all you'll need to do to allow the mech gear to handle the added weight of the extra barrel's. If you experience issues, it may help to glue the clutch and the gear wheel together. Re-assemble the rotation mech, and replace the pushnut fastener. Once you've ascertained the correct positioning of the fastener on the connecting rod through rotation testing, it would be advisable to glue the fastener in place.
Now, get your Dremel with a cutting bit, and cut the majority of the front of the turret housing on the blaster, so that the longer barrels aren't obstructed. Leave a small ring around the edge, to give the turret something to press up against.
Remove the 4 screws from the top of the turret, and it should all come apart, and look like this:

I only used a precision screw driver to remove the dart posts, and the AR's fall out on their own. The main transparent yellow turret can take a bit of leverage to get it to separate from the bottom.
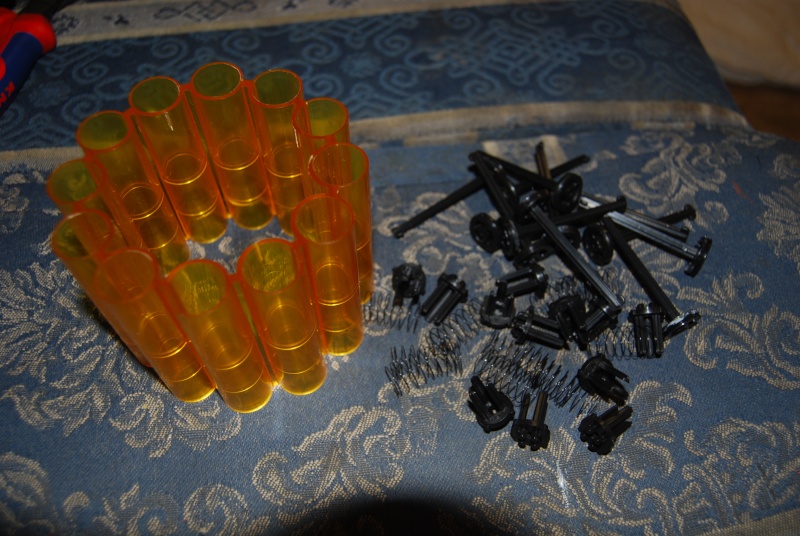
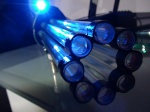
The ID of the barrels narrows in the middle, and is wider at the ends. I used a pedestal drill with a spade bit to bore out the holes, so the PETG would fit nicely.
Wrap e-tape around one end of the petg barrel, and then slide it as far as possible through the base of the turret. You should have a slight gap where the petg is inside the profile:
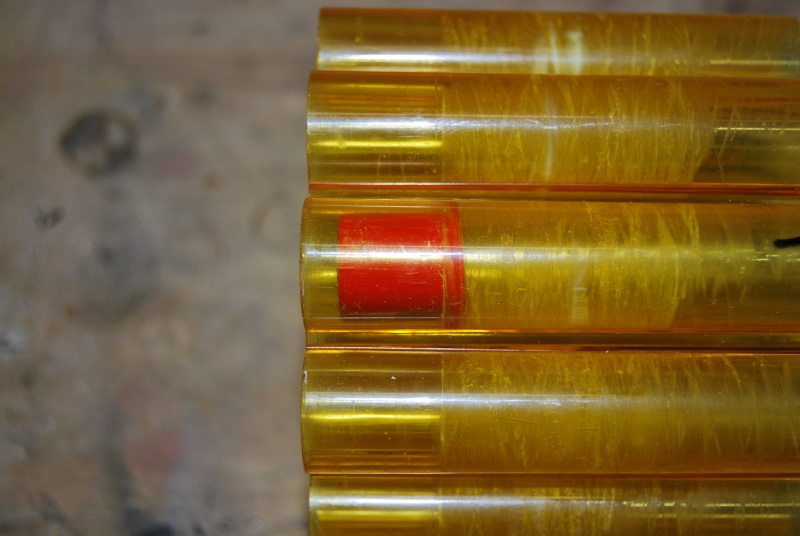
Wrap e-tape around the PETG, as close to the top of turret as possible:

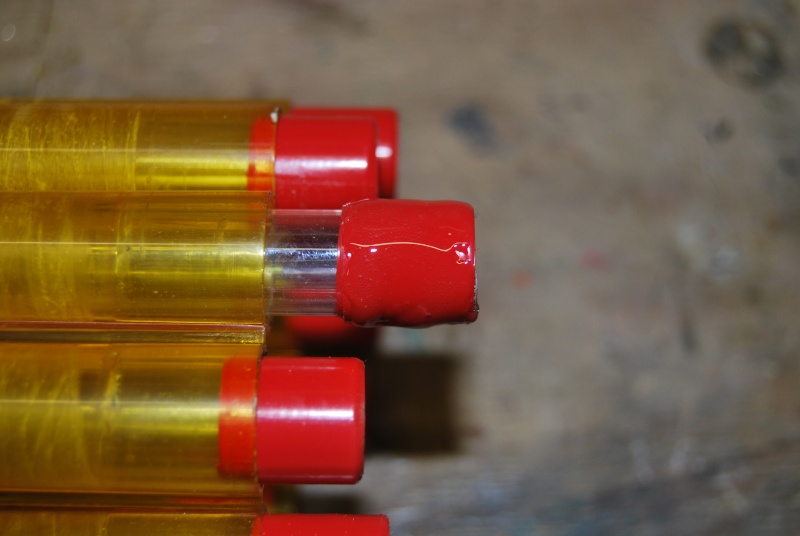
Apply pvc cement/plumber's goop/epoxy adhesive to the bottom of the PETG barrel, and pull it through the top of the turret. Stick the turret on to the black bottom plate, to locate the correct depth.
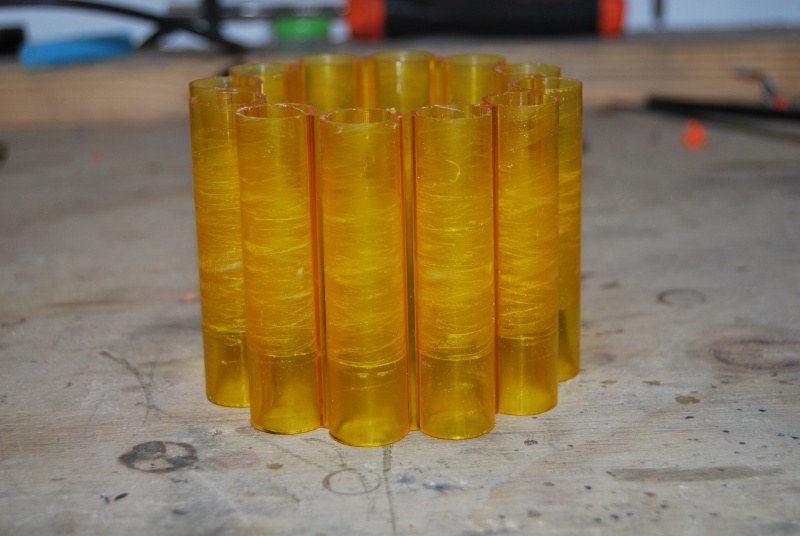
Repeat these steps another 11 times, to make all 12 barrels:
Before re-assembling the turret, we'll need to modify the base plate to allow the turret to be rear-loading. Grab a drill or a dremel, and hone out the holes to the first ring. Stock hole on the left, rear-loading holes on the right:

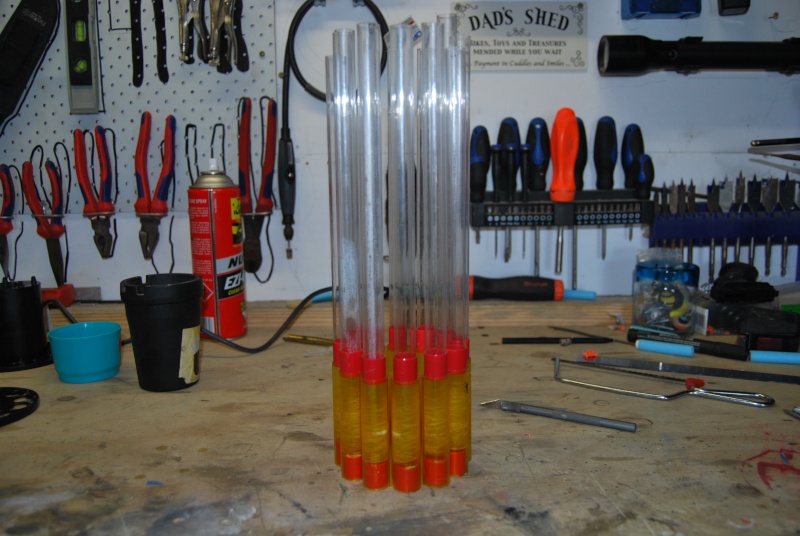
Once you've completed these tasks, apply adhesive in circles around the barrel holes on the bottom turret plate, and sit the barrel on top. Assemble the other components of the barrel, and add some weight to the black top plate, to aid in curing the adhesive. I drilled a hole in my work bench so the connecting rod would pass through, and the turret would sit flat. Then I filled a container full of fishing sinker's, and placed it on the top plate, inside the barrels.

Clean out any adhesive that may be present in the bottomm of the barrels with a hobby knife. Replace the turret in the blaster, and screw the two shell halves together. Drop a Sharpie/marker down the barrel numbers 2,3,4 and 9,10 and 11 to mark the position for the rear-loading holes. Disassemble the blaster again. I used a 3 mm pilot hole, then turned the blaster over, and drilled right through with a 16mm spade bit. One one side, I left the 3 rear-loading holes, and on the other side, I dremelled out a bigger area around the holes. I didn't have any alignment issues, I just liked the look of the slot. Clean up all the edges with a sanding attachment:
Now, on to the plunger, and air seals:
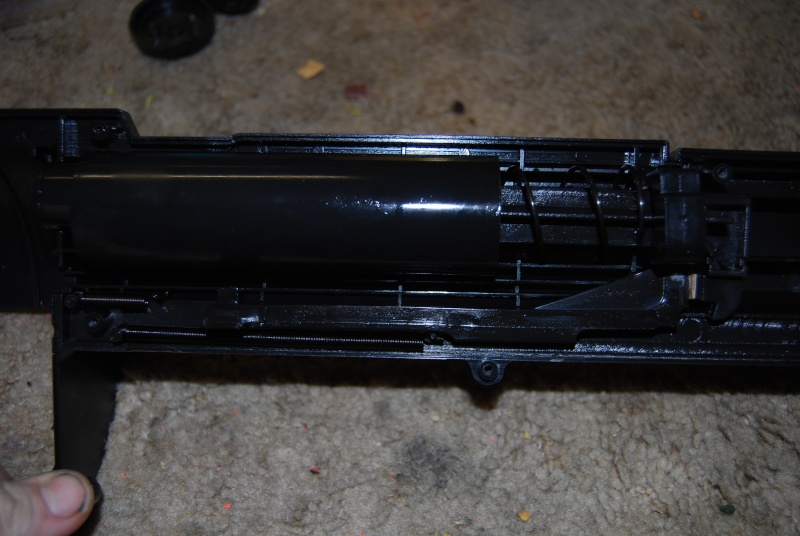
There are a few different ways of adding another spring/s. Most people prefer to remove the rubber plunger seal, and use hot water to dissolve the glue, and remove the entire plunger head. It seemed like alot of finicky work, so I just wound a stock Longshot spring on to the plunger rod.
For a better plunger seal, I added some foam strips from a mangled dart, and used e-tape to secure it in place, and to increase the plunger OD. I also added a small piece of foam to the top of the plunger head, for some buffering. I also hot glued the underneath of the plunger head, as I could feel air escaping back down through there as well:

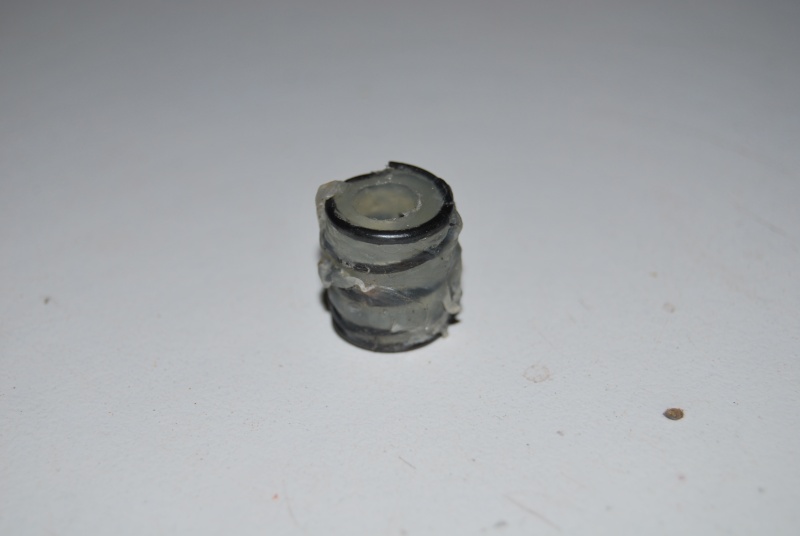
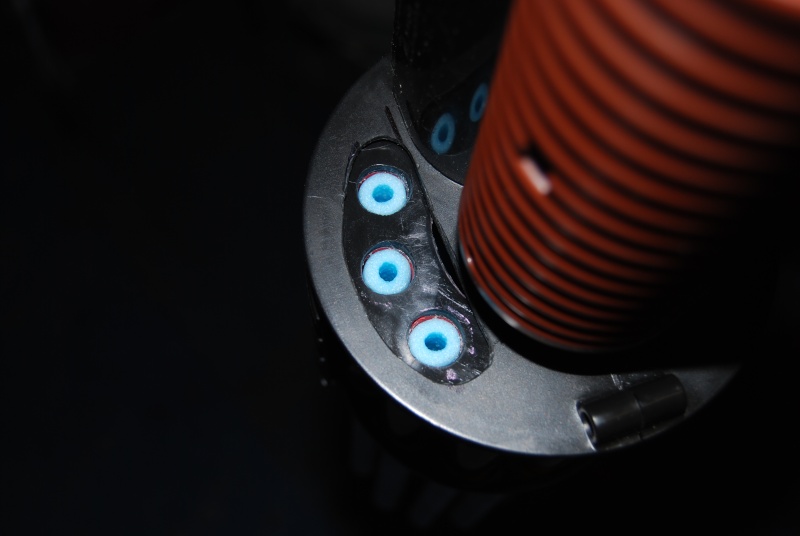
Lube up the plunger head with your preferred lubricant. Next we need to fix the plunger to turret seal. I custom made an o-ring to fit on the front of the tube. There's a tiny lip which it fits in to perfectly. Then I cut a washer out of insertion foam, and super-glued it in place. You made need to trim the o-ring and foam washer down, so they don't foul the rotation of the turret:
The final part, is to add some epoxy putty to the priming arm, and glue a small piece of plastic on to the end. This piece of plastic decreases the travel needed to prime the blaster:

Now, it's time to re-assemble the blaster, check rotation mech, firing mech etc. Perform any tweaking that may be required, and you should have a very accurate blaster, with good range.
I haven't found the need to beef up the trigger actuation, as I'm only using a fairly mediocre spring set-up. I did remove the safety lock though, as it was becoming a little frustrating.
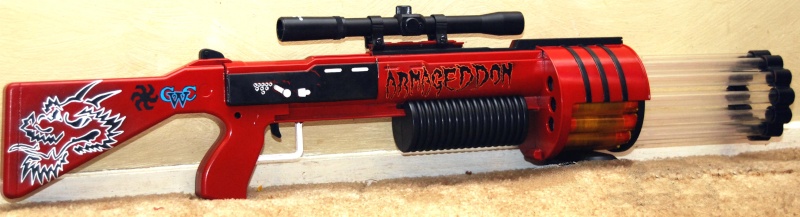
And here's the finished product:
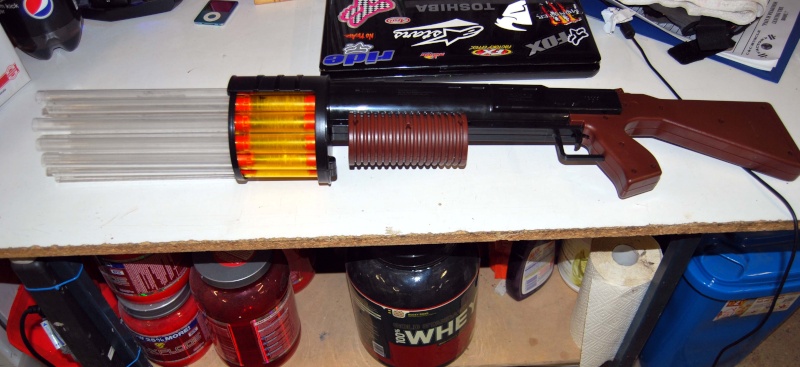
I never tested the blaster stock, so ranges are unknown at this stage. I had only intended for this to be a mid-range blaster, but results were better than expected.
Flat: 112 feet (from shoulder-height, less than 5 degree elevation)
Range tests were conducted using blue foam with cut-down heavy sili's. I still can't get over how extremely accurate this blaster is, and projectile speed is not too shabby either.
All in all, it wasn't an overly difficult modification. There was alot of finicky test and see work with the plunger to turret seal, and turret rotation, but nothing too complex.
Cheers,
Following FA24's lead, here's the Aussie DoomSayer - the "Armageddon" haha
Tools:
Basic Tool Kit
Dremel/Rotary tool with cutting, sanding attachments
Hot glue gun
Hobby hacksaw
Power drill/drill press and associated drill bits
Materials
PETG x 12 feet
PVC cement/plumber's goop
E-tape
O-rings and insertion foam
Foam
Epoxy putty
Super glue
1/8" pushnut fasteners.
Start by opening up the blaster, as normal. There are two screws obscured by the pump slide. You'll also need to cut off the orange barrel marker/sight. Apart from that, it's a fairly straight-forward procedure.
Once opened, remove the plunger tube, priming bar and spring, rotation mech rod and spring, and lastly the turret. There's a fair bit of work to be done on the turret, so I started on it first.
cut the pushnut fastener pictured below, so the rotation mech can be accessed. I just used a pair of diagonal cutters:
These are the components of the rotation mech. Beefy gear wheel,slip clutch, connecting rod, mech spring.
Grease up the black rod of the gear wheel, and slip the mech spring over the top of it. Fill the mech spring with hot glue to beef it up, then cut each end flat with a hobby knife.
This should hopefully be all you'll need to do to allow the mech gear to handle the added weight of the extra barrel's. If you experience issues, it may help to glue the clutch and the gear wheel together. Re-assemble the rotation mech, and replace the pushnut fastener. Once you've ascertained the correct positioning of the fastener on the connecting rod through rotation testing, it would be advisable to glue the fastener in place.
Now, get your Dremel with a cutting bit, and cut the majority of the front of the turret housing on the blaster, so that the longer barrels aren't obstructed. Leave a small ring around the edge, to give the turret something to press up against.
Remove the 4 screws from the top of the turret, and it should all come apart, and look like this:
I only used a precision screw driver to remove the dart posts, and the AR's fall out on their own. The main transparent yellow turret can take a bit of leverage to get it to separate from the bottom.
The ID of the barrels narrows in the middle, and is wider at the ends. I used a pedestal drill with a spade bit to bore out the holes, so the PETG would fit nicely.
Wrap e-tape around one end of the petg barrel, and then slide it as far as possible through the base of the turret. You should have a slight gap where the petg is inside the profile:
Wrap e-tape around the PETG, as close to the top of turret as possible:
Apply pvc cement/plumber's goop/epoxy adhesive to the bottom of the PETG barrel, and pull it through the top of the turret. Stick the turret on to the black bottom plate, to locate the correct depth.
Repeat these steps another 11 times, to make all 12 barrels:
Before re-assembling the turret, we'll need to modify the base plate to allow the turret to be rear-loading. Grab a drill or a dremel, and hone out the holes to the first ring. Stock hole on the left, rear-loading holes on the right:
Once you've completed these tasks, apply adhesive in circles around the barrel holes on the bottom turret plate, and sit the barrel on top. Assemble the other components of the barrel, and add some weight to the black top plate, to aid in curing the adhesive. I drilled a hole in my work bench so the connecting rod would pass through, and the turret would sit flat. Then I filled a container full of fishing sinker's, and placed it on the top plate, inside the barrels.
Clean out any adhesive that may be present in the bottomm of the barrels with a hobby knife. Replace the turret in the blaster, and screw the two shell halves together. Drop a Sharpie/marker down the barrel numbers 2,3,4 and 9,10 and 11 to mark the position for the rear-loading holes. Disassemble the blaster again. I used a 3 mm pilot hole, then turned the blaster over, and drilled right through with a 16mm spade bit. One one side, I left the 3 rear-loading holes, and on the other side, I dremelled out a bigger area around the holes. I didn't have any alignment issues, I just liked the look of the slot. Clean up all the edges with a sanding attachment:
Now, on to the plunger, and air seals:
There are a few different ways of adding another spring/s. Most people prefer to remove the rubber plunger seal, and use hot water to dissolve the glue, and remove the entire plunger head. It seemed like alot of finicky work, so I just wound a stock Longshot spring on to the plunger rod.
For a better plunger seal, I added some foam strips from a mangled dart, and used e-tape to secure it in place, and to increase the plunger OD. I also added a small piece of foam to the top of the plunger head, for some buffering. I also hot glued the underneath of the plunger head, as I could feel air escaping back down through there as well:
Lube up the plunger head with your preferred lubricant. Next we need to fix the plunger to turret seal. I custom made an o-ring to fit on the front of the tube. There's a tiny lip which it fits in to perfectly. Then I cut a washer out of insertion foam, and super-glued it in place. You made need to trim the o-ring and foam washer down, so they don't foul the rotation of the turret:
The final part, is to add some epoxy putty to the priming arm, and glue a small piece of plastic on to the end. This piece of plastic decreases the travel needed to prime the blaster:
Now, it's time to re-assemble the blaster, check rotation mech, firing mech etc. Perform any tweaking that may be required, and you should have a very accurate blaster, with good range.
I haven't found the need to beef up the trigger actuation, as I'm only using a fairly mediocre spring set-up. I did remove the safety lock though, as it was becoming a little frustrating.
And here's the finished product:
I never tested the blaster stock, so ranges are unknown at this stage. I had only intended for this to be a mid-range blaster, but results were better than expected.
Flat: 112 feet (from shoulder-height, less than 5 degree elevation)
Range tests were conducted using blue foam with cut-down heavy sili's. I still can't get over how extremely accurate this blaster is, and projectile speed is not too shabby either.
All in all, it wasn't an overly difficult modification. There was alot of finicky test and see work with the plunger to turret seal, and turret rotation, but nothing too complex.
Cheers,