
****PICTURE INTENSIVE POST****
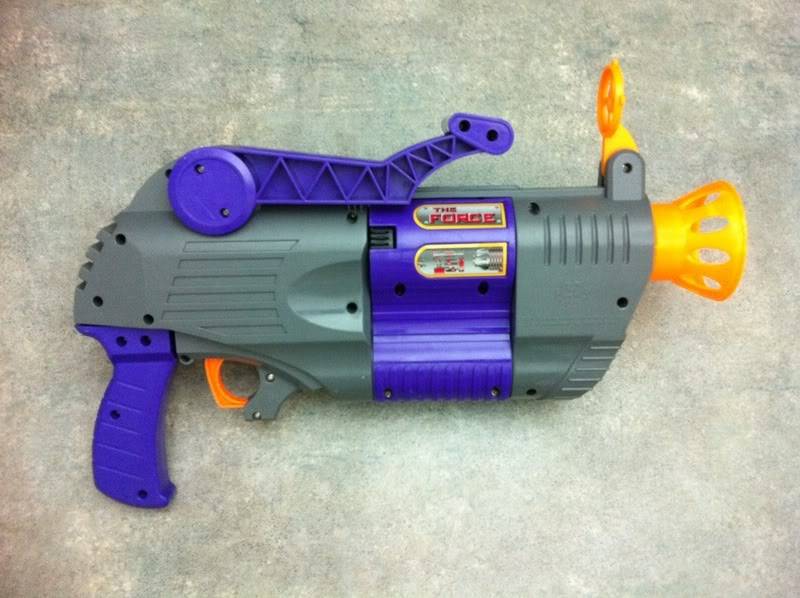
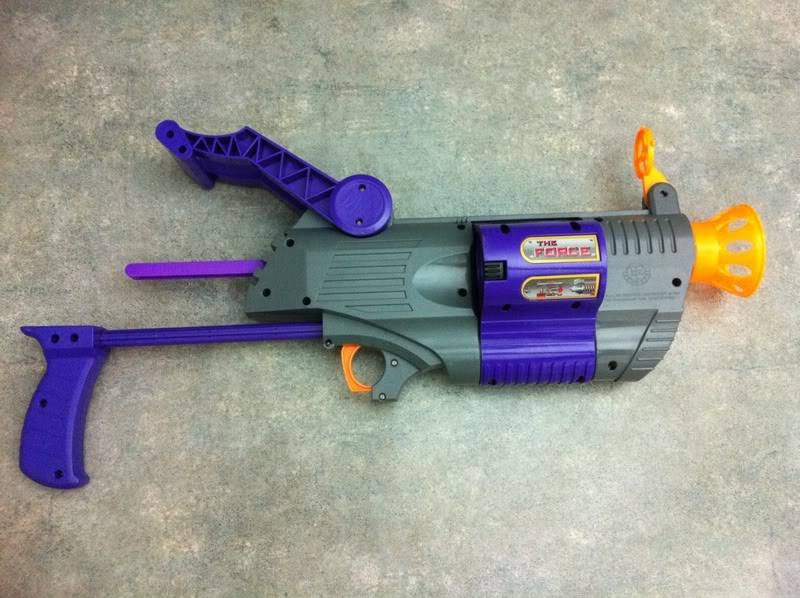
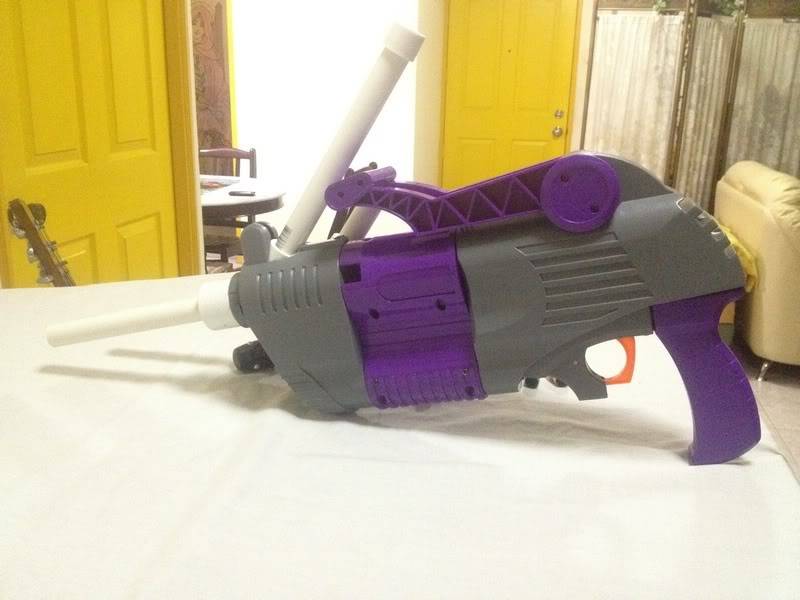
To start off, this is the finished product (or something close to this) should you choose to perform this mod:

Basically, it's a modded RAW The Force blaster with a BBBB tank addition and a pump replacement.
But, before you carry on, kindly read through the entire write-up first before you decide on whether you want to perform the same mod or come up with your own variation(s).
1) I have a tendency to hopper my blasters. If you don't like hoppers, then I'm sure you can come up with a variation.
2) I used a BBBB tank. You don't have to.
3) I'm Southpawed. Right handers, all you have to do is "flip" the side of the pump and hopper for the BBBB tank.
4) I kept an adjustable OPRV. You might not want that.
________________________________________________________________
Things / materials I used for this mod:
- RAW The Force blaster
- BBBB airtank (including the pump)
- CPVC
- CPVC elbow joint x 3
- PVC wye x 2 (for the hopper)
- 1/2 inch PVC pipe (for the hopper barrel & clip area, and a short little stub for Taerkitty's lever trigger mod)
- 1/2 inch PVC endcap x 2 (for the hopper clip)
- 1/2 inch PVC straight coupler
- 1 inch (thanks to hamoidar for the clarification!) PVC tube
- PETG (for the hopper)
- Pipe cutter (the spinspinspinspinspinspinspin type)
- Pipe cutter (the ratcheting type aka "parrot")
- A bunch of assorted screws
- A bunch of assorted washers
- A small spring (to add to the lever trigger mod)
- A metal stationery clip with removable arms (for the lever trigger mod - according to Taerkitty, medium sized.)
- A dremel (you absolutely need this.)
- A cutting bit
- A sanding drum bit
- A small drill bit
- Superglue
- Goop
- Hotglue gun
- Hotglue
- A (Crappy) Schwinn bike pump
- Vinyl Tubing
*** Optional: some tubing joints, depending on the type of pump you're using
- A short length of galvanized steel wire
- E-Tape
________________________________________________________________
Here we go.
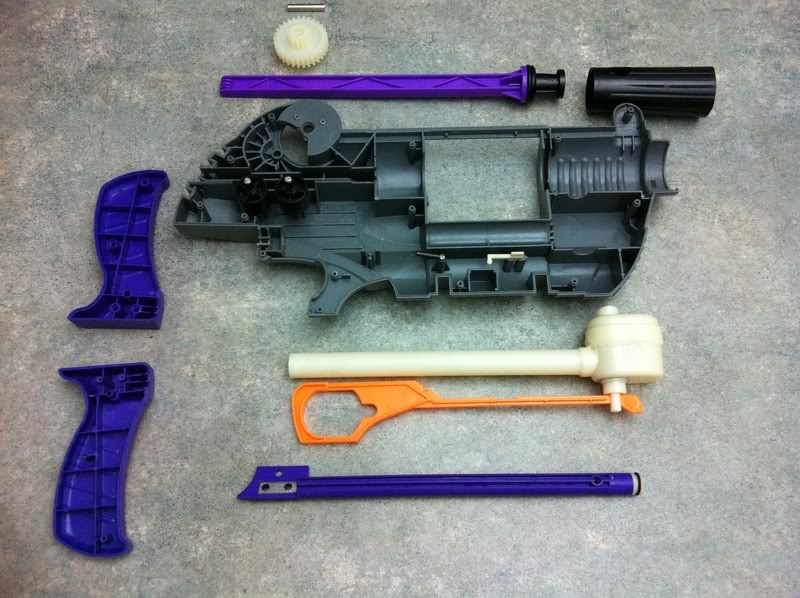
First up, external, internals and exploded internals pictures courtesy of makeitgo.

Look at the picture just above;
We're NOT using the orange crosshair piece, the orange muzzle piece, and the purple piece that looks like binoculars.
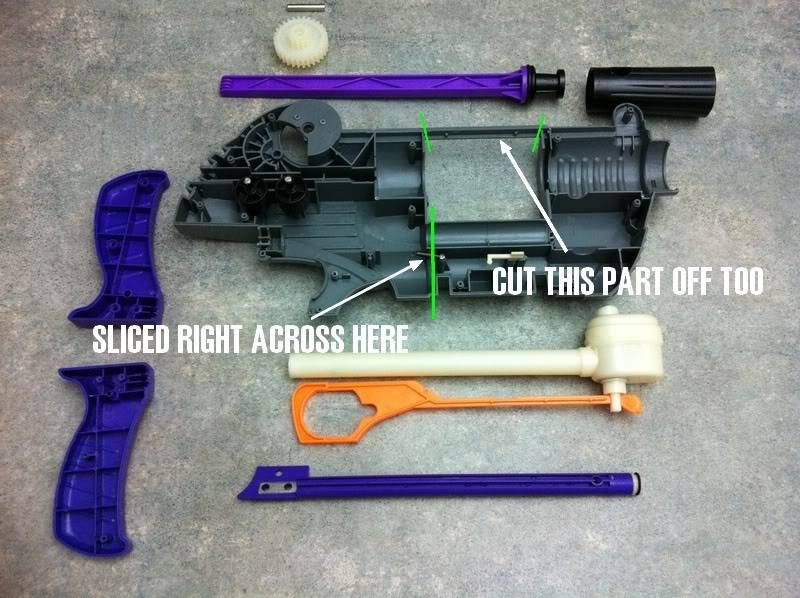
Now look at the next picture;
We're NOT using the purple rod, the gear piece, the metal pin, the black cylindrical piece and the two black wheel pieces (that are pictured sitting in the shell) along with those metal pins.
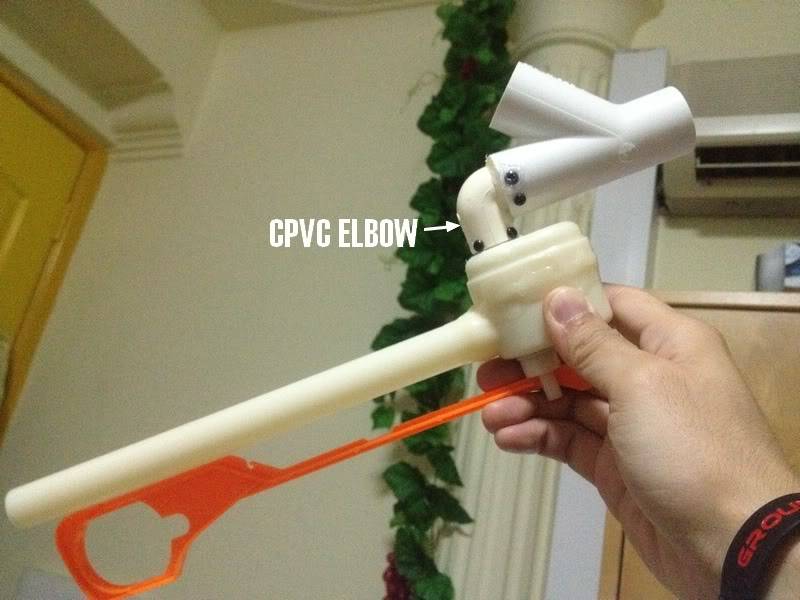
I took a CPVC elbow joint, wrapped some e-tape around one end and shoved that into the back of a wye.
Then I just jammed the air output of the Force tank into the other end of the elbow joint.
It fits, you just really need to jam it in.
I drilled a hole and installed machine screws so it's going to be crazy sturdy.
Note that the machine screws are very, very, very close to the tank itself because the air output lip is very short.
Get your dremel and scanding bit and do this to the shell:

Do that on both sides so you get this:

Once done right you should be able to get this:
Now, if all you wanted to do was just to add a hopper to the Force tank, you can close your blaster back up and call it a day.
If not, carry on reading.
I performed Taerkitty's "lever trigger" mod on the BBBB tank.
(Go read it up here: http://www.nerfrevolution.com/forums/viewtopic.php?f=8&t=1876)
The only difference is that I added a small "return spring" to the lever.
And of course, I stuck a 1/2inch PVC coupler to the air release.

Then, I added vinyl tubings to my Schwinn pump by means of superglue followed by goop.
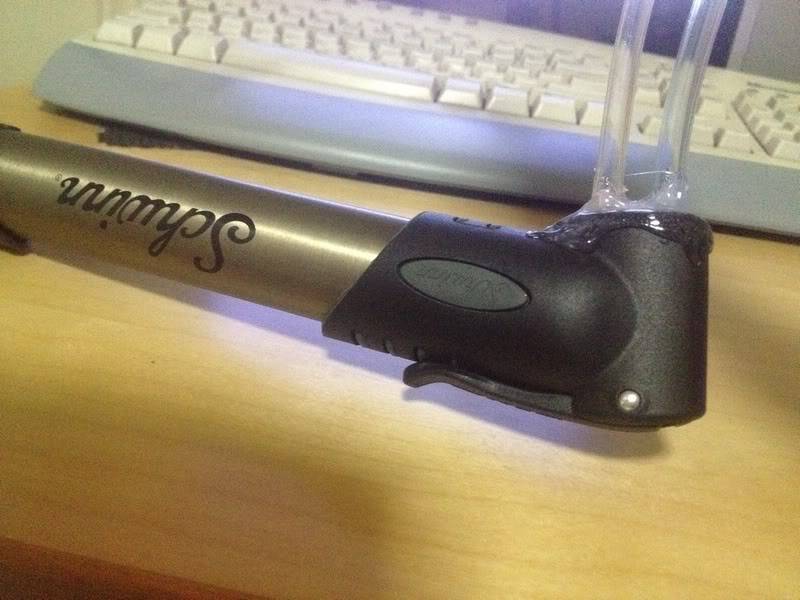
This pump is a dual-purpose pump to pump both balls and bike tyres.
This particular pump features an "auto selector" type of feature for it's usual usage (Schrader or Presta valves), but in this application, you need to get rid of the auto-select feature.
You should goodle it and read up on this thing for full details, but basically, you knock out the metal pin holding the lever, then get to the inside of the air output area behind the valve.
You'll find two loose pieces: a flat, circular rubber disc (you NEED this piece, DO NOT LOSE IT. This makes the valve itself.) and a small little rubber ball.
Get rid of the ball, and install everything back in place.
The end result is getting air through both tubes at the same time with each pump stroke.
You could get the same result with any other pump, by means of a 3-way connector in your setup.
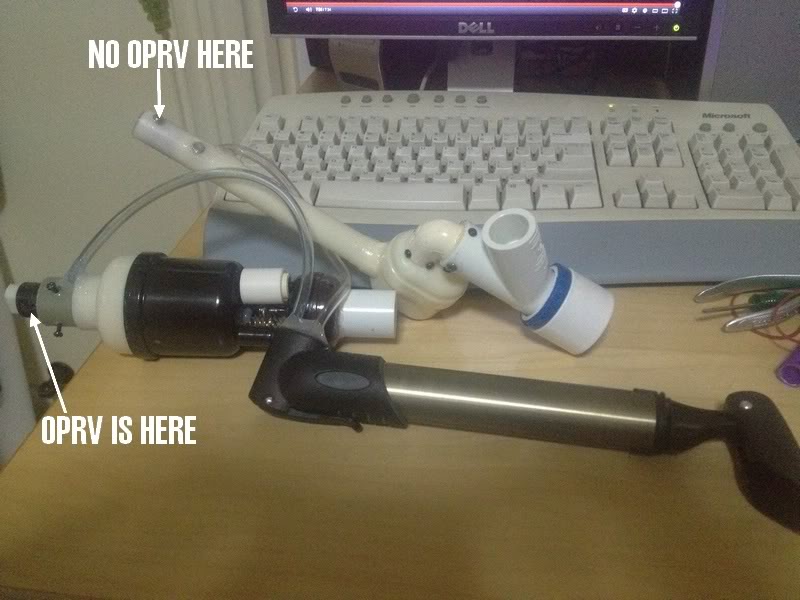
Next, I wanted this system to have an adjustable OPRV, so I did this initially (This is the exact same way I modded my pump-replaced BBUMB to maintain the adjustable OPRV):
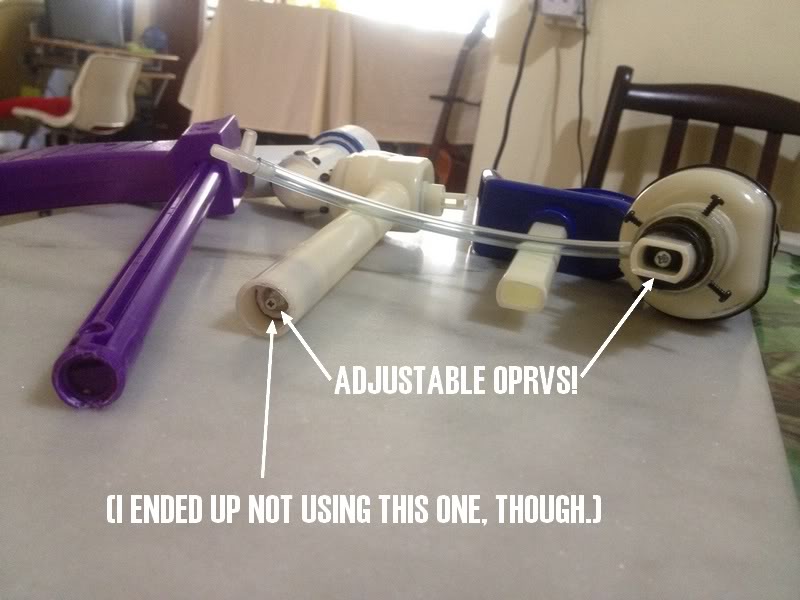
Both of these work, but I ended up using only the OPRV in the BBBB tank.
Based on that, here's the idea that I had in my head:

I already e-taped and gooped the OPRV in the shaft, but those screws you see sticking out in the BBBB pump shaft are there to assist in holding the OPRV in place, lest the pressure becomes so strong that it pops the OPRV out.
So the idea is that a single OPRV will control the overall pressure inside of both tanks,with the valves of each tank still working, so the pressure in the shaft areas and tubes will be of the same pressure that are in the tanks.
Any higher pressures and the OPRV will kick in. Having two separate OPRVs with different OPRV settings will just result in the entire system following the OPRV that is set to a lower pressure rating.
The only way for you to have different pressures for each tank is to have 2 separate OPRVs (one for each tank) and either individual pumps for each tank or have a selector of some sort.
Now I'm going to move away from the air tanks for awhile because at this point, I was waiting for my goop to cure.
Do this:

So that you can do this:
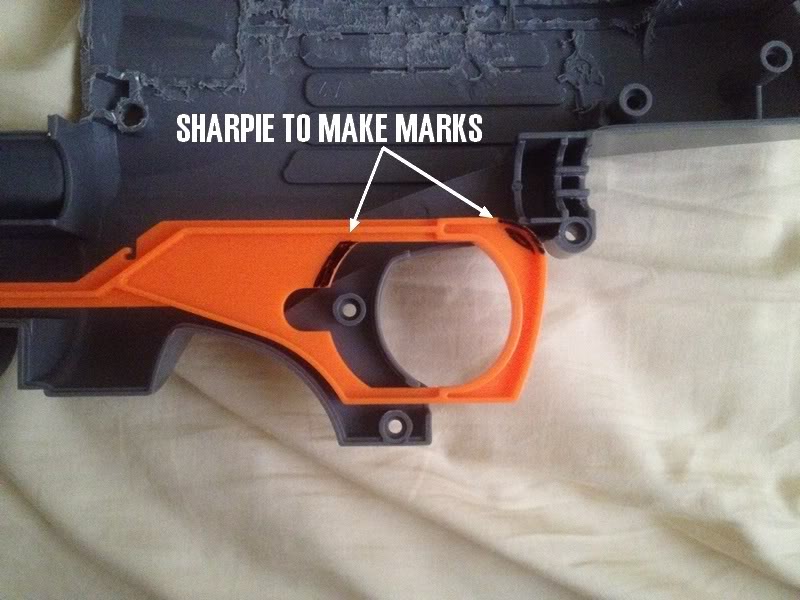
In order to properly pull the pin on the BBBB tank, the trigger pull has to be extended.
Areas that are needed to be dremelled off are marked out with a sharpie for your reference:
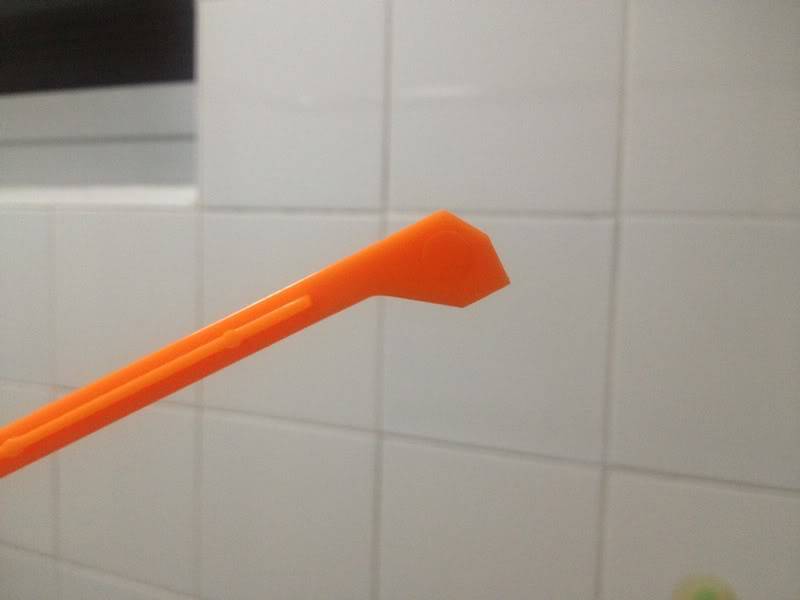
The next thing is to get rid of this nub:


And finally, you need to round out the "head" of the trigger or it might get stuck in the release mech of the Force tank.

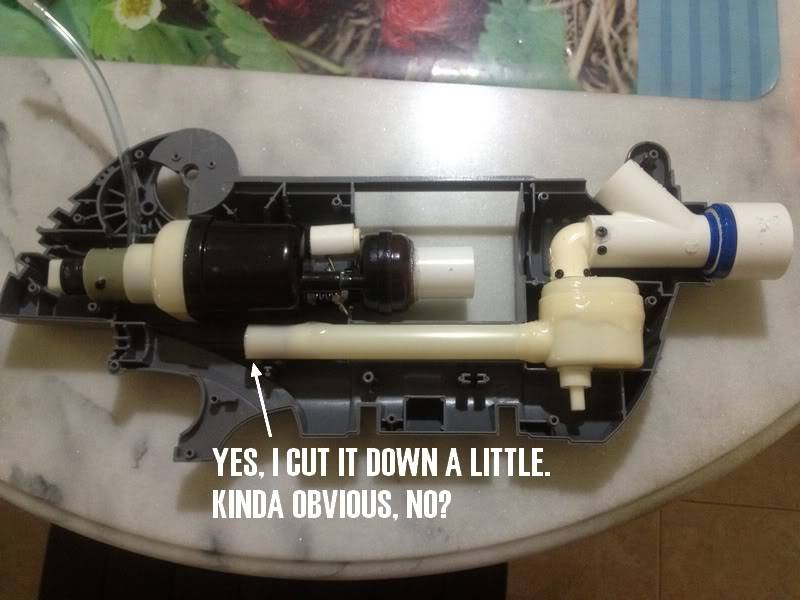
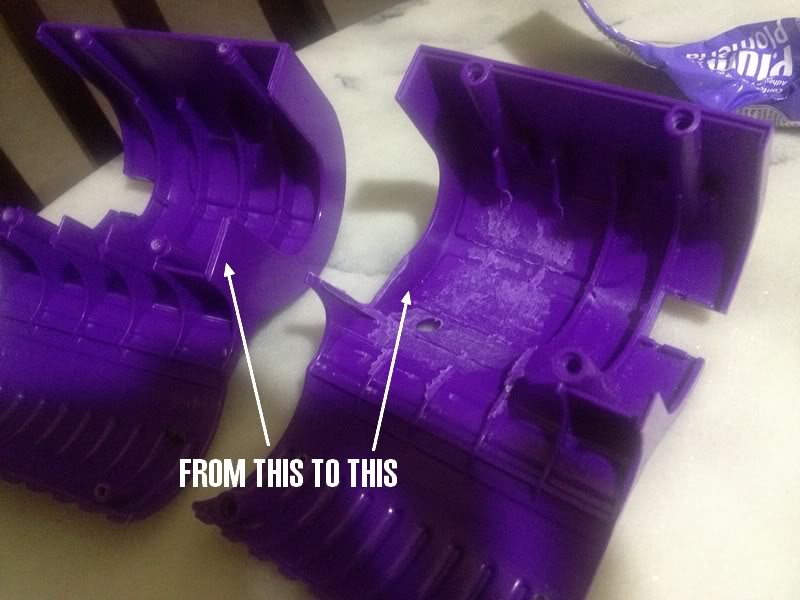
Now, work on the purple "ammo holder" area needs to be done.
And use a hacksaw to accomplish this:
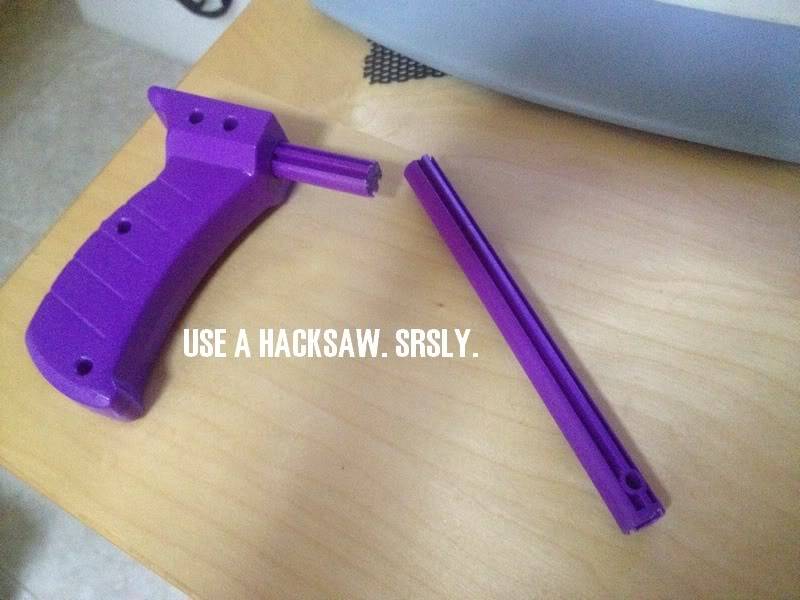
Seriously, it has a metal rod running through. (Talk about a stiff pump, heh.)
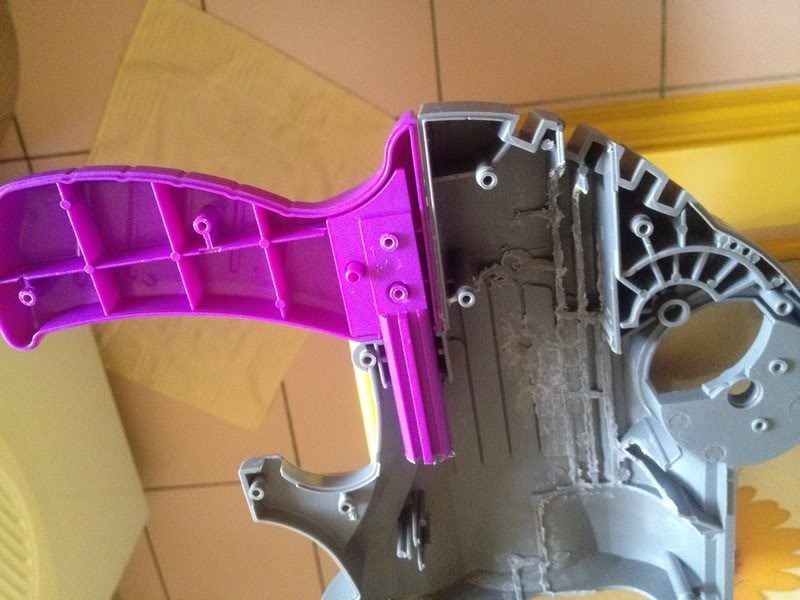
Apply hotglue like this (so you can still split the shell in half, see?):

Then place the grip with cut-down rod into position and MAKE SURE IT'S CENTERED AND STRAIGHT.

Once the hotglue cools off, the grip will split in half along with the shell. This wouldn't be a problem if you lined the grip with the shell nicely.
Of course, hotglue isn't strong enough to be used to hold the grip to the shell, so you should install some screws:

Make sure you do this on both sides of the shell, please.
Then, spam some hotglue and glue the cut-down rod in place.
Because of the grooves in the shell and the rod, it'll help even more (alongside the screws) to prevent the grip from wobbling.

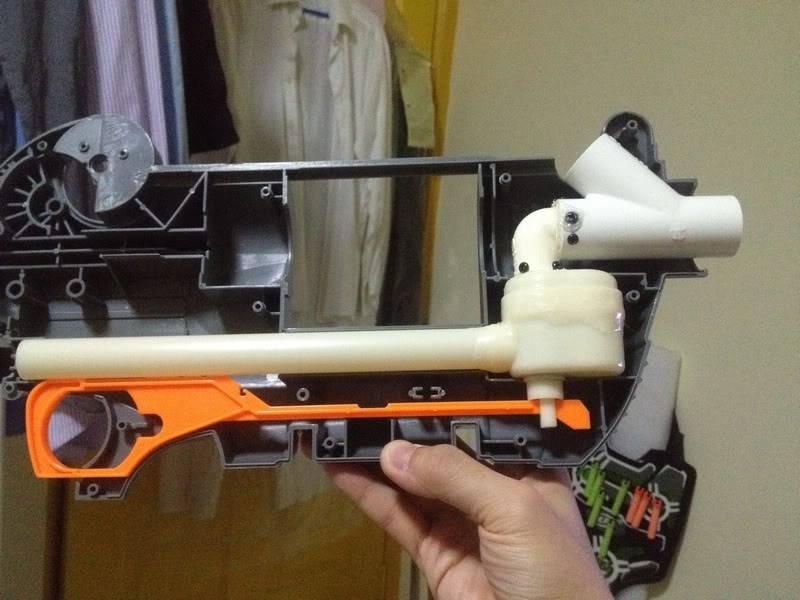
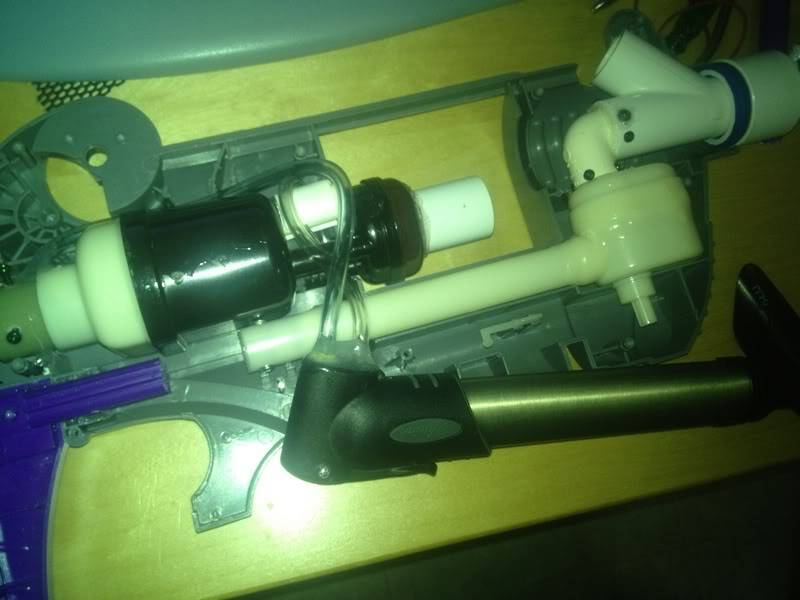
Now, back to the airtank setup, you should get something like this:
By no means should you follow exactly where I installed my tubings. Test-fit first before you drill the slots.
I made a mistake and drilled a slot at the wrong spot so I had to fill it in.
You can see it near the end of the pump shaft of the Force tank. Also, the extra coupler thingy on the front of the wye is there for cosmetics + helping me to center the wye when I install it into the shell.
You don't need to do this if you installed your CPVC elbow + wye combo straight.
I did a test fit and it sat like this:
The next step is to link the lever of the BBBB to the main trigger.
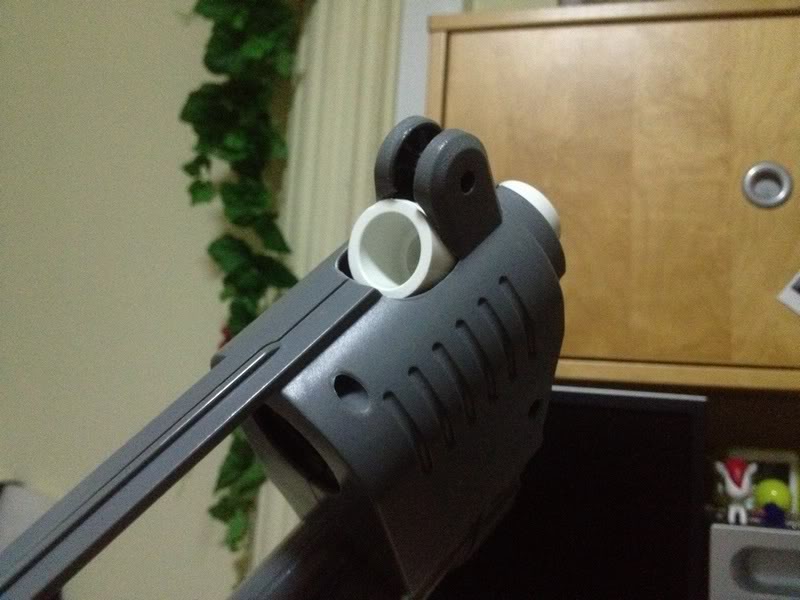
Here's the picture first:

That weird white piece is there to sort of "resist" your trigger pull, as you can see the ramp on the trigger arm.
Once you apply enough pressure, the white piece will bend upward, causing a sort of "quick release" trigger pull for the Force tank, much like the SuperMAXX 500 and 1000 triggers. I feel that this design is genius! props to Yes! Entertainment Corp for coming up with this.
I wanted the BBBB tank to be released after the Force tank release, that's why I lined the trigger in this position before I made my measurements.
This position, with the weird white piece at the "high" area of the orange trigger ramp, should be the "closed" position of the BBBB tank, JUST EVER-SO-SLIGHTLY before the release of the tank. I hope you get what I mean.
This is the MOST tricky part of the entire mod. If you do this wrong, you'll either:
1) start leaking air from the BBBB tank when you fire the Force tank
2) not get a proper "full" release stroke when you fire the BBBB tank, in a "pssssssh" air release instead of a "POP!". (ah, you know what I mean.)
So I got my galvanized steel wire and then I did this:

I threaded this through a small hole I made in the trigger, and basically "twist-wrapped" the other end onto the lever, and I spent like, 873648102398 hours adjusting the tautness of the wire in relation to the open / closed position of the BBBB tank and the trigger position.
Now this is what the whole system looks like when everything's in the rest position:

I forgot to take a picture of this, so I'll guess this will have to suffice:
What I did was to cut the shell (ONLY ON ONE SIDE PLEASE) so that I could just unscrew the back half to make adjustments to the OPRV or the trigger linkage if I needed.
(I mean, seriously, how many times do we encounter a situation where something works great at first but screws up once you close your blaster up, right?)
I then joined two CPVC elbows and wrapped e-tape around the ends. These have to go into the 1/2 inch coupler of the BBBB tank and the wye respectively.
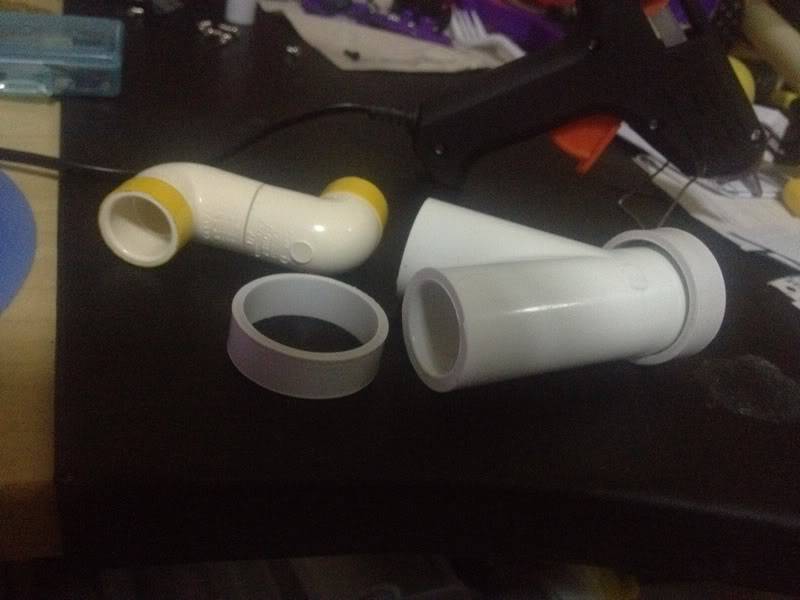
Also, pictured are two 1 inch rings to slip around the wye.
I'll be installing these rings into the side of the blaster shell to help "line up" and hold the wye in place.
I guess you'll understand a little better once you see these pics:
So... I gooped these things in place. Once they're set in place, then that's that. It took me a little coaxing to get the CPVC "Z" piece in place but thanks to the e-tape and the goop, everything's sealed perfectly.
Now, getting back to the "ammo holder" pieces once again, I dremelled them out even more.

Install the purple "ammo holder" pieces in reverse.
Meaning, the piece that was originally on the left of the blaster is now on the right, and vice versa.
Finally, I put everything in place and this is my end result.
Yeah, I installed even more screws to make sure everything's locked nicely in place, and I used the wheels of the gear system as a "gap filler":
The following are a bunch of "finished product" pics.
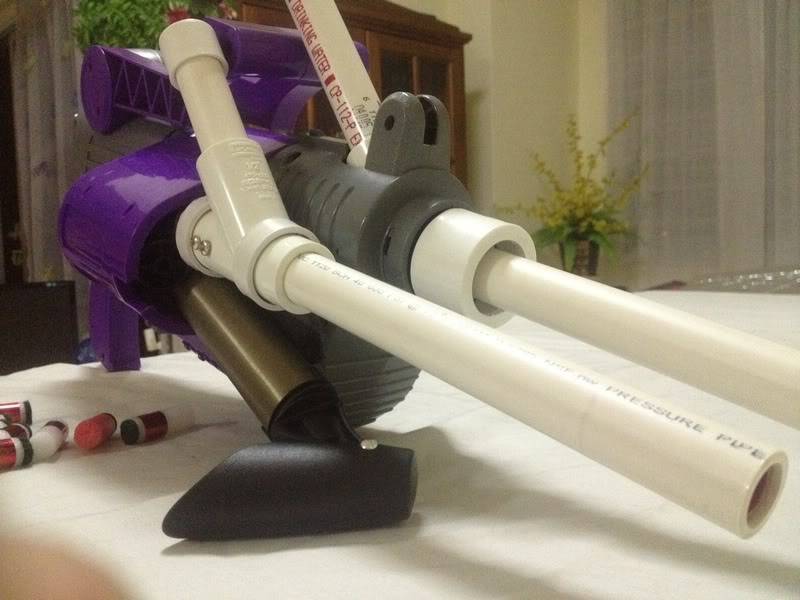
Pump stroke:

Back of the blaster:
(no, that slot does not access the OPRV. I didn't cover it up. You could use that slot for, say, a stock attachment (hint hint.)

The left side of the blaster (right side if you made it for right-handed usage):
Random shot:
So before I end the write-up, let me just say that if you're a right-hander intending to perform this mod,
MAKE SURE TO FLIP SIDES, KAY? common sense.
With the way my OPRV is currently set, it takes 11 pumps before the OPRV kicks in.
If the Force tank is fired, without firing the BBBB tank, then it takes about 4-5 pumps before the OPRV kicks in again.
The way I set it up is so that the BBBB tank is more of a "backup" shot. Air release from the Force tank is significantly quicker than the BBBB tank for sure.
You know how BBBB tanks release air... it makes more of a "TCHOK" sound rather than a "PSSHT" sound.
The only thing you need to take note is that you need to pull the trigger quickly for the BBBB tank in order for a substantial release.
Get what I mean?
Anyway, on to ranges:
I've not done an official range test. I'll probably never get down to doing it. Sorry.
There's deadspace behind the wye of the BBBB tank. That will reduce range.
Everything is sealed perfectly. I plugged all outlets for about 20 minutes and there was no leakage whatsoever.
Other than that, you should get an average of the usual BBBB ranges.
As for the Force tank, performance is slightly better than my BBUMB.
Of course, you can adjust the OPRV to your liking. That, in itself, affects ranges.
Finally, I stress again: Due to the way I rigged my trigger, I have to make sure that I pull it quick to get a quick release from the BBBB tank. If I'm not fast enough, it'll result in double-feeding and double-firing due to the sheer volume of air in the BBBB tank.
Have fun, guys.
Customary video: (Sorry, it's 11mins long; but it includes the firing demo tho!)
Hit the thread with any questions you have.
To start off, this is the finished product (or something close to this) should you choose to perform this mod:
Basically, it's a modded RAW The Force blaster with a BBBB tank addition and a pump replacement.
But, before you carry on, kindly read through the entire write-up first before you decide on whether you want to perform the same mod or come up with your own variation(s).
1) I have a tendency to hopper my blasters. If you don't like hoppers, then I'm sure you can come up with a variation.
2) I used a BBBB tank. You don't have to.
3) I'm Southpawed. Right handers, all you have to do is "flip" the side of the pump and hopper for the BBBB tank.
4) I kept an adjustable OPRV. You might not want that.
________________________________________________________________
Things / materials I used for this mod:
- RAW The Force blaster
- BBBB airtank (including the pump)
- CPVC
- CPVC elbow joint x 3
- PVC wye x 2 (for the hopper)
- 1/2 inch PVC pipe (for the hopper barrel & clip area, and a short little stub for Taerkitty's lever trigger mod)
- 1/2 inch PVC endcap x 2 (for the hopper clip)
- 1/2 inch PVC straight coupler
- 1 inch (thanks to hamoidar for the clarification!) PVC tube
- PETG (for the hopper)
- Pipe cutter (the spinspinspinspinspinspinspin type)
- Pipe cutter (the ratcheting type aka "parrot")
- A bunch of assorted screws
- A bunch of assorted washers
- A small spring (to add to the lever trigger mod)
- A metal stationery clip with removable arms (for the lever trigger mod - according to Taerkitty, medium sized.)
- A dremel (you absolutely need this.)
- A cutting bit
- A sanding drum bit
- A small drill bit
- Superglue
- Goop
- Hotglue gun
- Hotglue
- A (Crappy) Schwinn bike pump
- Vinyl Tubing
*** Optional: some tubing joints, depending on the type of pump you're using
- A short length of galvanized steel wire
- E-Tape
________________________________________________________________
Here we go.
First up, external, internals and exploded internals pictures courtesy of makeitgo.
Look at the picture just above;
We're NOT using the orange crosshair piece, the orange muzzle piece, and the purple piece that looks like binoculars.
Now look at the next picture;
We're NOT using the purple rod, the gear piece, the metal pin, the black cylindrical piece and the two black wheel pieces (that are pictured sitting in the shell) along with those metal pins.
I took a CPVC elbow joint, wrapped some e-tape around one end and shoved that into the back of a wye.
Then I just jammed the air output of the Force tank into the other end of the elbow joint.
It fits, you just really need to jam it in.
I drilled a hole and installed machine screws so it's going to be crazy sturdy.
Note that the machine screws are very, very, very close to the tank itself because the air output lip is very short.
Get your dremel and scanding bit and do this to the shell:
Do that on both sides so you get this:
Once done right you should be able to get this:
Now, if all you wanted to do was just to add a hopper to the Force tank, you can close your blaster back up and call it a day.
If not, carry on reading.
I performed Taerkitty's "lever trigger" mod on the BBBB tank.
(Go read it up here: http://www.nerfrevolution.com/forums/viewtopic.php?f=8&t=1876)
The only difference is that I added a small "return spring" to the lever.
And of course, I stuck a 1/2inch PVC coupler to the air release.
Then, I added vinyl tubings to my Schwinn pump by means of superglue followed by goop.
This pump is a dual-purpose pump to pump both balls and bike tyres.
This particular pump features an "auto selector" type of feature for it's usual usage (Schrader or Presta valves), but in this application, you need to get rid of the auto-select feature.
You should goodle it and read up on this thing for full details, but basically, you knock out the metal pin holding the lever, then get to the inside of the air output area behind the valve.
You'll find two loose pieces: a flat, circular rubber disc (you NEED this piece, DO NOT LOSE IT. This makes the valve itself.) and a small little rubber ball.
Get rid of the ball, and install everything back in place.
The end result is getting air through both tubes at the same time with each pump stroke.
You could get the same result with any other pump, by means of a 3-way connector in your setup.
Next, I wanted this system to have an adjustable OPRV, so I did this initially (This is the exact same way I modded my pump-replaced BBUMB to maintain the adjustable OPRV):
Both of these work, but I ended up using only the OPRV in the BBBB tank.
Based on that, here's the idea that I had in my head:
I already e-taped and gooped the OPRV in the shaft, but those screws you see sticking out in the BBBB pump shaft are there to assist in holding the OPRV in place, lest the pressure becomes so strong that it pops the OPRV out.
So the idea is that a single OPRV will control the overall pressure inside of both tanks,with the valves of each tank still working, so the pressure in the shaft areas and tubes will be of the same pressure that are in the tanks.
Any higher pressures and the OPRV will kick in. Having two separate OPRVs with different OPRV settings will just result in the entire system following the OPRV that is set to a lower pressure rating.
The only way for you to have different pressures for each tank is to have 2 separate OPRVs (one for each tank) and either individual pumps for each tank or have a selector of some sort.
Now I'm going to move away from the air tanks for awhile because at this point, I was waiting for my goop to cure.
Do this:
So that you can do this:
In order to properly pull the pin on the BBBB tank, the trigger pull has to be extended.
Areas that are needed to be dremelled off are marked out with a sharpie for your reference:
The next thing is to get rid of this nub:
And finally, you need to round out the "head" of the trigger or it might get stuck in the release mech of the Force tank.
Now, work on the purple "ammo holder" area needs to be done.
And use a hacksaw to accomplish this:
Seriously, it has a metal rod running through. (Talk about a stiff pump, heh.)
Apply hotglue like this (so you can still split the shell in half, see?):
Then place the grip with cut-down rod into position and MAKE SURE IT'S CENTERED AND STRAIGHT.
Once the hotglue cools off, the grip will split in half along with the shell. This wouldn't be a problem if you lined the grip with the shell nicely.
Of course, hotglue isn't strong enough to be used to hold the grip to the shell, so you should install some screws:
Make sure you do this on both sides of the shell, please.
Then, spam some hotglue and glue the cut-down rod in place.
Because of the grooves in the shell and the rod, it'll help even more (alongside the screws) to prevent the grip from wobbling.
Now, back to the airtank setup, you should get something like this:
By no means should you follow exactly where I installed my tubings. Test-fit first before you drill the slots.
I made a mistake and drilled a slot at the wrong spot so I had to fill it in.
You can see it near the end of the pump shaft of the Force tank. Also, the extra coupler thingy on the front of the wye is there for cosmetics + helping me to center the wye when I install it into the shell.
You don't need to do this if you installed your CPVC elbow + wye combo straight.
I did a test fit and it sat like this:
The next step is to link the lever of the BBBB to the main trigger.
Here's the picture first:
That weird white piece is there to sort of "resist" your trigger pull, as you can see the ramp on the trigger arm.
Once you apply enough pressure, the white piece will bend upward, causing a sort of "quick release" trigger pull for the Force tank, much like the SuperMAXX 500 and 1000 triggers. I feel that this design is genius! props to Yes! Entertainment Corp for coming up with this.
I wanted the BBBB tank to be released after the Force tank release, that's why I lined the trigger in this position before I made my measurements.
This position, with the weird white piece at the "high" area of the orange trigger ramp, should be the "closed" position of the BBBB tank, JUST EVER-SO-SLIGHTLY before the release of the tank. I hope you get what I mean.
This is the MOST tricky part of the entire mod. If you do this wrong, you'll either:
1) start leaking air from the BBBB tank when you fire the Force tank
2) not get a proper "full" release stroke when you fire the BBBB tank, in a "pssssssh" air release instead of a "POP!". (ah, you know what I mean.)
So I got my galvanized steel wire and then I did this:
I threaded this through a small hole I made in the trigger, and basically "twist-wrapped" the other end onto the lever, and I spent like, 873648102398 hours adjusting the tautness of the wire in relation to the open / closed position of the BBBB tank and the trigger position.
Now this is what the whole system looks like when everything's in the rest position:
I forgot to take a picture of this, so I'll guess this will have to suffice:
What I did was to cut the shell (ONLY ON ONE SIDE PLEASE) so that I could just unscrew the back half to make adjustments to the OPRV or the trigger linkage if I needed.
(I mean, seriously, how many times do we encounter a situation where something works great at first but screws up once you close your blaster up, right?)
I then joined two CPVC elbows and wrapped e-tape around the ends. These have to go into the 1/2 inch coupler of the BBBB tank and the wye respectively.
Also, pictured are two 1 inch rings to slip around the wye.
I'll be installing these rings into the side of the blaster shell to help "line up" and hold the wye in place.
I guess you'll understand a little better once you see these pics:
So... I gooped these things in place. Once they're set in place, then that's that. It took me a little coaxing to get the CPVC "Z" piece in place but thanks to the e-tape and the goop, everything's sealed perfectly.
Now, getting back to the "ammo holder" pieces once again, I dremelled them out even more.
Install the purple "ammo holder" pieces in reverse.
Meaning, the piece that was originally on the left of the blaster is now on the right, and vice versa.
Finally, I put everything in place and this is my end result.
Yeah, I installed even more screws to make sure everything's locked nicely in place, and I used the wheels of the gear system as a "gap filler":
The following are a bunch of "finished product" pics.
Pump stroke:
Back of the blaster:
(no, that slot does not access the OPRV. I didn't cover it up. You could use that slot for, say, a stock attachment (hint hint.)
The left side of the blaster (right side if you made it for right-handed usage):
Random shot:
So before I end the write-up, let me just say that if you're a right-hander intending to perform this mod,
MAKE SURE TO FLIP SIDES, KAY? common sense.
With the way my OPRV is currently set, it takes 11 pumps before the OPRV kicks in.
If the Force tank is fired, without firing the BBBB tank, then it takes about 4-5 pumps before the OPRV kicks in again.
The way I set it up is so that the BBBB tank is more of a "backup" shot. Air release from the Force tank is significantly quicker than the BBBB tank for sure.
You know how BBBB tanks release air... it makes more of a "TCHOK" sound rather than a "PSSHT" sound.
The only thing you need to take note is that you need to pull the trigger quickly for the BBBB tank in order for a substantial release.
Get what I mean?
Anyway, on to ranges:
I've not done an official range test. I'll probably never get down to doing it. Sorry.
There's deadspace behind the wye of the BBBB tank. That will reduce range.
Everything is sealed perfectly. I plugged all outlets for about 20 minutes and there was no leakage whatsoever.
Other than that, you should get an average of the usual BBBB ranges.
As for the Force tank, performance is slightly better than my BBUMB.
Of course, you can adjust the OPRV to your liking. That, in itself, affects ranges.
Finally, I stress again: Due to the way I rigged my trigger, I have to make sure that I pull it quick to get a quick release from the BBBB tank. If I'm not fast enough, it'll result in double-feeding and double-firing due to the sheer volume of air in the BBBB tank.
Have fun, guys.
Customary video: (Sorry, it's 11mins long; but it includes the firing demo tho!)
Hit the thread with any questions you have.